Bell peppers are one of those plants that reward patience beautifully.
From a tiny seed barely visible in your palm to a glossy, vibrant fruit ready for harvest, every stage of growth feels like a small celebration.
Understanding the lifecycle of Capsicum annuum makes the whole process feel less like guesswork and more like tending to something you truly know.
Walk through each stage with the right care tips, timelines, and a little visual guidance, and growing bell peppers starts to feel wonderfully, completely doable.
Every Stage Your Bell Pepper Plant Goes Through
Bell peppers move through a beautifully predictable set of stages, starting from germination all the way to that satisfying final harvest.
The timeline shifts depending on the variety you choose, but most plants hit their stride somewhere between 60 and 90 days after transplant.
Knowing what each stage looks like means you can spot problems early, adjust care at the right time, and actually improve your yield rather than just hoping for the best.
Growth becomes something you can read, not just watch.
Bell Pepper Growth Timeline at a Glance
Every stage of a bell pepper plant builds on the one before it. This quick reference breaks down the full lifecycle so you always know where your plant stands and what to expect next.
| Stage | Timeline | Key Activity | What to Watch For |
|---|---|---|---|
| Germination | Days 1–14 | Root and shoot emergence | Soil warmth, moisture levels |
| Seedling | Weeks 2–4 | First and true leaves form | Light exposure, stem strength |
| Vegetative Growth | Weeks 4–8 | Leaf, stem, root development | Nitrogen levels, transplant readiness |
| Flowering | Weeks 8–10 | Flower formation, pollination | Flower drop, temperature stress |
| Fruit Development | Weeks 10–12 | Peppers form and swell | Watering consistency, fertilizer balance |
| Ripening | Weeks 12–14+ | Color change, flavor development | Harvest timing, pepper firmness |
Stage 1: Seed Germination
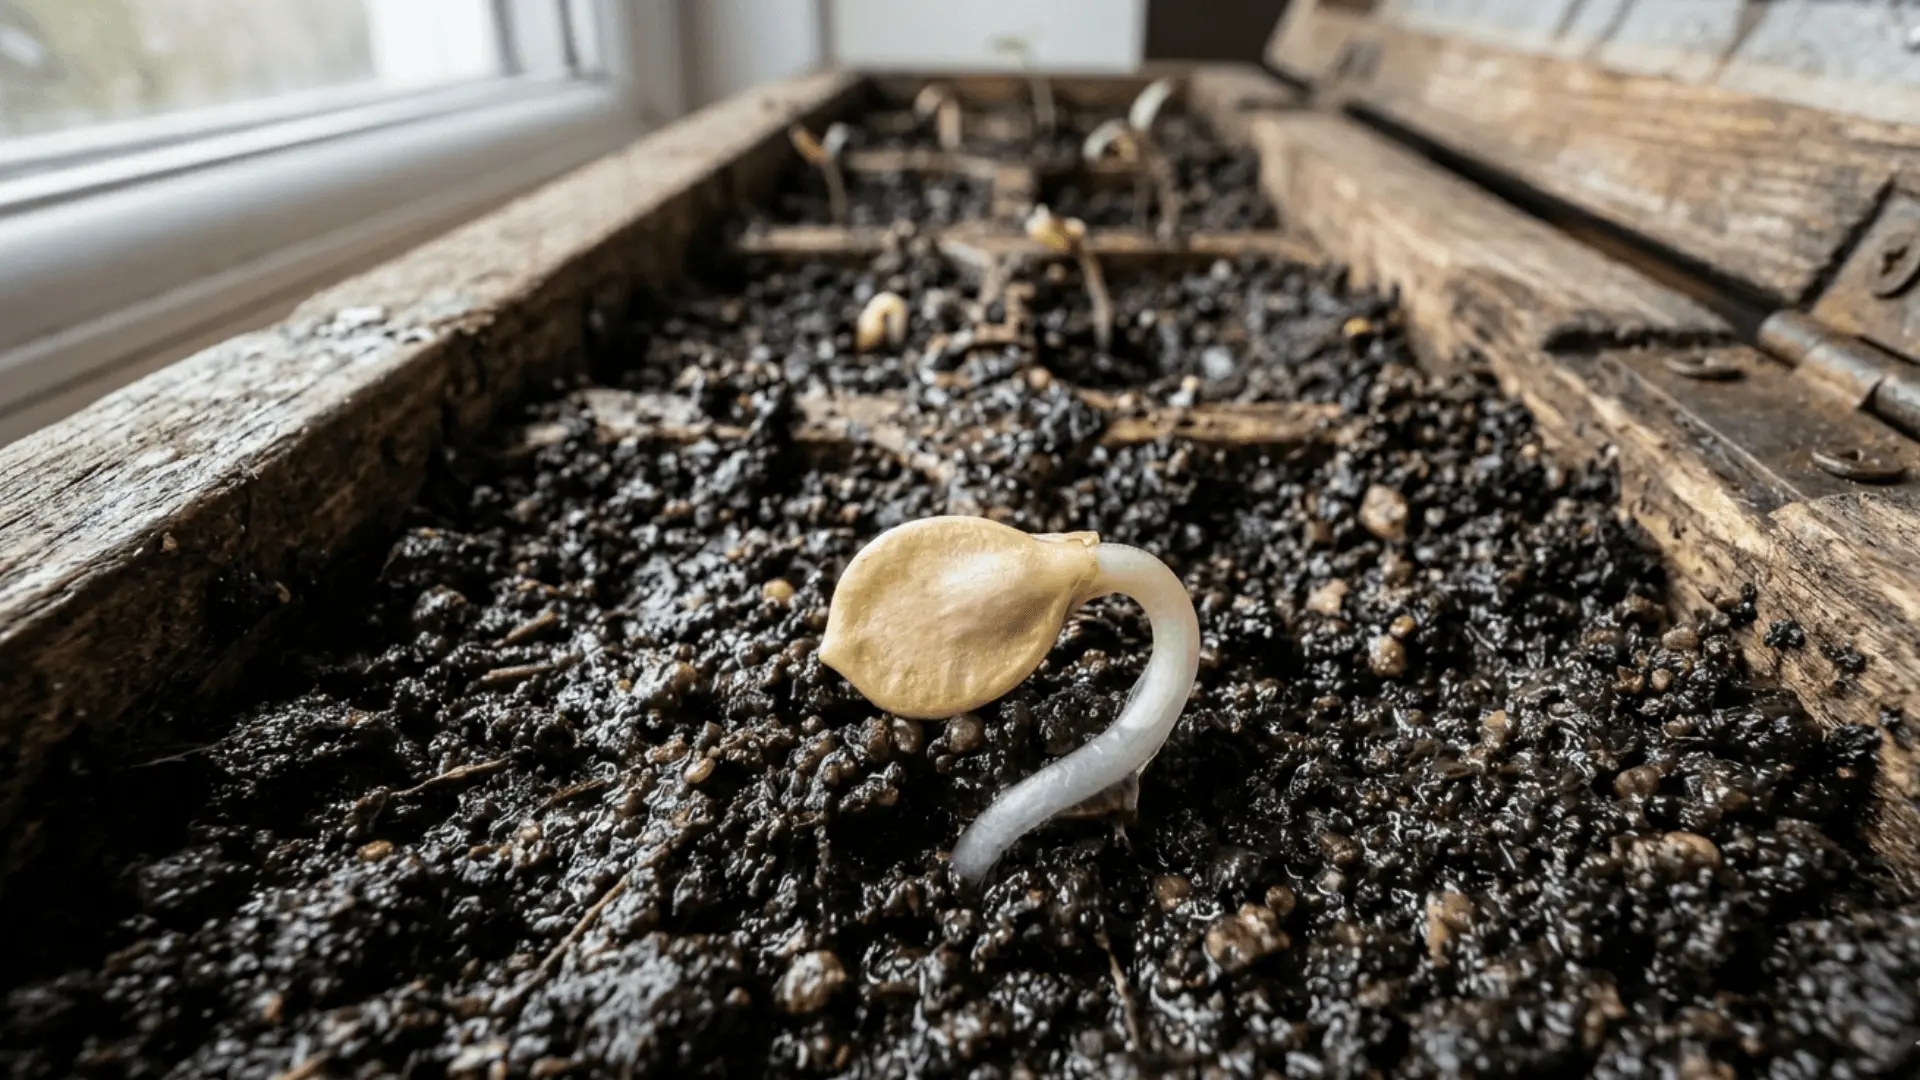
This is where everything begins. A little warmth, the right moisture, and your bell pepper seed quietly comes to life beneath the soil.
What Happens During Germination?
Once the seed absorbs water, the radicle (primary root) pushes out first, anchoring the seedling before anything visible breaks the surface.
Soon after, the shoot emerges and reaches toward the light. It is a slow and quiet process, but a remarkably steady one. Give it the right conditions and germination follows naturally, right on schedule.
Ideal Conditions for Germination
Getting germination right comes down to three things: warmth, moisture, and a stable environment. Keep these consistent, and your seeds will do the rest.
- Soil temperature between 70–85°F for reliable sprouting.
- Consistent moisture without waterlogging the growing medium.
- A warm, sheltered setup like a seed tray with a humidity dome to lock in heat.
Common Problems
Even with good intentions, a couple of early mistakes can set things back before the seedling even appears.
Here is what to watch for:
- Cold soil slows or completely stalls germination, sometimes indefinitely.
- Overwatering suffocates the seed and leads to rot before sprouting even begins.
Stage 2: Seedling Stage
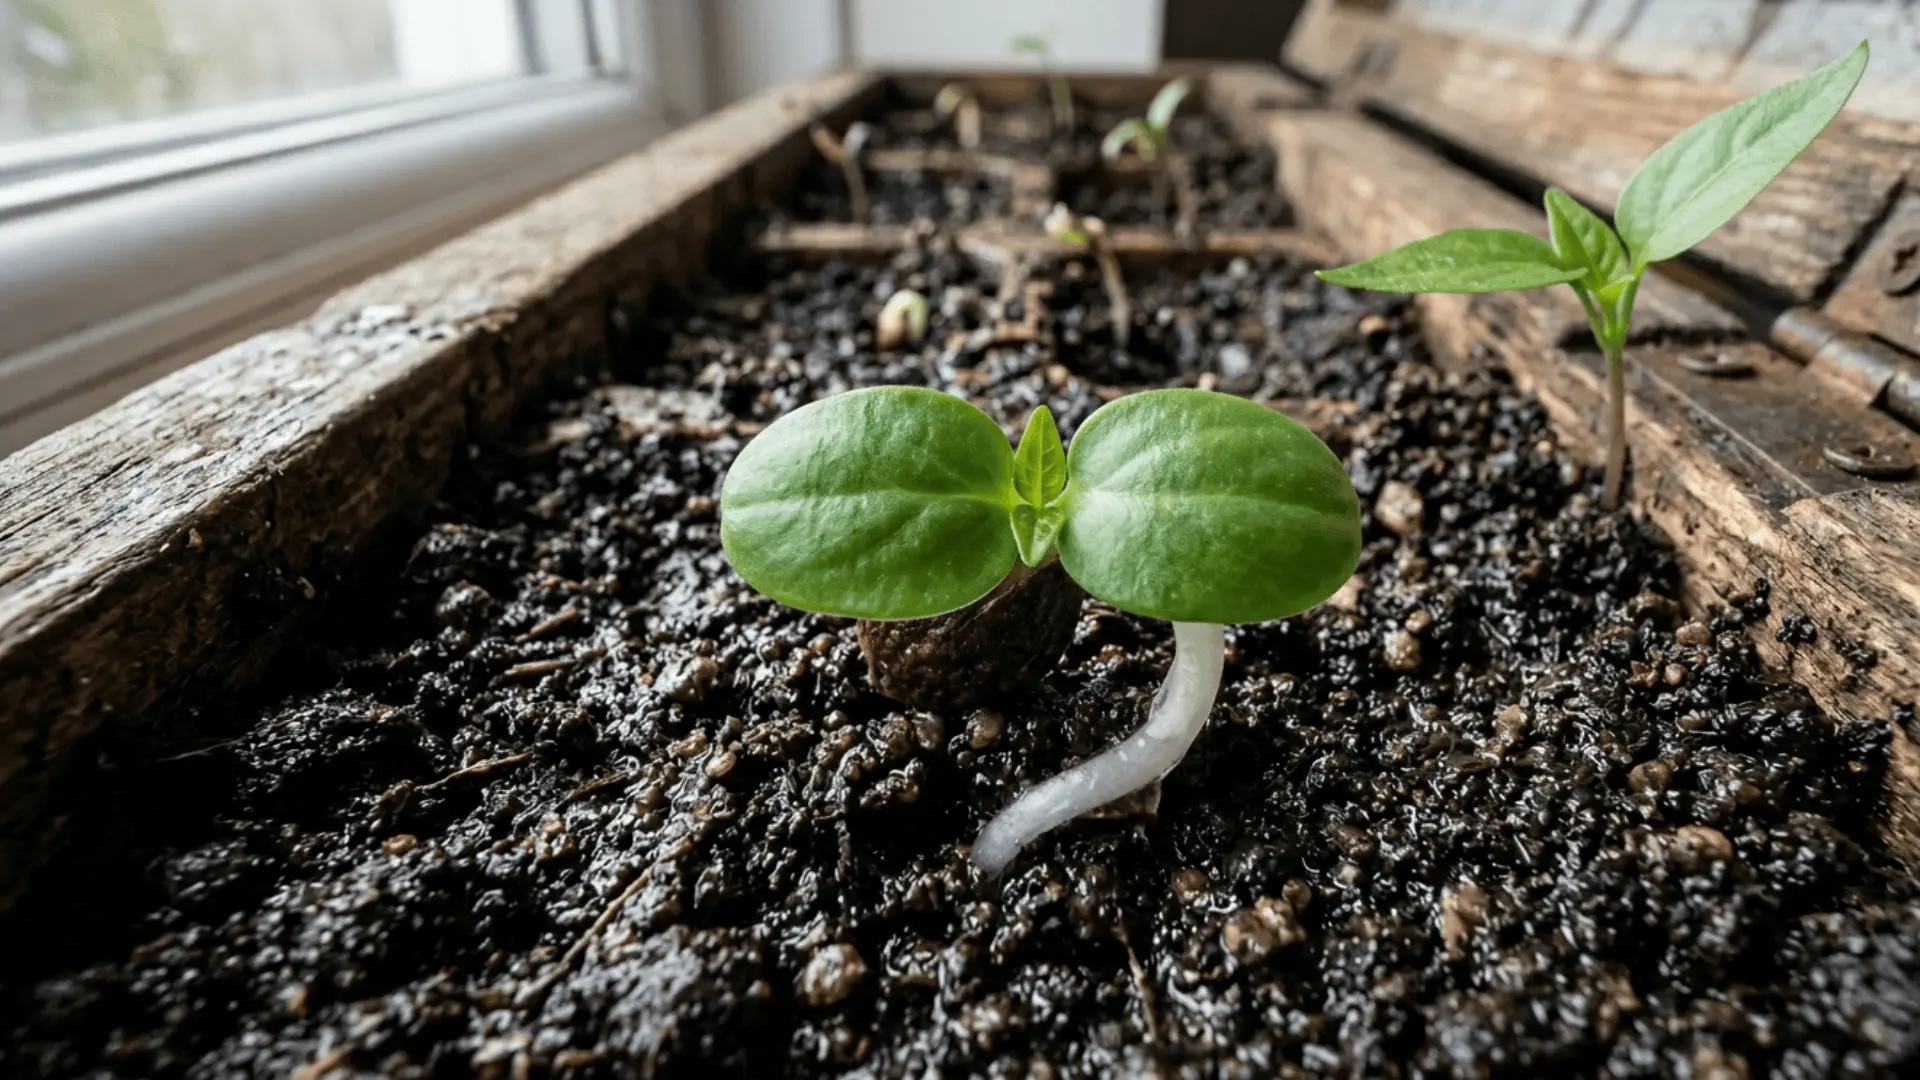
Tiny but determined, seedlings are fragile at this stage and incredibly responsive to their environment. What you do here shapes the entire plant.
Identifying Healthy Seedlings
The first leaves to appear are cotyledons, the seed leaves that emerge straight from the seed itself. True leaves follow shortly after, and that is when real photosynthesis begins.
A healthy seedling is compact, upright, and deep, even green. If the stem looks stretched or pale, that is the plant telling you something is off before it becomes a bigger problem.
Light & Water Needs
Seedlings are surprisingly demanding when it comes to light and moisture. Getting both right at this stage prevents most of the common problems growers run into later.
Here is what works:
- 12–16 hours of bright light or grow lights daily to prevent weak, leggy growth
- Light, consistent watering, letting the topsoil dry slightly between sessions to avoid root stress
Grower Tips
Leggy, stretched seedlings almost always point to insufficient light. Move them closer to a light source or increase the grow light intensity before the stem becomes too weak to support future growth.
A small fan running nearby also helps strengthen the stem naturally by mimicking outdoor airflow.
Stage 3: Vegetative Growth
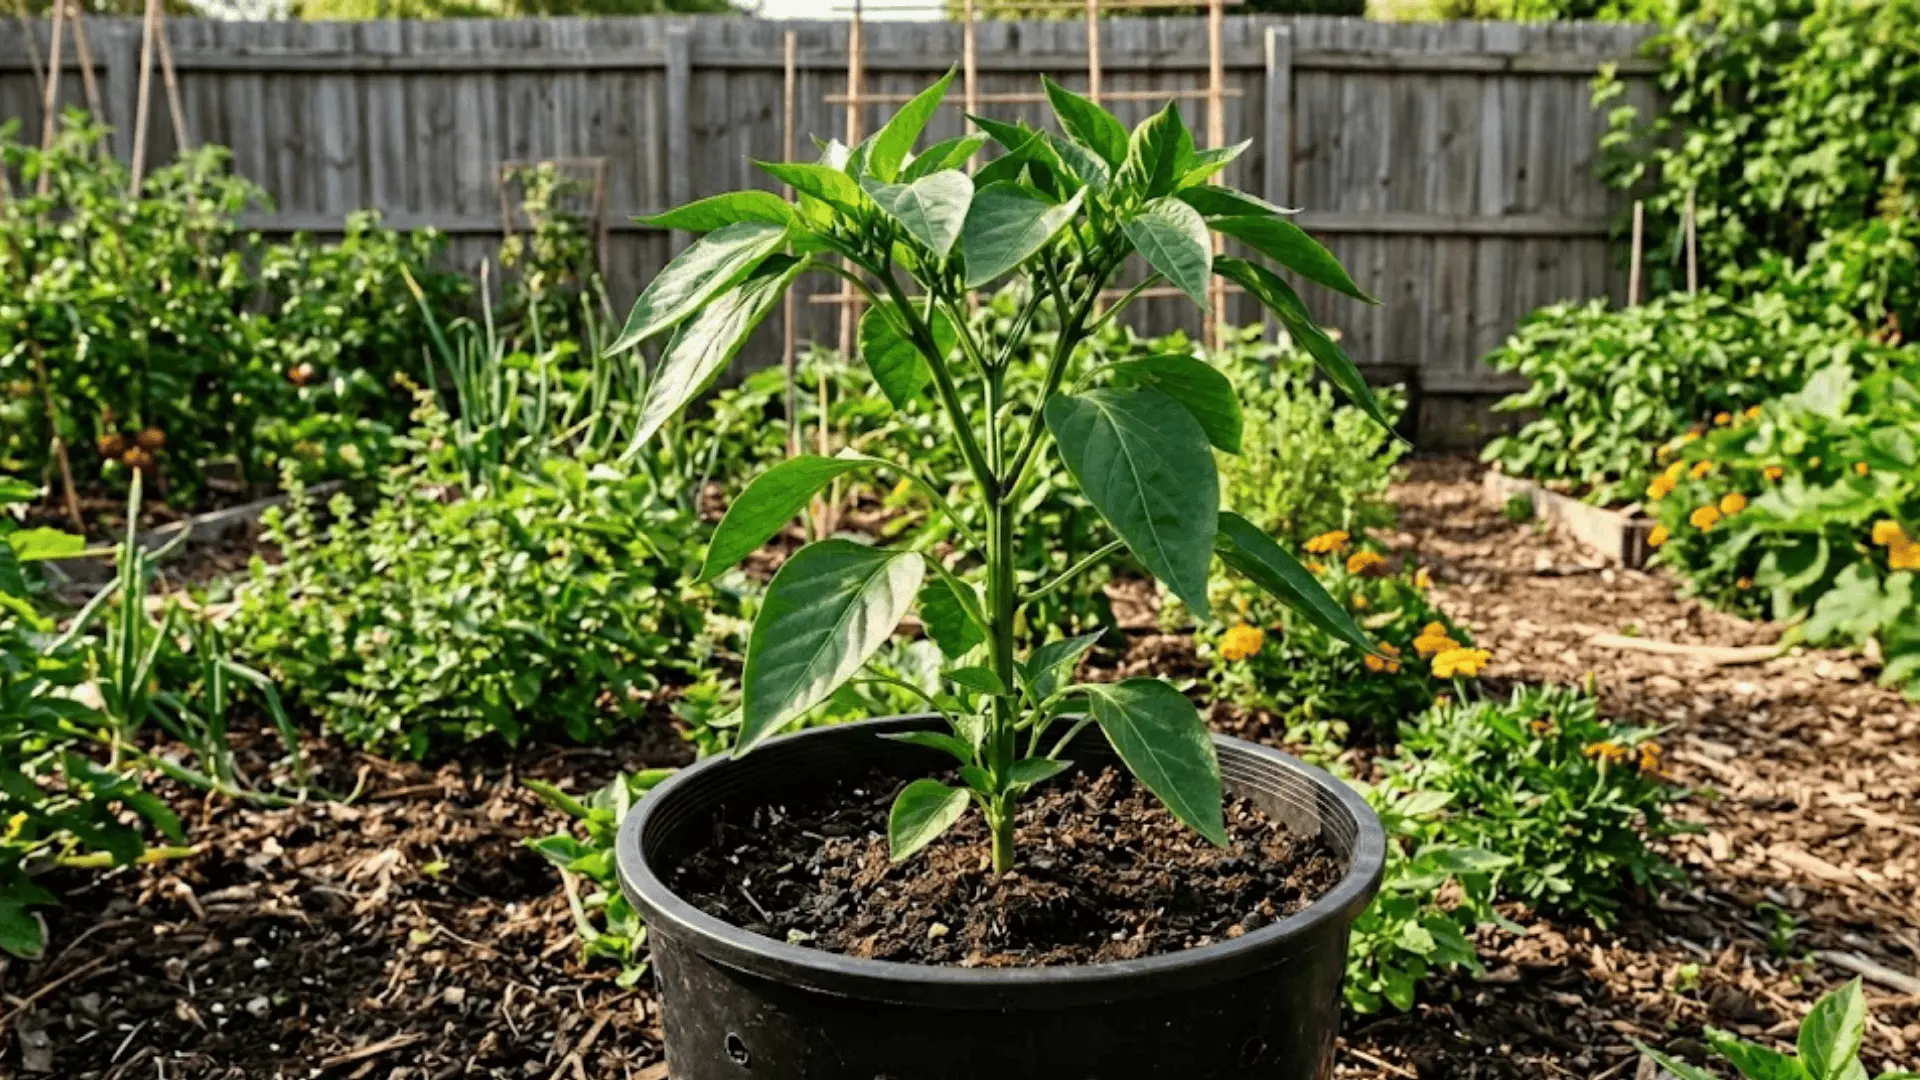
This is the plant’s most energetic phase. Roots deepen, stems thicken, and foliage fills out as the bell pepper builds the foundation it needs to flower and fruit successfully.
Rapid Leaf & Stem Development
The plant channels most of its energy into growing foliage and establishing a strong root system during this phase. New leaves form quickly, the main stem becomes noticeably sturdier, and the overall structure takes shape.
This is the stage where good soil, consistent watering, and the right nutrients make a genuinely visible difference in how the plant develops going forward.
Transplanting Outdoors
Moving your seedlings outside at the right time makes a significant difference in how smoothly they settle in. Rushing this step or skipping the hardening process can set the plant back by weeks.
Keep these in mind:
- Move seedlings outside only after the last frost has completely passed.
- Harden them off over 7–10 days by gradually increasing outdoor exposure each day.
- Choose a spot with full sun and well-draining soil for the strongest results.
Nutrient Requirements
Nitrogen takes the lead here. A nitrogen-rich fertilizer supports the leafy, structural growth the plant needs before it shifts energy toward flowering.
Avoid over-fertilizing, though; too much nitrogen later in this stage can actually delay flowering by keeping the plant focused on foliage instead of transitioning to its next phase.
Stage 4: Flowering Stage
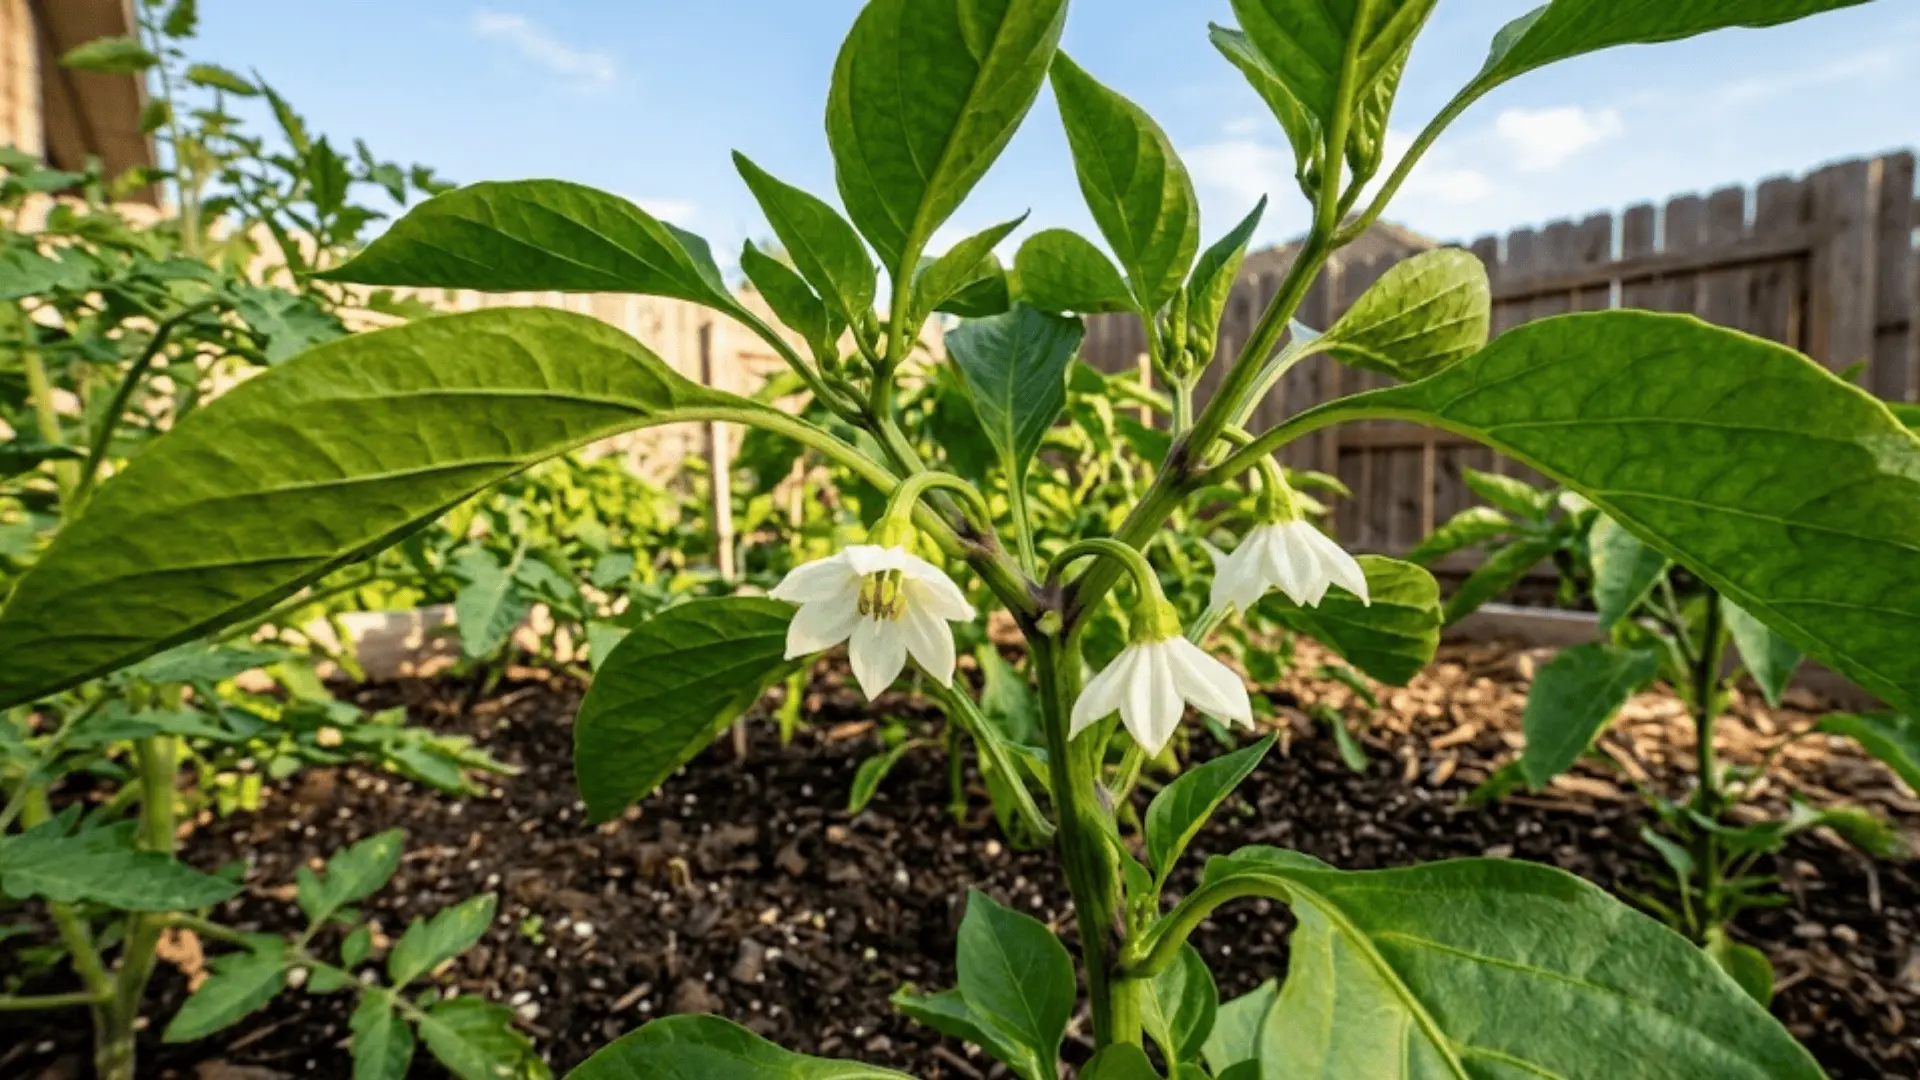
Small white flowers are a sign your plant is right on track. This stage is delicate, and a little extra attention goes a long way toward a productive harvest.
Flower Formation
Flowers emerge at the nodes, the points where stems branch off from the main stalk. Each small white bloom carries the potential to become a full pepper, which makes this stage one of the most rewarding to observe up close.
The plant can produce multiple flowers at once, and how many successfully set fruit depends largely on the growing conditions you maintain through this window.
Pollination Process
Bell peppers are self-pollinating, meaning each flower carries both male and female parts within the same bloom. That said, a little help from the environment improves results noticeably.
Here is what supports good pollination:
- A light breeze or gentle shake of the plant helps move pollen from flower to flower.
- Visiting bees and insects improves fruit set, especially in outdoor gardens.
- In indoor setups, a small fan or manual pollination with a soft brush works well.
Common Issues
Flowering is one of the most sensitive stages, and a few common stressors can cause blooms to drop before they ever set fruit.
Watch for these:
- Temperature extremes, both too hot and too cold, trigger flower drop quickly.
- Overwatering during this stage stresses the plant and causes blooms to fall prematurely.
Stage 5: Fruit Development
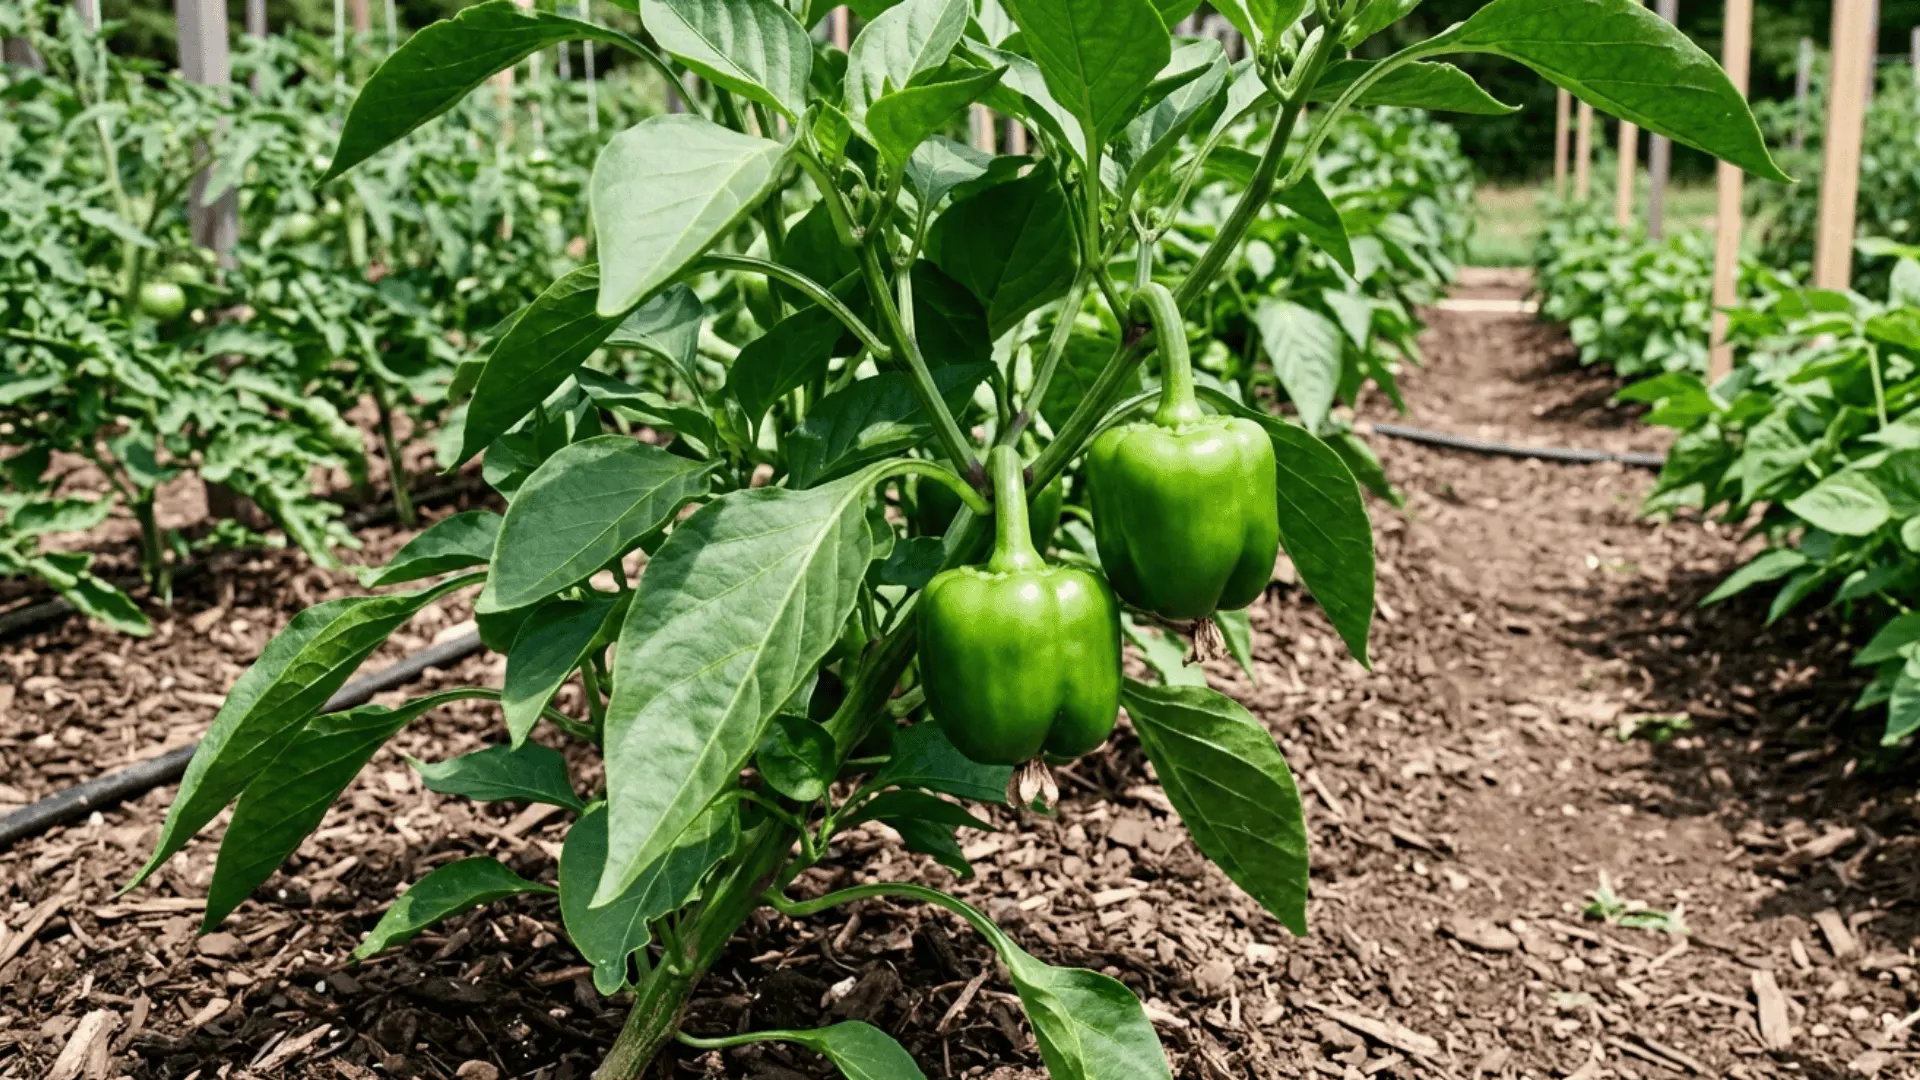
After successful pollination, tiny green peppers begin to take shape. This stage calls for consistency in care more than anything else, and the plant responds well to it.
Early Fruit Formation
Small, firm green peppers form where flowers once were, starting out no bigger than a marble before gradually swelling into the recognizable shape of a bell pepper.
Growth feels slow at first, then visibly picks up pace as the plant commits its energy to filling each fruit out fully. Keeping stress low during this window is key to even, well-formed peppers.
Supporting Healthy Fruit Growth
Fruit development asks for a slightly different care approach than the earlier stages. The plant’s nutritional needs shift, and so should yours.
Here is what to focus on:
- Switch to a balanced fertilizer lower in nitrogen and higher in phosphorus and potassium.
- Water consistently and evenly to support steady, uninterrupted fruit development.
- Avoid letting the soil dry out completely between waterings at this stage.
Grower Insight
Irregular watering is one of the most common reasons for misshapen or blemished fruits. Keeping soil moisture stable, not swinging between dry and waterlogged, makes a visible difference in the quality of your final harvest.
A layer of mulch around the base of the plant helps retain moisture and keeps conditions more consistent between waterings.
Stage 6: Ripening Stage
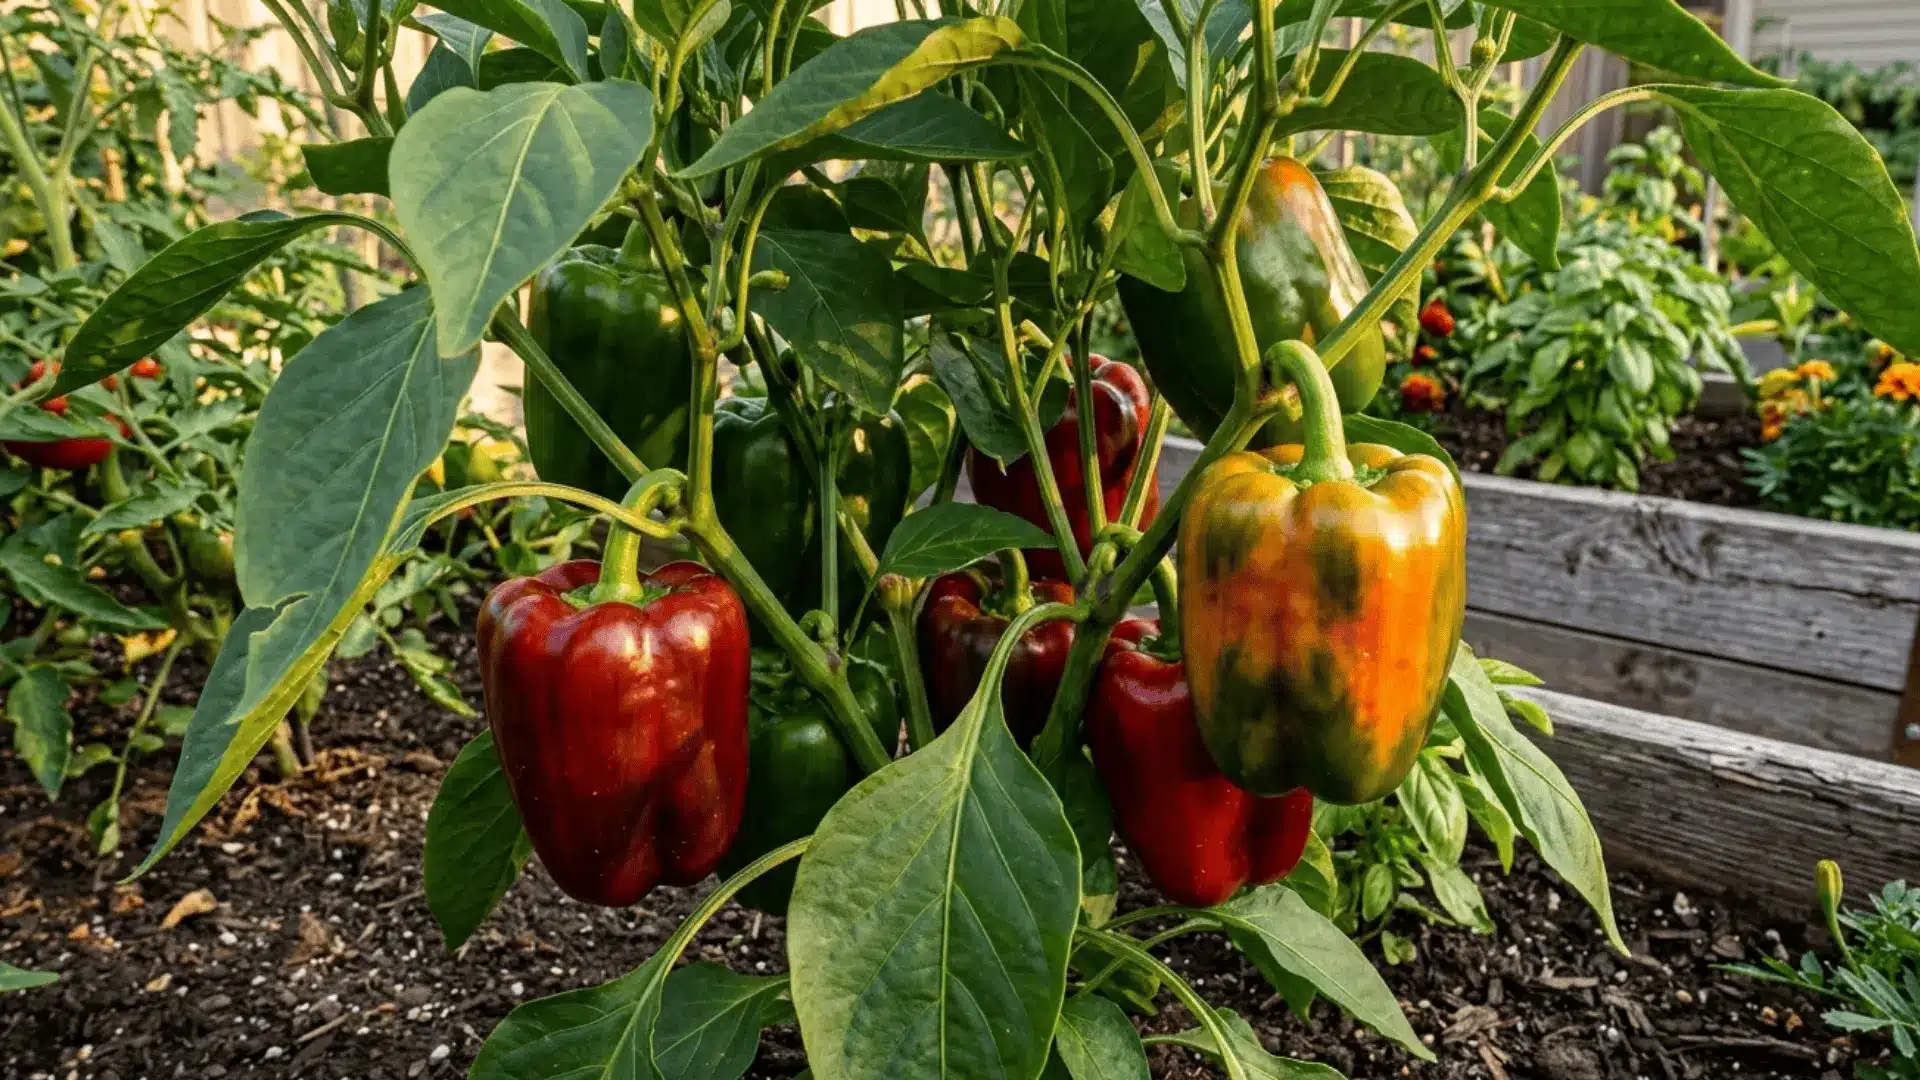
The finish line is close. Peppers begin showing their true colors, and the decision of when to pick comes down entirely to personal taste and preference.
Color Change & Flavor Development
Green peppers gradually shift to red, yellow, or orange depending on the variety you are growing. This transformation is not just visual; it signals a real change in the fruit’s chemistry.
Sugar content rises, bitterness fades, and the flavor becomes noticeably richer and more complex the longer the pepper stays on the plant to fully develop.
When to Harvest?
There is no single right time to harvest, and that flexibility is one of the more enjoyable parts of growing bell peppers. Timing it to your preference gives you real control over flavor.
Here is a simple guide:
- Harvest green for a slightly bitter, crisp flavor with a firmer texture.
- Wait for a full color change for a sweeter, mellow, and nutritious pepper.
- Use clean scissors or pruners to cut the stem cleanly and avoid stressing the plant.
Taste & Nutritional Differences
Fully ripe peppers contain significantly more vitamin C and antioxidants compared to peppers picked at the green stage.
The longer they remain on the plant through the ripening process, the more their nutritional profile develops. If flavor and nutrition are the priority, patience through this final stage is genuinely worth it.
How to Grow Bell Peppers Successfully?
Bell peppers are not particularly demanding, but they do have clear preferences. Nail these basics and the plant practically takes care of itself.
- Full sun is non-negotiable; aim for at least 6–8 hours of direct sunlight daily.
- Well-draining, nutrient-rich soil sets the foundation for healthy root development.
- Water deeply and consistently, letting the topsoil dry slightly between sessions.
- Avoid waterlogging at all costs, soggy roots are one of the fastest ways to lose a plant.
- Mulch around the base to retain moisture and keep soil temperature stable.
Get these right from the start and every stage that follows becomes noticeably smoother, more predictable, and a lot more rewarding.
Common Problems at Each Growth Stage
Even the most attentive growers run into hiccups along the way. Knowing what the problem looks like and why it happens makes fixing it a lot more straightforward.
Problem 1: My Bell Pepper Seeds Just Will Not Sprout.
The Fix: Cold soil is almost always the culprit. Move your seed tray to a warmer spot, ideally with a heat mat set between 70–85°F, and give it a few more days before drawing any conclusions.
Problem 2: My Bell Pepper Leaves are Turning Yellow.
The Fix: This usually points to overwatering or a nitrogen deficiency, both of which are easy to course-correct. Let the soil dry out slightly between waterings and consider a balanced, nitrogen-rich fertilizer.
Problem 3: My Bell Pepper Flowers Keep Dropping Off.
The Fix: Temperature stress is the most common trigger, particularly when nights dip too cold or afternoons get too hot. Keep your plant in stable conditions and ease up on watering during the flowering stage.
Problem 4: My Bell Peppers are Growing Small and Misshapen.
The Fix: Inconsistent watering and poor pollination are usually behind this. Aim for even, regular watering throughout fruit development and gently shake the plant or use a soft brush to encourage better pollination, if growing indoors.
What Experienced Growers Wish They Knew Earlier?
Some of the best growing advice does not come from a manual. These are the small, practical things that make a real difference once you actually put them into practice.
- Start seeds indoors 8–10 weeks before the last frost date for a stronger, more established plant by transplant time.
- Never rush transplanting; cold soil stalls growth significantly and can set your plant back by weeks.
- Harvest frequently once peppers reach size, picking regularly signals the plant to keep producing instead of slowing down.
- Pinch off early flowers on young transplants to redirect energy toward root and stem development first.
- Stake taller varieties early on before the weight of fruit causes stems to bend or snap under pressure.
The growers who see the best results are usually the ones paying attention to the small details, not just the obvious ones.
The Closing Note
Growing bell peppers stage by stage genuinely changes how you approach the whole process.
Once you understand what the plant needs and when, everything from germination to that final harvest feels a lot more intentional.
The bell peppers growing stages covered here are your foundation, refer back whenever something looks off or a new stage begins.
Every plant behaves a little differently, and that is part of what makes growing your own so satisfying.
Tried any of these tips in your own garden? Drop your experience in the comments below.