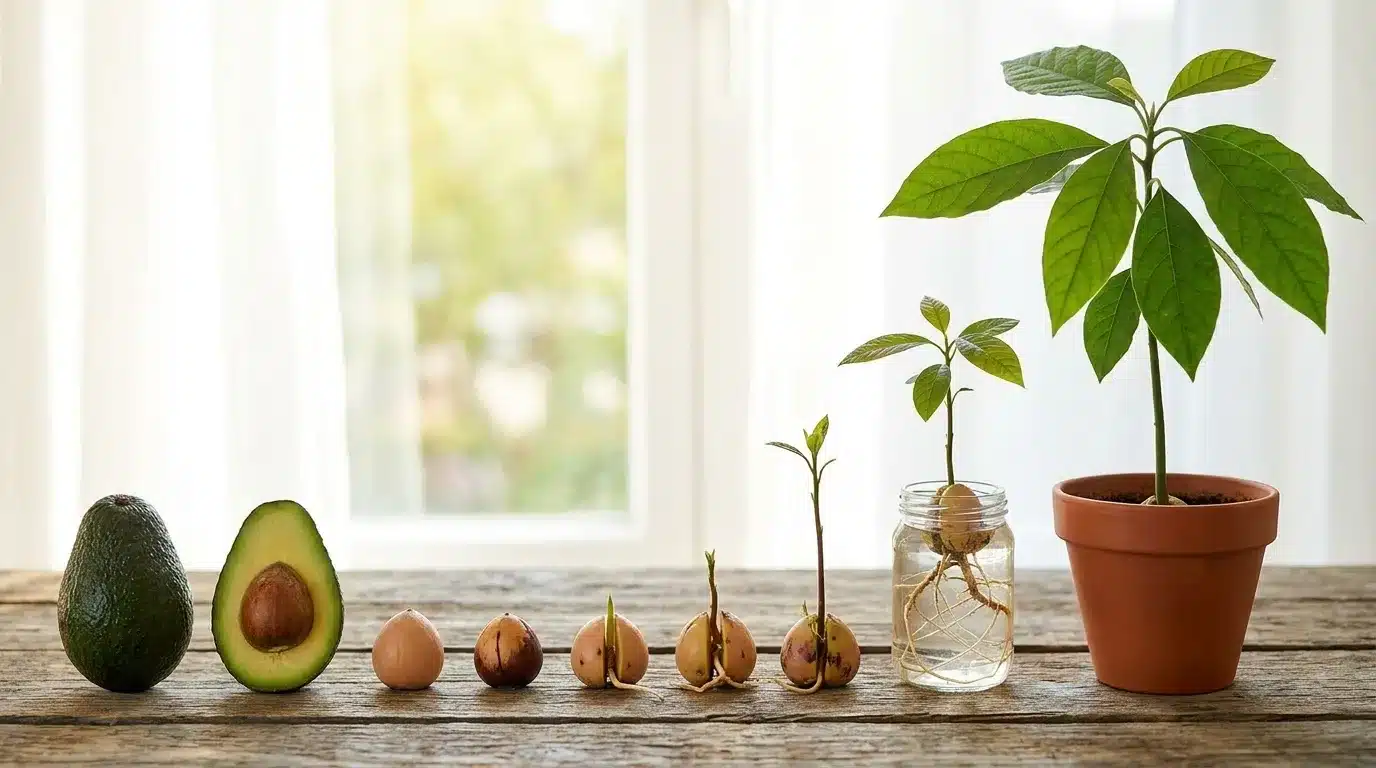
That pit sitting on your kitchen counter? It can grow into a real tree.
Most people toss it without a second thought, but growing an avocado seed at home is one of the easiest and most satisfying things a plant lover can do.
The catch is that most guides skip the part that actually matters: why some seeds sprout fast, and others sit there for three months doing nothing.
This guide covers every step, every fix, and every honest answer so you walk away with a plant that actually grows.
Quick Facts About the Avocado Plant
Before you start planting, it helps to know a little about what you are working with. Avocados are tropical fruit trees that are more patient than most people expect.
| Fact | Detail |
|---|---|
| Scientific name | Persea americana |
| Native region | Mexico and Central America |
| USDA growing zones (outdoor) | 9 to 11 |
| Cold tolerance | Frost-sensitive below 24 to 30°F |
| Time to fruit from seed | 5 to 13 years |
| Time to fruit from the grafted plant | 2 to 3 years |
| Mature tree height | Up to 65 feet outdoors |
| Water needs | About 2 inches per week |
| Soil type | Well-draining, light soil |
| Seed germination time | 2 to 8 weeks (up to 3 months in cold conditions) |
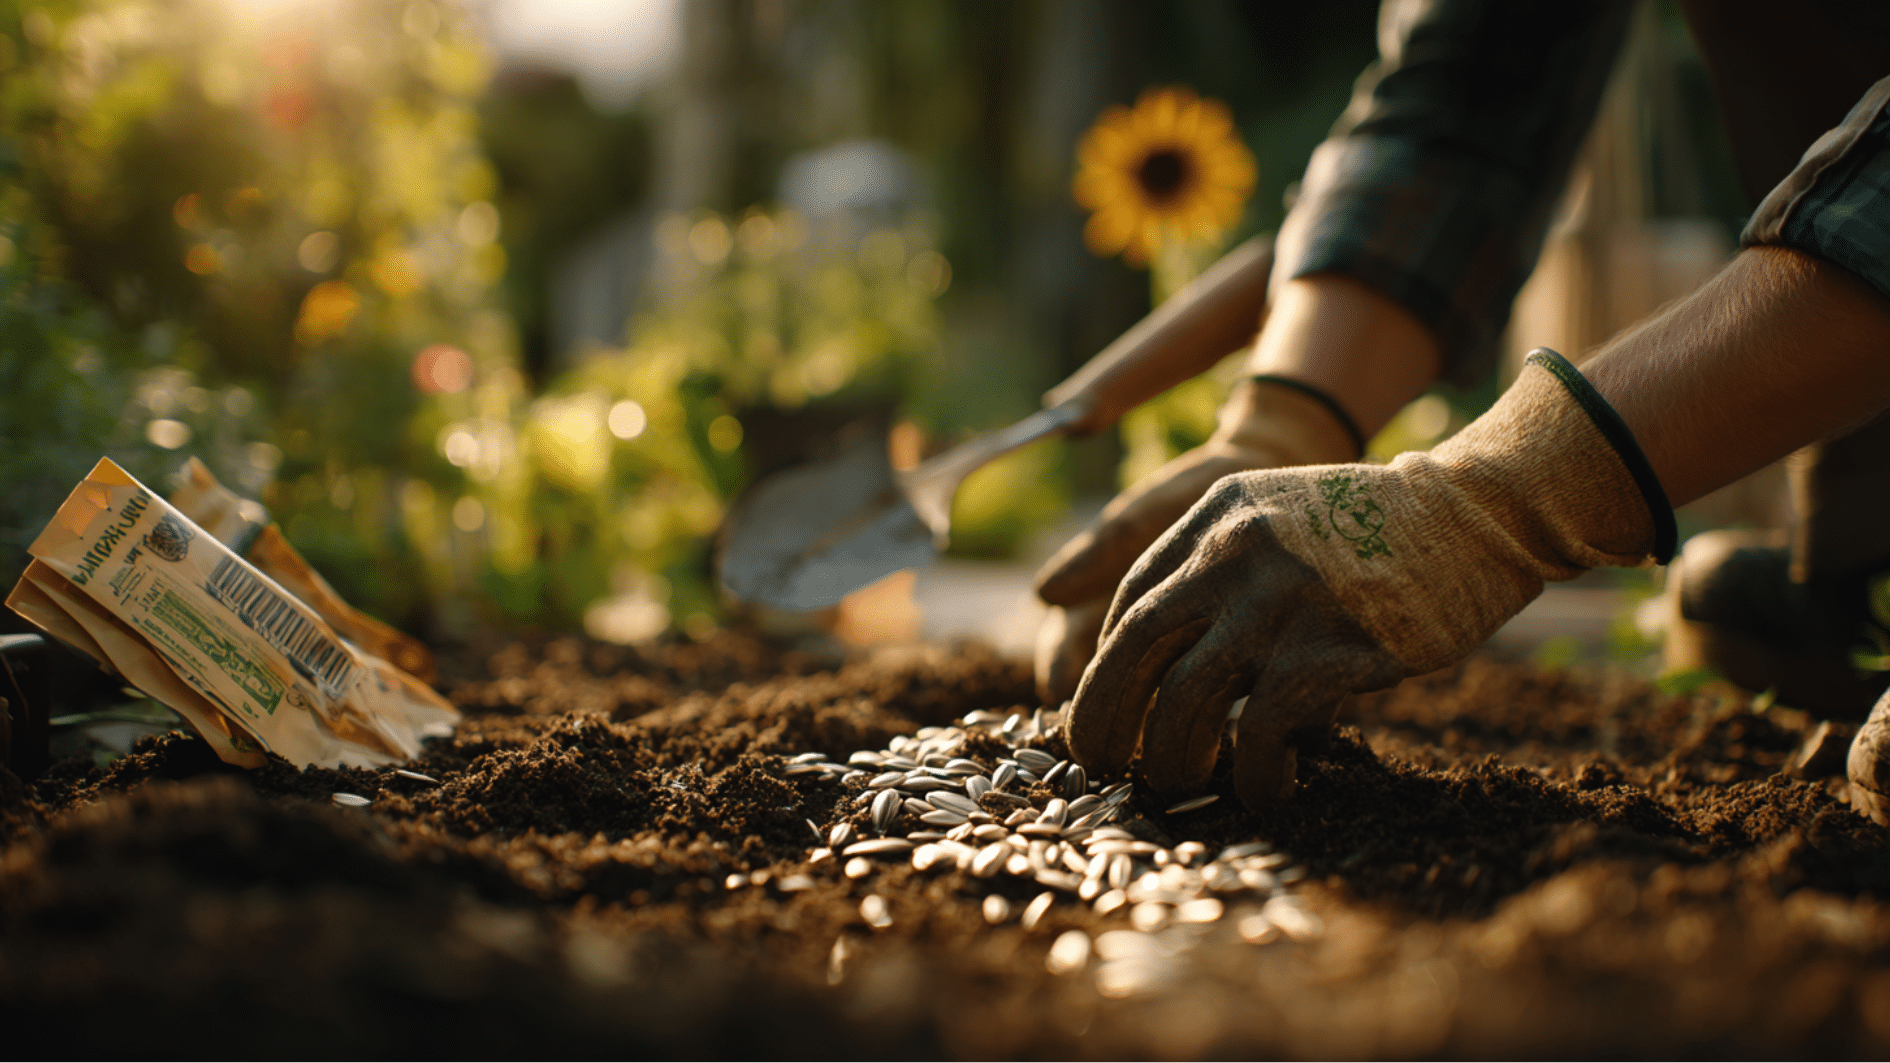
How to Pick the Right Avocado Seed?
Start with a ripe, good-tasting avocado. If the fruit tastes creamy and rich, the seed inside is mature and ready. Seeds from bland or unripe fruit often fail to sprout.
Any store-bought avocado works fine, and organic ones tend to germinate a little faster. Try to remove the seed carefully without nicking it with your knife, since even a small cut to the embryo inside can stop the whole process before it starts.
Start two or three seeds at once because not every seed will make it, and that is completely normal.
How to Prepare the Avocado Seed for Planting
Getting the seed ready takes maybe ten minutes, but skipping these steps is the reason most seeds fail. Think of it as giving the seed a proper head start.
- Clean the seed: Rinse it under warm running water and use a soft cloth or brush to remove every bit of green fruit flesh left on the surface.
- Identify the top and bottom: The pointy end is the top, where the stem and leaves will grow. The flat, wider end is the bottom, where roots come out. Planting it upside down is one of the most common mistakes people make.
- Let it dry for 1 to 2 days: Once dry, the outer brown skin will start to crack. This makes the next step much easier.
- Peel the skin partially: Removing the thin brown outer coat speeds up germination by a week or two. You do not have to remove all of it, but peeling the cracked parts off helps.
- Soak in warm water overnight: This removes natural compounds in the seed that slow down germination. It also gives the seed the moisture it needs to wake up.
Three Methods to Grow an Avocado Seed
There is no single “correct” way to sprout an avocado seed. The three methods below each have their place depending on what you want to see, how much effort you want to put in, and where you live.
Method 1: The Paper Towel Method (Most Reliable)
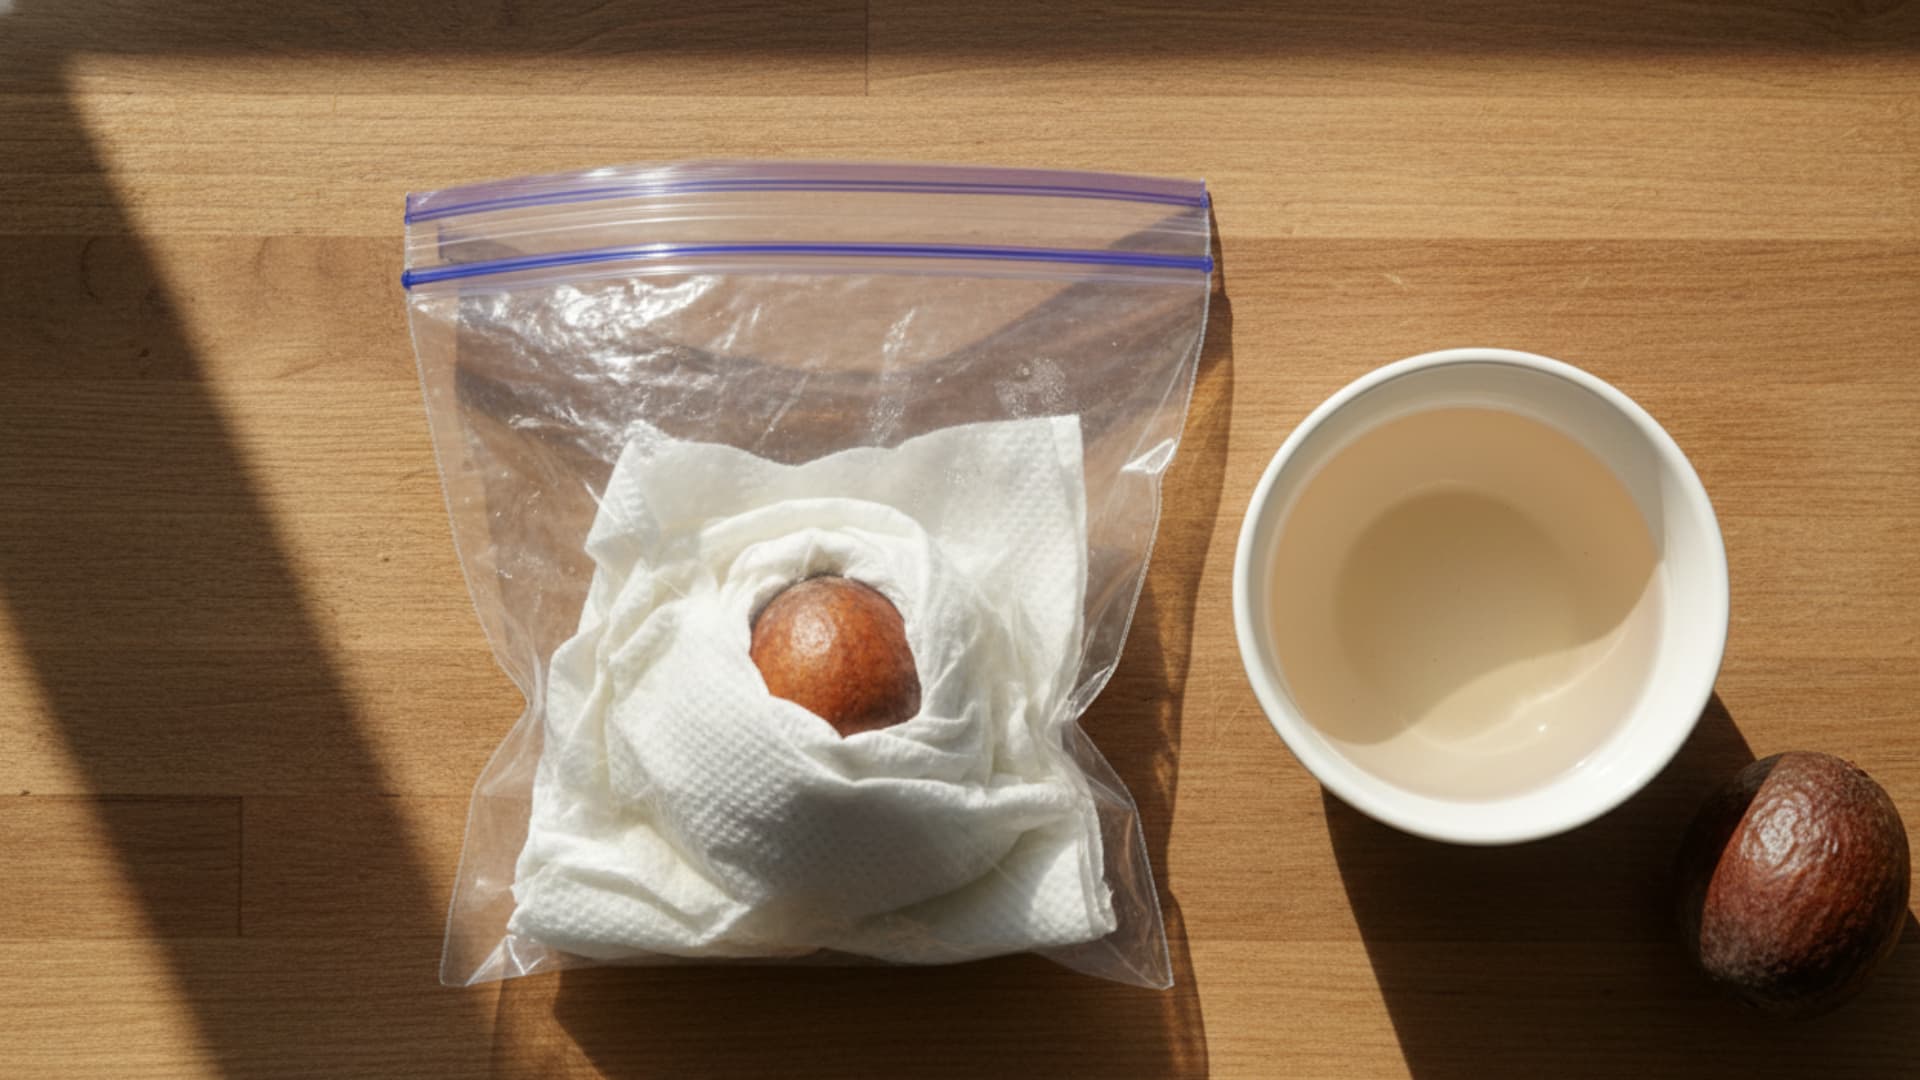
This is the method with the highest success rate. It keeps the seed warm, moist, and in the dark, which is exactly what an avocado seed needs to get started.
Tools and materials:
- 1 ripe avocado seed, cleaned and soaked
- 1 sheet of paper towel
- 1 zip-lock bag or airtight container
- Warm water
Steps:
- Dampen the paper towel. It should be moist but not dripping wet. Use warm water, not cold.
- Wrap the seed. Place the seed in the center of the paper towel, then fold the paper towel around it to fully cover it.
- Seal in a bag. Put the wrapped seed into a zip-lock bag. Leave it slightly open so a little air gets in.
- Store in a warm, dark spot. A kitchen cabinet above the fridge works well. Aim for around 70°F (21°C).
- Check every 4 to 5 days. Make sure the paper towel stays damp. Rewet it with warm water if it dries out.
- Watch for cracking. After 2 to 4 weeks, the seed will crack open, and a root will begin to push out from the flat end.
- Move to water or soil once the root is about 1 inch long. At this point, you can see the seed is alive and ready for the next stage.
Pro Tip: Write the date on the bag with a marker so you know how long it has been. It is easy to lose track.
Method 2: The Toothpick-in-Water Method (Classic Visual Method)
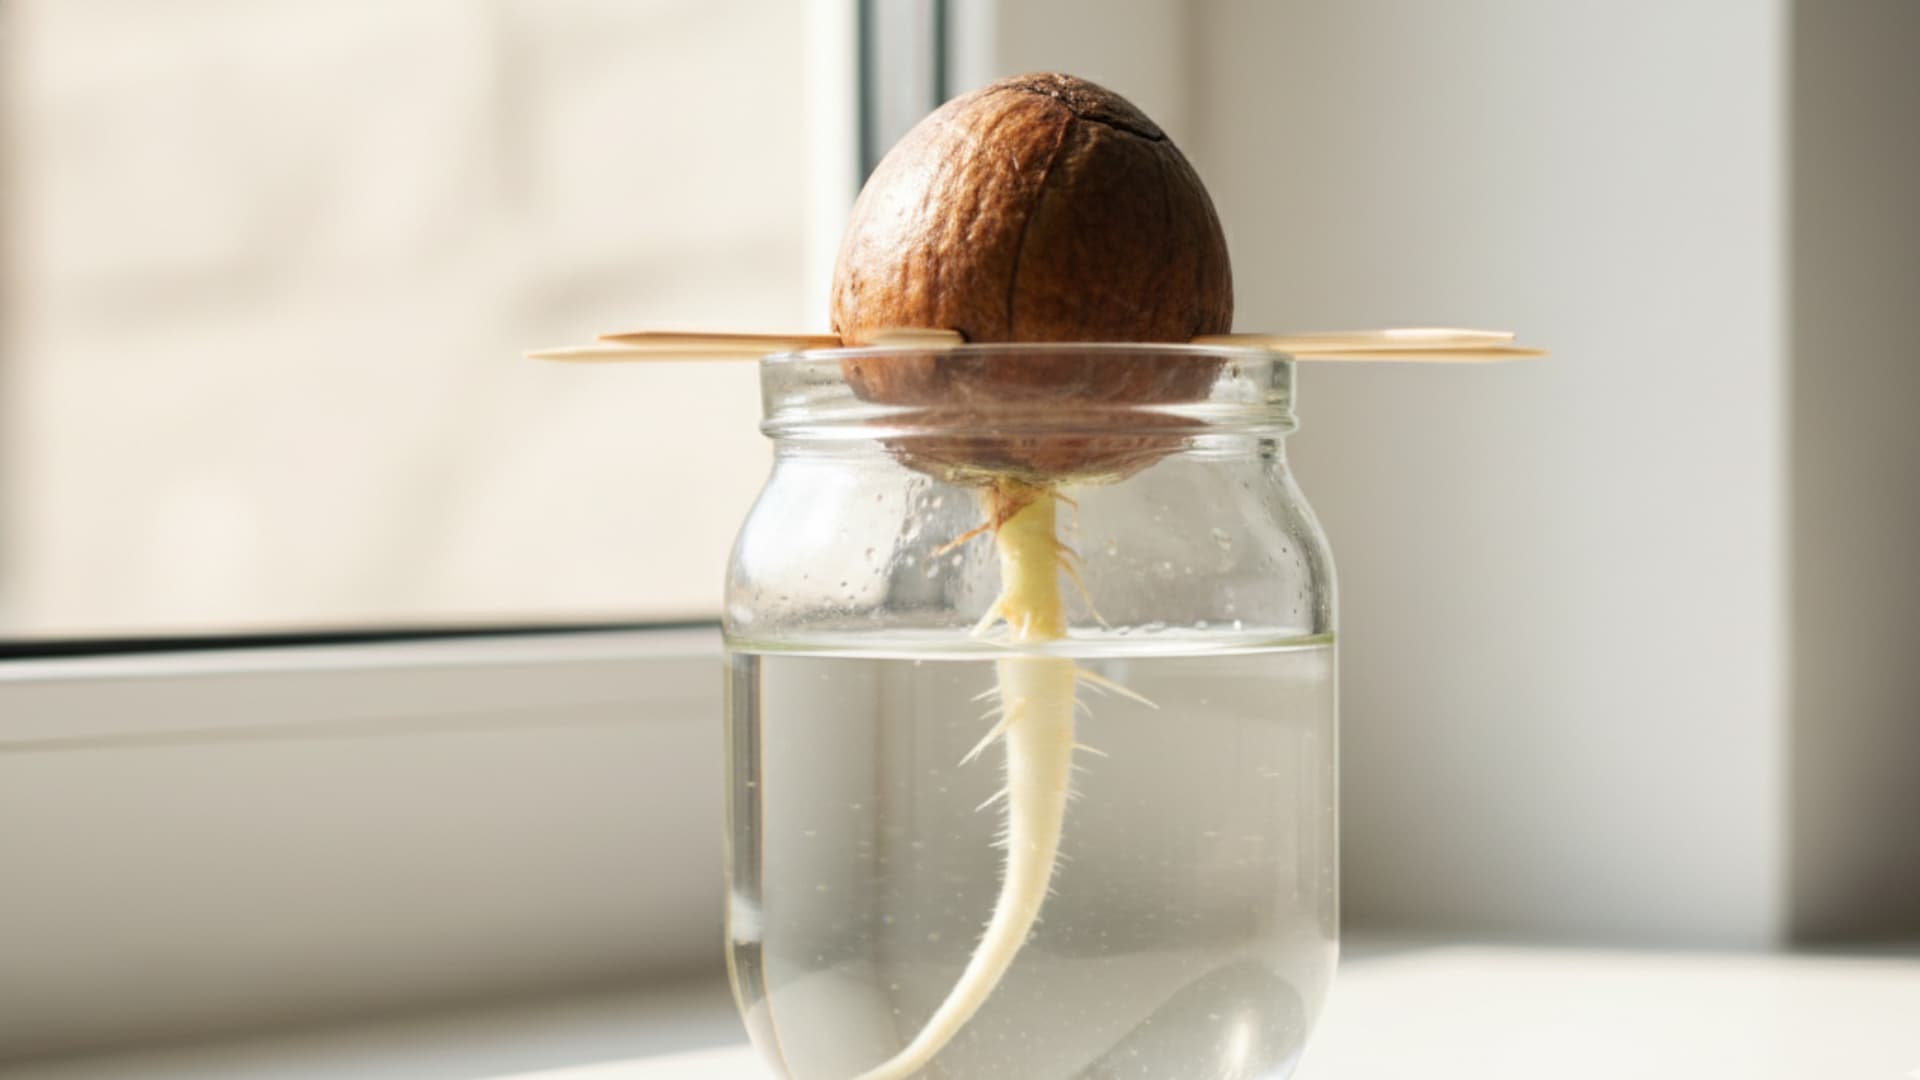
This is the method most people learn as kids. It works, but it needs more attention than the paper towel method. The payoff is that you get to watch the roots grow in real time, which is genuinely fun.
Tools and materials:
- 1 cleaned avocado seed
- 3 to 4 round toothpicks (round ones are sturdier than flat ones)
- A clear glass or jar
- Water
Steps:
- Push in the toothpicks. Insert 3 toothpicks into the seed at its widest point, spacing them equally around the seed. Angle them slightly downward so they hold the seed steady.
- Fill the glass with water. Use room-temperature water. If your tap water is heavily chlorinated, use filtered water instead.
- Set the seed on the rim. Rest the toothpicks on the rim of the glass so the flat bottom of the seed sits about 1 centimeter into the water. Only the bottom should be submerged.
- Place on a warm windowsill. A south or west-facing window with indirect light works best. Avoid putting it in direct harsh sunlight, as that can burn the seed.
- Change the water every week. Fresh water prevents mold and rot from building up around the base of the seed.
- Keep the water level consistent. Water evaporates, so check every few days and top it up to keep the seed base wet.
- Wait 3 to 6 weeks. You will see the seed crack, then a taproot will push down, followed by a stem growing upward from the top.
Honest note: This method is fussier than the paper towel method. If the water level drops or gets neglected, the seed can dry out or rot at the base. It is worth the extra attention if you want to watch the process, but do not expect it to be hands-off.
Method 3: Direct Soil Planting (Best for Outdoor Growers)
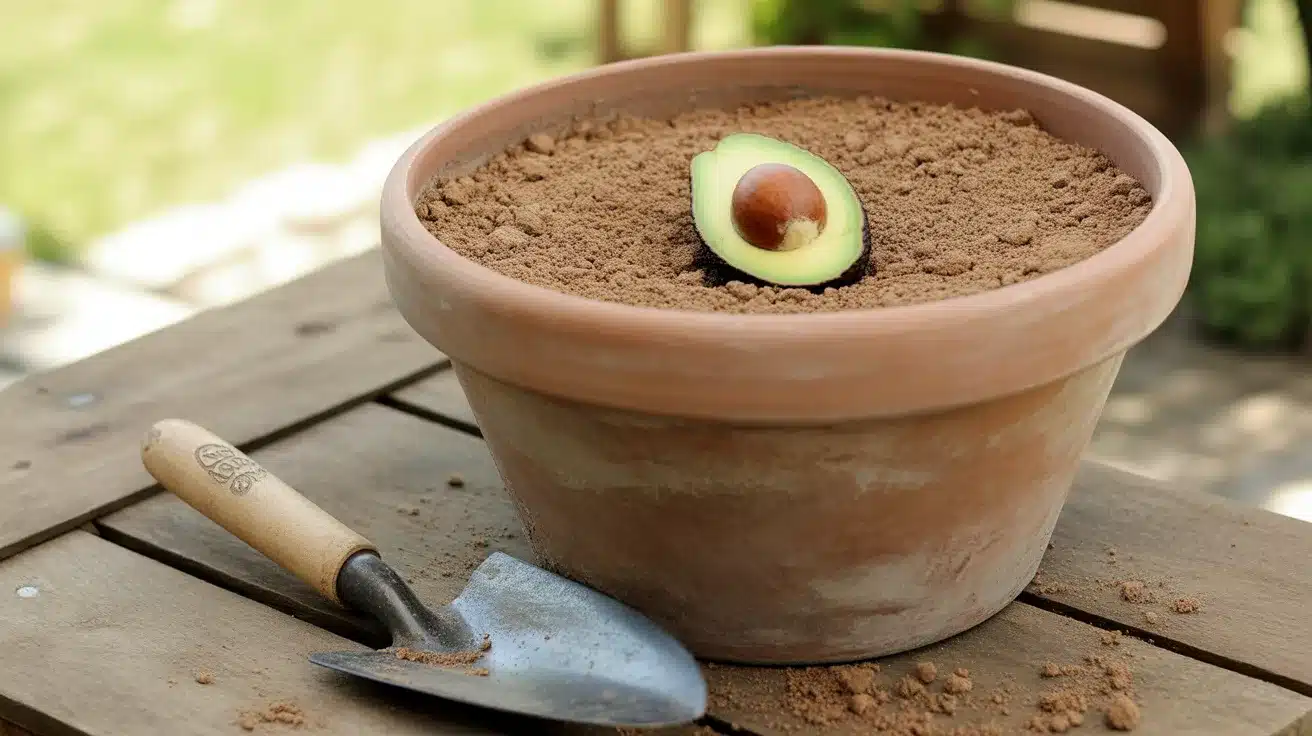
If you live in USDA zones 10 to 12 and want to plant directly in the ground or a pot, this method skips the water stage entirely.
Tools and materials:
- 1 cleaned and soaked avocado seed
- A tall pot (at least 10 inches deep) or a garden spot with good drainage
- Well-draining potting mix (peat and perlite blend, or cactus mix)
- Water
Steps:
- Fill the pot with soil. Use a light, fast-draining mix. Heavy or compacted soil will hold too much moisture, causing the seed to rot.
- Push the seed halfway into the soil. The flat bottom goes down. The top half of the seed should stay above the soil surface.
- Cover the top of the seed with a thin layer of mulch. This keeps moisture in and protects the exposed part of the seed.
- Water the soil. It should be moist, not soggy. Let the top layer dry out a little between waterings.
- Place in a warm, partially shaded spot. The seed does not need direct sunlight to germinate. Too much strong sun at this stage can dry the seed out.
- Check weekly. The soil should never completely dry out. Add water when the top inch of soil feels dry.
- Watch for a stem to appear. With good conditions, a green shoot will push through the soil within 4 to 8 weeks.
Best for: People who want a tree in the ground and don’t want to watch the germination process step by step.
When and How to Move the Seedling into Soil
Once your seed has sprouted and the stem is growing, it needs soil to keep going. Water alone cannot give it the nutrients a young plant needs to build strong roots and leaves.
Here is what to look for before you make the move, and what to do once you are ready.
| Signal or Step | Detail |
|---|---|
| Right time to transplant | The stem is about 12 inches tall, or the root is about 1 inch long (paper towel method) |
| Pot size | At least 10 inches in diameter, with drainage holes at the bottom |
| Best soil mix | Peat and perlite blend, coconut coir and perlite, or a cactus and succulent mix |
| Seed position in soil | Flat bottom down, top half of the seed left above the soil surface |
| First watering | Water thoroughly right after transplanting |
| Sunlight after transplanting | Bright, indirect light for the first 1 to 2 weeks before moving to full sun |
| Pot shape | Tall and slender works better than wide and shallow, as the taproot grows down first |
| Cut the stem before transplanting? | Yes. Cut back to 3 inches to push the plant to branch out rather than grow thin and tall |
How to Care for a Young Avocado Plant?
Getting the seed to sprout is the exciting part. Keeping the plant alive and healthy after that is where most people quietly lose the plot. These are the things that actually matter day to day.
1. Watering
Avocado plants like moist soil, but they do not like sitting in water. The roots will rot if the soil stays wet for too long. Water when the top inch of soil feels dry to the touch.
Always water near the base of the plant so it reaches the roots directly. Make sure the pot drains fully after each watering and never let the bottom of the pot sit in a tray of standing water.
2. Light
Young avocado plants grow best in bright, indirect sunlight. A south or west-facing windowsill is ideal for indoor plants.
Too much direct afternoon sun can scorch the leaves, especially on young plants that are still adjusting. As the plant grows and becomes tougher, it can handle more sun.
3. Pinching the Stem (Most Skipped Step)
When the plant reaches about 12 inches tall, cut the stem back to about 6 inches, just above a leaf node. This feels wrong the first time you do it, but it forces the plant to grow sideways branches instead of one long, thin, weak stem.
New shoots will appear within 1 to 2 weeks. Repeat this every time the plant adds another 6 inches of height. The result is a full, bushy plant instead of something that looks like a stick.
4. Fertilizing
Young avocado plants benefit from a balanced, water-soluble fertilizer about once a month. Use it at half the strength listed on the package.
Signs of over-fertilizing include yellowing leaves, slow growth, or leaf drop. Yellow coloring between the leaf veins often points to a lack of magnesium or iron.
Bronze-colored leaves can signal a potassium or phosphorus deficiency. If the leaf edges are turning brown, the plant is likely getting too much direct sun or heat.
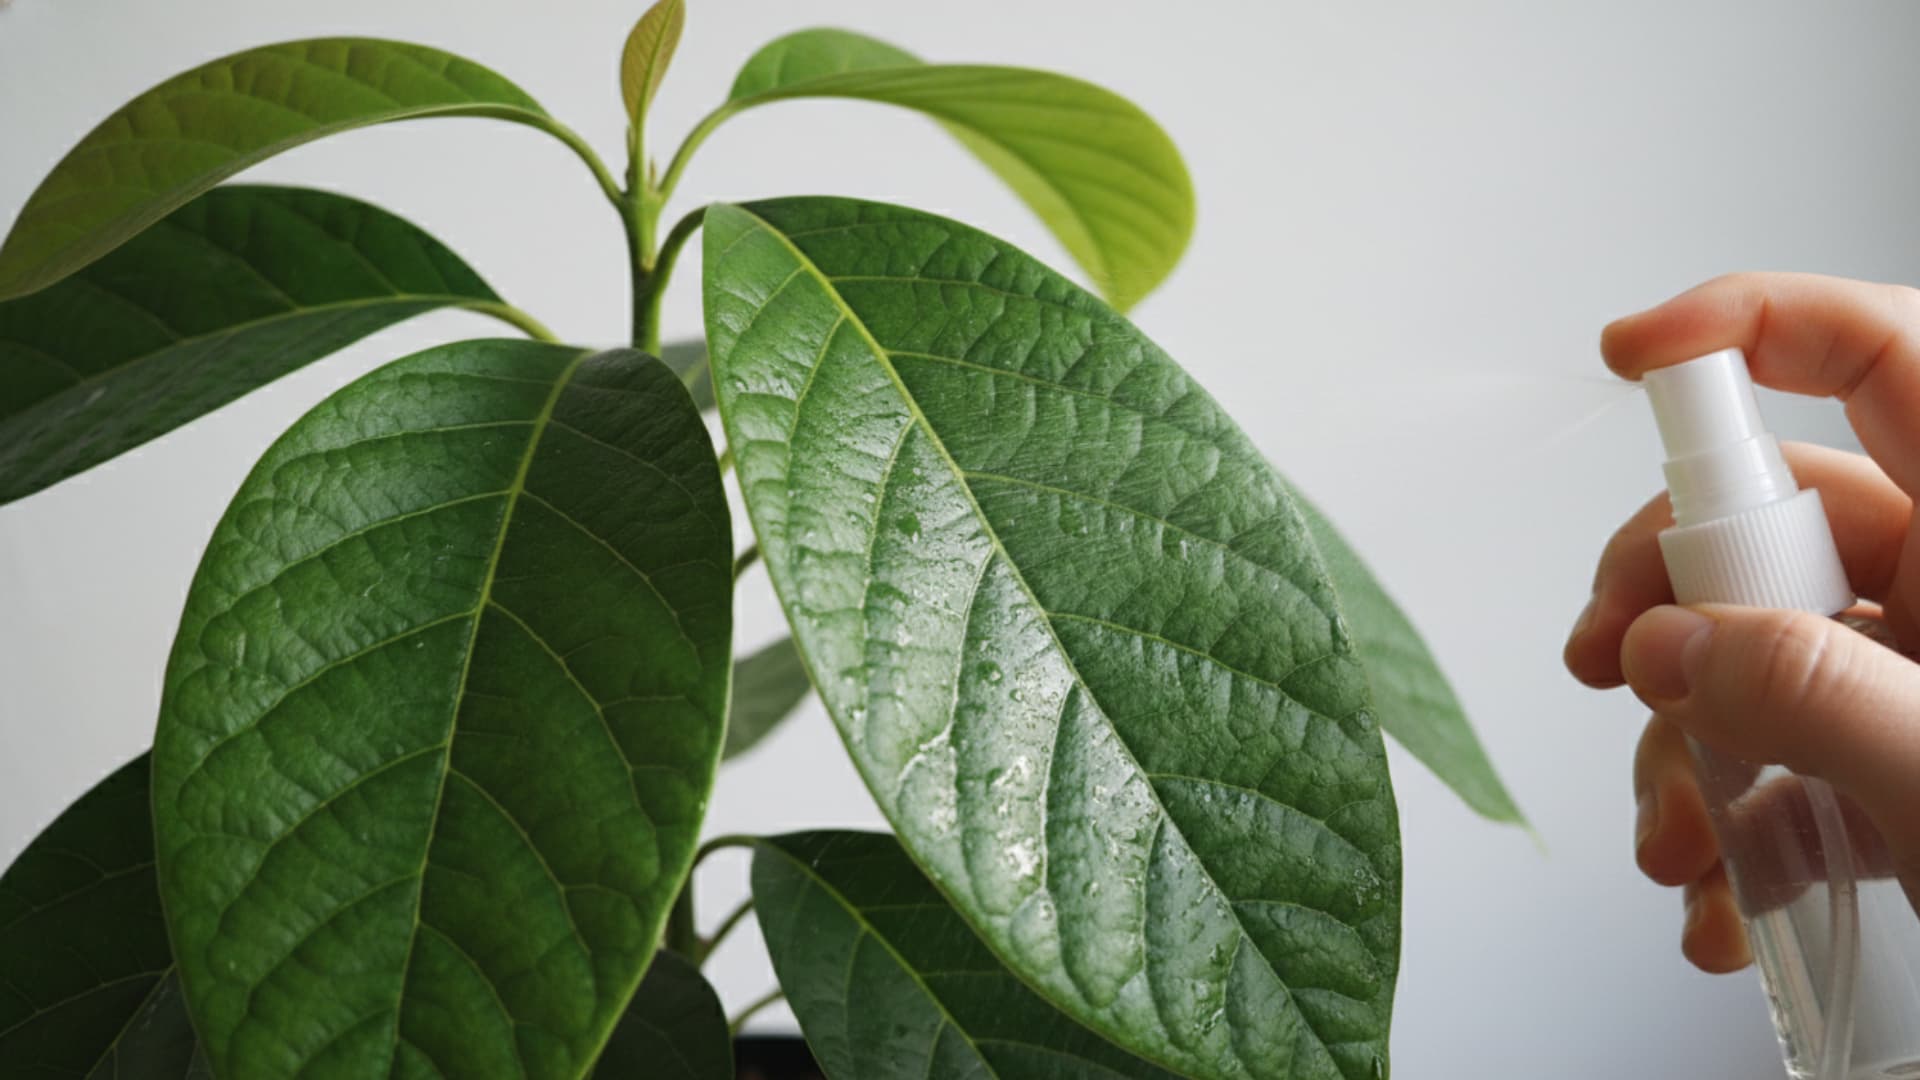
5. Pests
Indoor avocado plants occasionally attract spider mites, aphids, thrips, and scale insects. Check the undersides of leaves regularly since that is where most pests hide first.
For a small infestation, wipe the bugs off with a damp cloth. If the problem keeps coming back, spray the leaves with diluted neem oil mixed with a small drop of dish soap. The neem oil handles the insects, and the soap helps the spray stick to the leaves.
Growing Avocado Seeds Indoors vs. Outdoors
The method you choose for growing an avocado seed matters less than where the plant ends up living. Both paths can work well, but they have very different expectations.
Here is an honest comparison so you can plan ahead before your seedling outgrows its first pot.
| Factor | Indoors | Outdoors |
|---|---|---|
| Best climate | Any climate (container growing) | USDA zones 9 to 11 |
| Fruit production | Very unlikely | Possible after many years |
| Container or ground | Always in a container | Ground or large container |
| Light needs | Bright, indirect sunlight | Full sun, 6 or more hours daily |
| Watering | Controlled, based on soil feel | Rain plus irrigation, about 2 inches per week |
| Cold risk | Low (kept inside) | High below 28°F, needs frost protection |
| Max size | 5 to 10 feet in a pot | Up to 65 feet in the ground |
| Best use | Houseplant, foliage, learning | Long-term tree, possible fruit |
| Soil control | Full control over the mix | Needs well-draining garden soil |
| Pest risk | Low to moderate | Moderate to higher outdoors |
Quick note for outdoor growers: If you are in a borderline zone like 8b, plant near a south-facing wall. The extra warmth from the wall can make a real difference during cool winters.
How Long Does It Take to Grow an Avocado from Seed?
The honest answer is: longer than most people expect. A seed-grown avocado tree typically takes 5 to 13 years just to reach the stage where it can flower, and even then, producing actual fruit indoors is very difficult without two trees nearby and some hand-pollination.
Outdoor trees in the right climate have a better shot, but patience is still the main requirement. If fruit is the goal, a grafted plant from a nursery will get you there in 2 to 3 years instead.
Growing from seed is best treated as a long-term plant project, not a fruit-farming plan.
Summing It Up
Growing an avocado seed from scratch is worth every bit of waiting. You start with a pit that most people throw away, and with the right setup, you end up with a real, living tree.
Pick a ripe seed, prepare it properly, choose the method that fits your situation, and then give the plant consistent care once it is in the soil.
The seed sprouting is just the beginning. Have you ever tried growing an avocado seed? Drop a comment and share how it went or what you are trying this time.