Building a backyard fire pit is one of those weekend projects that looks complicated from the outside but turns out to be very manageable once you break it into steps.
My preference for a first build is always the above-ground block fire pit: it uses retaining wall blocks, a gravel base, leveling sand, and a metal fire ring. No poured concrete, no heavy masonry skills, and no specialized equipment.
You can complete a solid, safe DIY fire pit in a single weekend with basic tools and a clear sequence.
Below, I’ll cover the planning decisions, materials, build steps, safety rules, and the mistakes that are worth knowing about before you start, rather than after.
What a DIY Fire Pit Project Actually Involves
A homemade fire pit is an outdoor fire pit built for small backyard fires, typically using stacked blocks, bricks, or natural stone around a central fire.
The most common styles are above-ground block fire pits, brick fire pits, in-ground fire pits, and portable setups.
Below, I have focused on the above-ground block build because it is the most beginner-friendly option: the materials are widely available, the tools are basic, and the structure is stable without needing mortar or a concrete foundation.
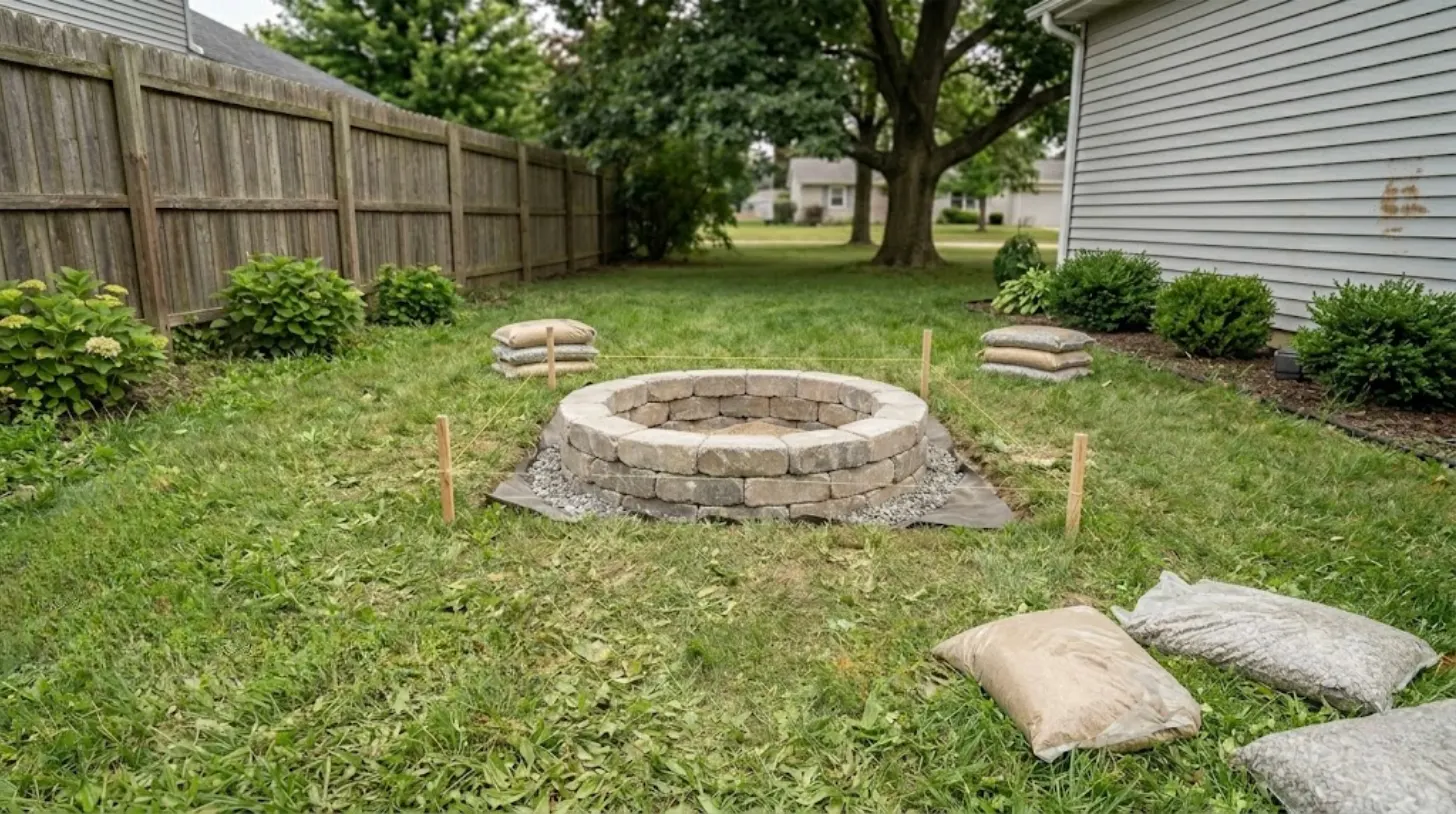
A metal fire ring insert sits inside the block wall to protect the blocks from direct heat and give the interior a clean, consistent shape. It is also one of the most cost-effective builds for a first-time project.
Planning: What to Sort Out Before Buying Anything
Skipping the planning stage is the most common reason a fire pit project creates problems later. Three things need to be confirmed before a single block is purchased.
1. Check Local Fire Rules First
Fire pit rules vary significantly by city, county, HOA, and wildfire-risk zone. Check whether a fire pit permit is required in your area, what fuel types are allowed, whether there are active burn bans, and what the minimum required distance from homes, fences, trees, and sheds is.
Some areas restrict fire pits entirely during dry seasons. A quick call to your local fire department or municipality website takes ten minutes and prevents a costly mistake.
2. Choose the Right Location
Select a flat, open area with no overhanging branches above. Keep the fire pit well away from house walls, wood fences, dry grass, sheds, propane tanks, and wood decks. A non-combustible base surface, such as gravel, compacted soil, pavers, or stone, is strongly recommended.
Grass directly under a fire pit creates a fire risk and will not survive the heat. The surrounding seating area should have three to four feet of clear space around the pit before chairs are placed.
3. Decide on Size
Most backyard fire pits sit between 36 and 44 inches wide on the outside. A 30 to 36-inch inner ring works well for most yards and gives enough room for a proper fire without creating an oversized flame.
Smaller yards may be better served by a compact or portable fire pit. A larger pit is harder to manage and may create smoke problems for neighbors, so starting on the smaller side is a reasonable call for a first build.
Building a Fire Pit on a Budget
Build a safe, low-cost fire pit by spending on the parts that matter most: solid blocks, a metal ring, gravel, and sand. Save the fancy patio work for later instead:
| Build Level | Cost | What It Includes |
| Low-cost | $100 to $200 | Basic blocks, metal ring, gravel, sand |
| Mid-range | $250 to $450 | Fire pit blocks, fire bricks, pea gravel, seating area |
| Full patio setup | $500+ | Pavers, seating, lighting, fire pit kit |
The key is not spending less on safety. Keep the ring and gravel base, then choose simpler blocks and basic seating to keep the full project cost lower overall today.
Materials and Tools Needed
Gather every item before you start so the build goes smoothly, the base stays level, and you don’t have to leave the site halfway through the fire pit project to get supplies later.
Materials:
- Retaining wall blocks or fire pit blocks for the outer wall
- Metal fire ring insert sized to match your planned inner diameter
- Crushed gravel or paver base, enough for a 3 to 4 inch layer
- Leveling sand for a 1 to 2 inch top layer under the first block course
- Fire bricks for inner wall lining if you want a longer-lasting build
- High-heat masonry adhesive, where the product allows it
- Lava rock or fire-rated stone for the bottom of the fire area
- Pea gravel, pavers, or flagstone for the surrounding seating area
Tools:
- Tape measure, stake, string, and marking paint for layout
- Shovel, rake, and hand tamper for base preparation
- Level and rubber mallet for block placement
- Work gloves and safety glasses throughout
- Wheelbarrow for moving gravel and sand
With these supplies ready, you can mark the layout, prepare the base, stack each course, add the liner, and finish the seating area without delays or unsafe shortcuts later.
How to Build a DIY Fire Pit: Step-by-Step
Follow these steps in order. Each stage sets up the next one correctly, and cutting corners early creates problems that are harder to fix once blocks are stacked.
Step 1: Mark and Clear the Site
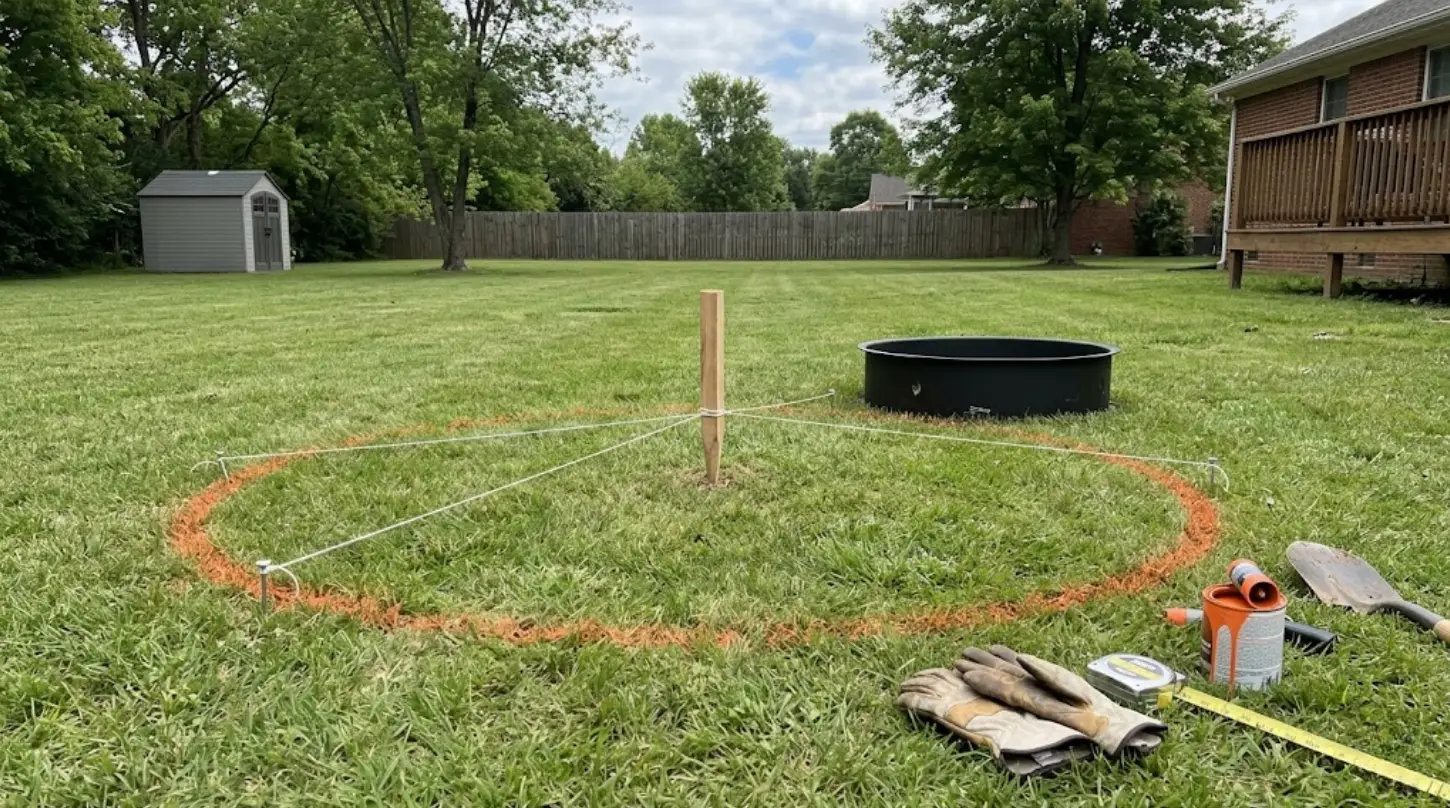
Choose a flat, open spot away from fences, trees, sheds, decks, and dry grass. Place a stake at the center, tie a string to it, and mark the circle with paint.
Set the metal ring inside the mark to check sizing before digging. A safe location helps the pit sit level and keeps heat away from items that can catch fire while you use it in your backyard all season long.
Step 2: Dig, Level, and Compact the Base
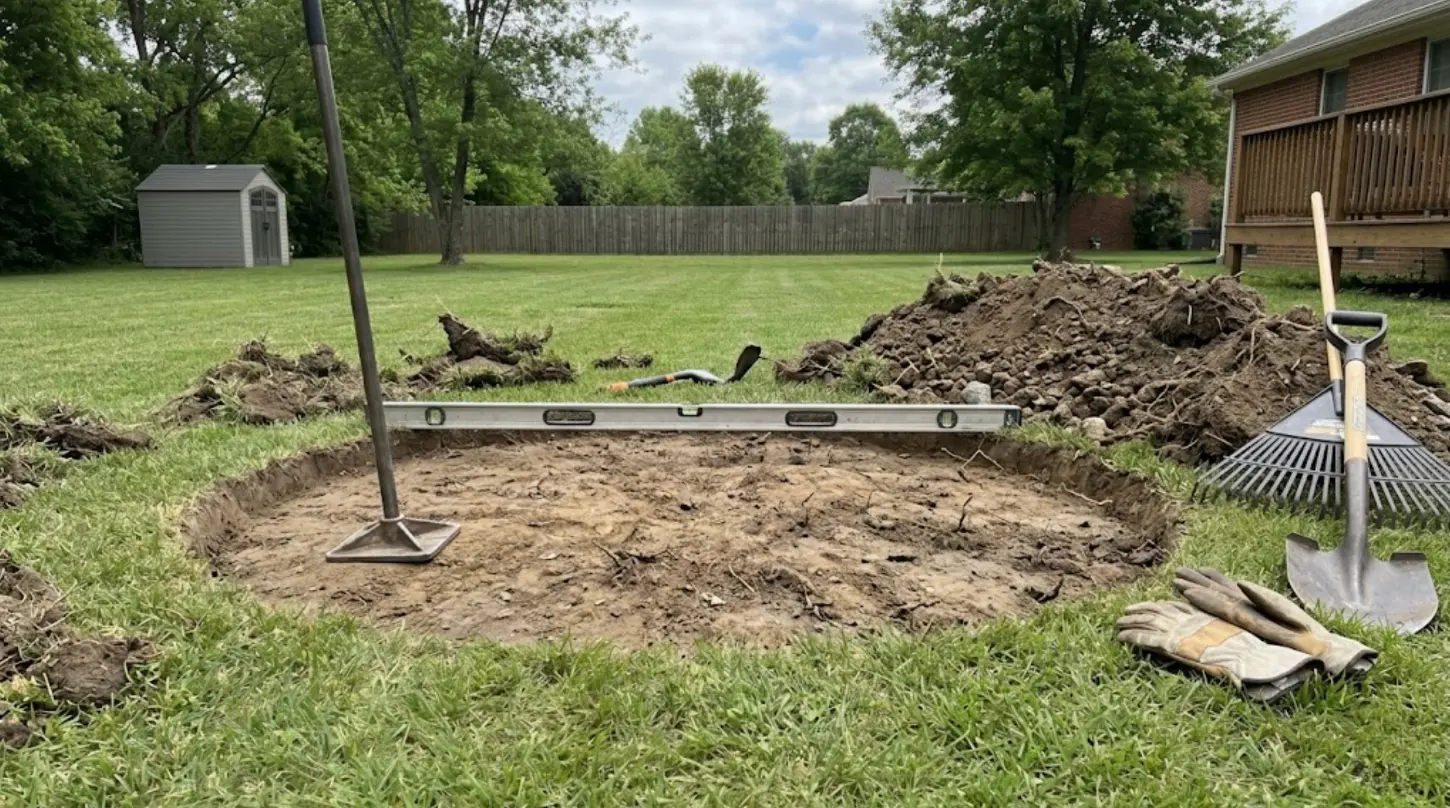
Remove grass and topsoil inside the marked circle, plus a few inches beyond the edge. Dig 6 to 8 inches deep, then pull out roots, rocks, and loose soil. Rake the area flat and tamp it firmly.
Check the surface with a level before moving on. A level base keeps the first block course steady and helps prevent shifting after rain or regular use.
Step 3: Add Gravel and Sand Layers
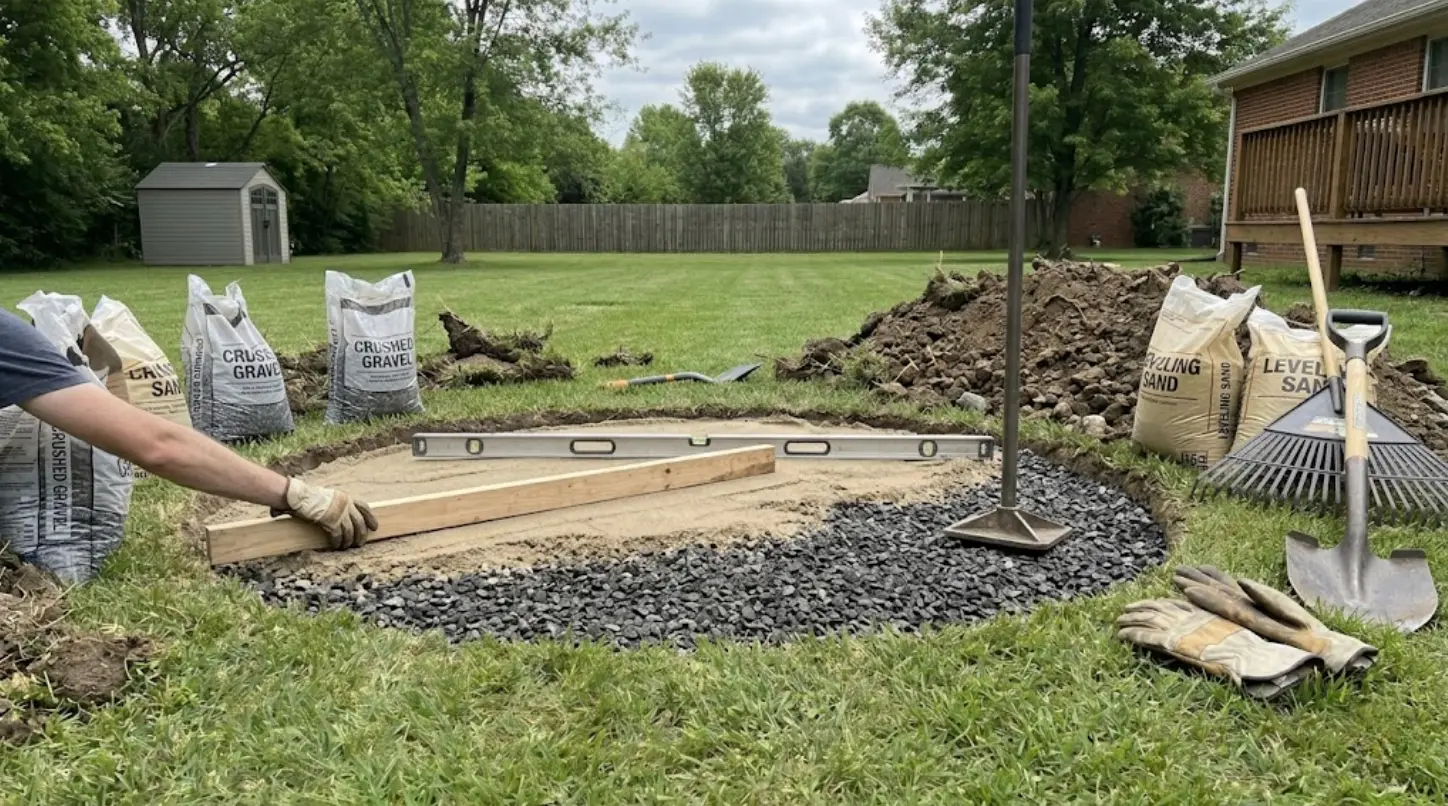
Spread 3 to 4 inches of crushed gravel or paver base across the dug area. Rake it even, then compact it well with a hand tamper. Add 1 to 2 inches of leveling sand over the gravel and smooth it with a board.
This gravel layer helps water drain beneath the fire pit and provides the blocks with a firm surface to sit on.
Step 4: Stack the Blocks and Add Adhesive
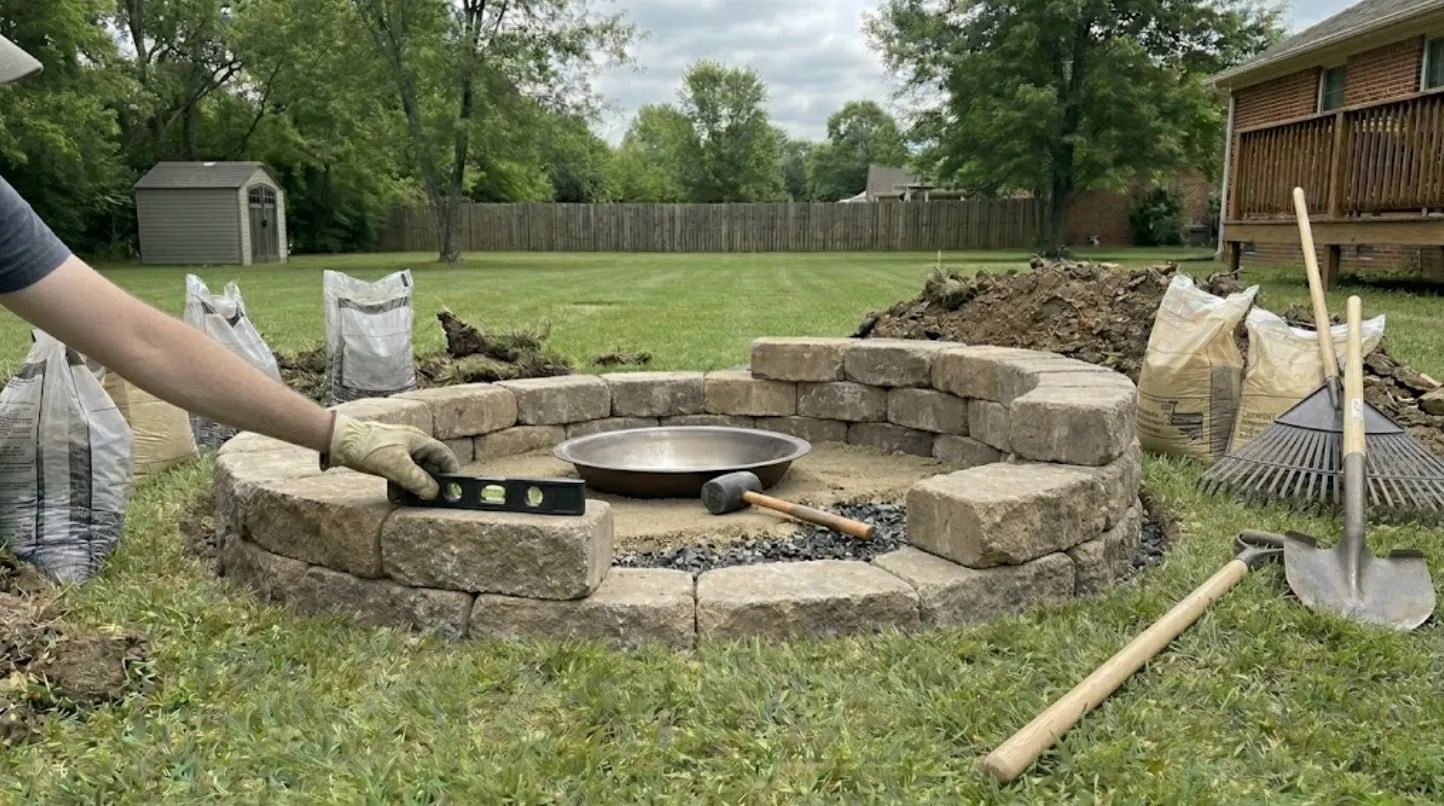
Place the first ring of blocks on the sand, checking each one with a level. Tap uneven blocks with a rubber mallet until the course sits flat. Add 2 to 3 more courses, staggering the joints between layers.
Use masonry adhesive only where the product is safe to use. Let it cure fully before lighting your first fire in the pit.
Step 5: Install the Ring and Finish the Area
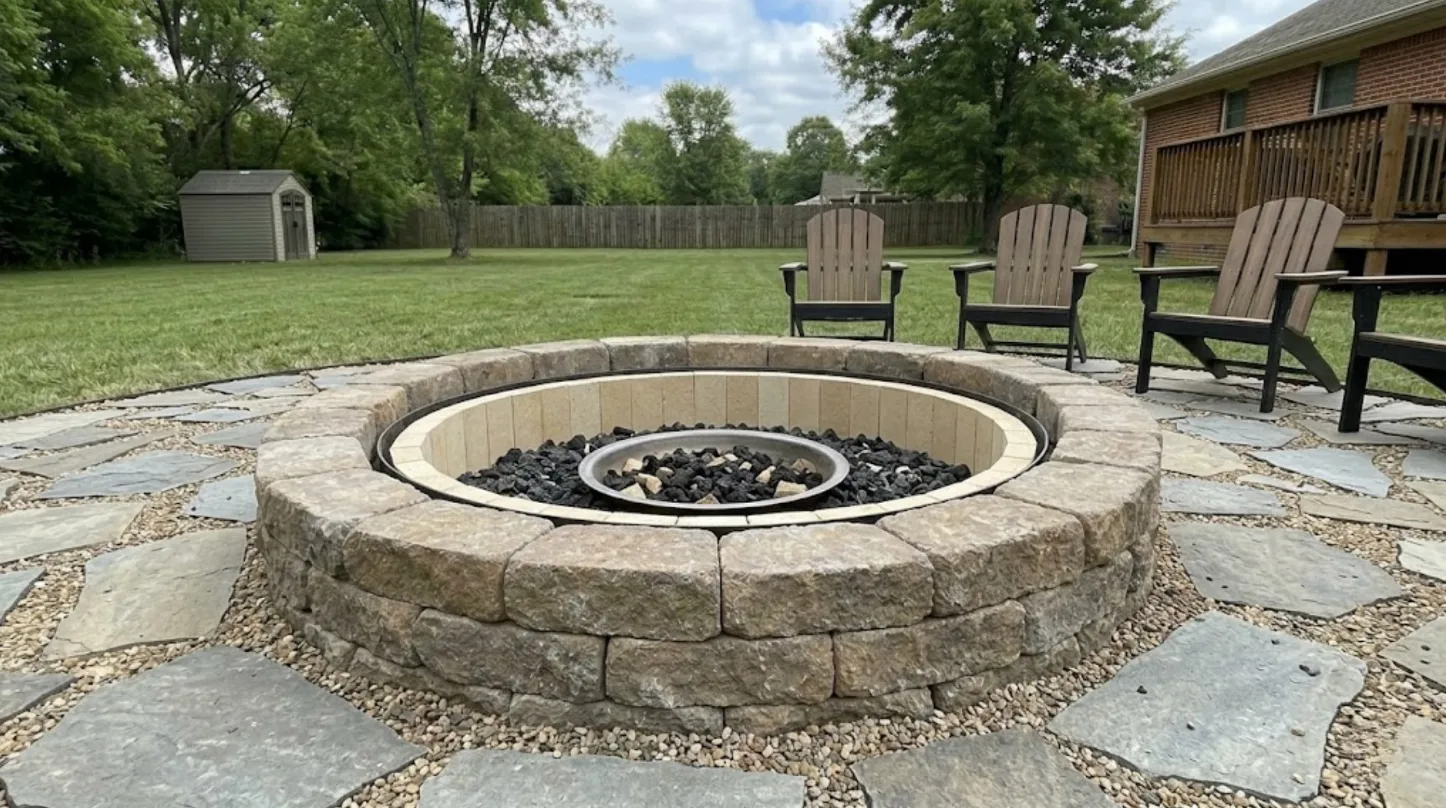
Set the metal fire ring inside the block wall, leaving a small gap for heat movement and airflow. Add fire bricks inside for better heat protection.
Place a shallow layer of lava rock or fire-rated stone at the bottom. Finish with pea gravel, pavers, or flagstone around the pit. The metal ring protects the blocks and keeps the fire area neat.
Best Materials for a Backyard Fire Pit
Choose materials that handle heat, hold their shape, and match your yard setup. The right mix keeps the fire pit safer, cleaner, and easier to build from the first course:
| Material | Best Use | Notes |
|---|---|---|
| Retaining wall blocks | Outer wall | Easy to stack, widely available, best with a metal ring |
| Fire bricks | Inner wall lining | Made for high heat, extends the life of the build significantly |
| Concrete pavers | Outer wall or seating area | Budget-friendly but needs liner protection from direct flame |
| Natural stone | Outer wall | Must be dense and dry. Never use river rocks or porous stones near a flame |
| Metal fire ring | Inner liner | Protects blocks, shapes the interior, and makes the build easier for beginners |
Use a metal liner whenever blocks, pavers, or stone sit near flame. It shields the wall, controls heat, and reduces the risk of cracks from repeated backyard fires over time.
| Caution: Never use river rocks, wet porous stones, or random landscaping rocks inside the fire area. These can absorb moisture and crack or shatter under heat, creating a safety risk. |
Fire Pit Maintenance Between Uses
Good fire pit maintenance helps your fire pit last longer and keeps each fire safer. After every use, let the ashes cool fully before removing them, then place them in a metal container.
Check the blocks for cracks, leaning, or shifting, and reset any pieces that have moved. Clear leaves, sticks, and debris from the pit before lighting the next fire, especially after wind or rain. Keep the gravel base open so water can drain rather than pool under the wall.
Use a waterproof cover when the pit is not in use to protect blocks, fire bricks, and adhesive from moisture. Replace cracked fire bricks or a warped metal ring as soon as you see damage, since broken inner parts push more heat toward the outer wall.
| Tip: Replace cracked fire bricks or a warped metal ring as soon as you notice them. Running a fire pit with damaged inner components increases heat stress on the outer block wall and shortens the overall lifespan of the build. |
Fire Pit Safety Rules That Always Apply
A fire pit needs careful use every time it is lit. Keep the area clear, watch the flame closely, and use safe fuel from start to finish:
- Keep water, sand, a hose, or a fire extinguisher close while the fire burns.
- Never leave the fire alone, even for a short break or quick indoor task.
- Burn only dry, seasoned wood, not treated lumber, trash, plastic, or yard waste.
- Skip fires on windy days, and keep kids and pets away from the wall.
- Let ashes cool fully, then store them in a metal container before disposal.
These simple rules lower the risk of burns, smoke problems, flying sparks, and hidden hot ashes. Check local fire rules too, since burn bans and distance rules can change by area.
Common Mistakes That Cause Problems
Small shortcuts can lead to cracked blocks, poor drainage, unsafe flames, or a crooked wall. Check these common mistakes before you dig, stack blocks, or light the first fire:
| Mistake | Why It Matters | Fix |
| Building too close to a fence or structure | Fire can spread | Check distance rules before choosing the spot |
| Skipping local fire rules | Fines or removal | Read local rules before buying materials |
| Using river rocks inside the pit | Rocks may crack under heat | Use fire-rated stone or lava rock |
| Skipping the gravel base | Water pools and the base shifts | Add compacted gravel before sand |
| Not leveling the first course | The wall may lean or move | Check every block with a level |
| Placing it on a wooden deck | High fire risk | Use only non-combustible surfaces |
Most fire pit problems stem from poor placement, inadequate base prep, or unsafe materials. Slow down early, check each layer, and use fire-safe parts to keep the build steady over time.
Frequently Asked Questions
Does a DIY fire pit need a permit in most areas?
Rules vary significantly by location. Many suburban areas and HOA communities require a fire pit permit or have setback requirements from property lines, structures, and trees. Some areas restrict fire pits entirely during dry seasons. Check with your local municipality or fire department before building rather than after the pit is finished.
What is the safest material to put in the bottom of a fire pit?
A compacted gravel base for drainage, topped with a thin sand layer and a shallow bed of lava rock or fire-rated stone inside the fire area, is the standard setup. Lava rock is porous enough to allow drainage and does not retain moisture the way river rocks and standard landscaping stones do, which makes it safer under repeated high-heat exposure.
Can a fire pit sit directly on grass or soil?
Placing a fire pit directly on grass poses a fire risk and will kill the grass beneath it through heat. Dry soil with no gravel base also shifts over time, leaving the wall unstable. A non-combustible base layer of compacted gravel or pavers is the minimum recommended surface for any permanent fire pit build.
How many blocks does a standard backyard fire pit require?
A basic round fire pit with an outer diameter of around 40 inches and three to four block courses typically uses between 30 and 50 standard retaining wall blocks, depending on block size and the exact diameter of the build. Buying 10 percent extra to account for cuts and rejects is standard practice for any masonry project.
What is the difference between a fire pit kit and a custom block build?
A fire pit kit includes pre-cut or shaped blocks designed to fit together in a specific pattern, which reduces measuring and layout time. A custom block build using standard retaining wall blocks gives more flexibility in size and shape. Kits cost more per unit but are faster to assemble. Custom builds are cheaper and more adaptable for irregular yard sizes.
Closing Thoughts
From my experience with first-time builds, the single most useful thing is committing to the gravel base and the metal fire ring before anything else. These two elements do more for the long-term stability and safety of the fire pit than any decorative upgrade.
A solid DIY fire pit does not need to be expensive or complicated to work well. Build the block wall level, install the ring correctly, and keep the seating area clear and non-combustible.
Once the basic structure is in place and you have used it for a few seasons, adding pavers, lighting, and a defined seating layout becomes a natural, much easier next step.
Start with the structure. Everything else follows from there. Drop a comment below and let me know if your fire pit turned out to be as good as you hoped.