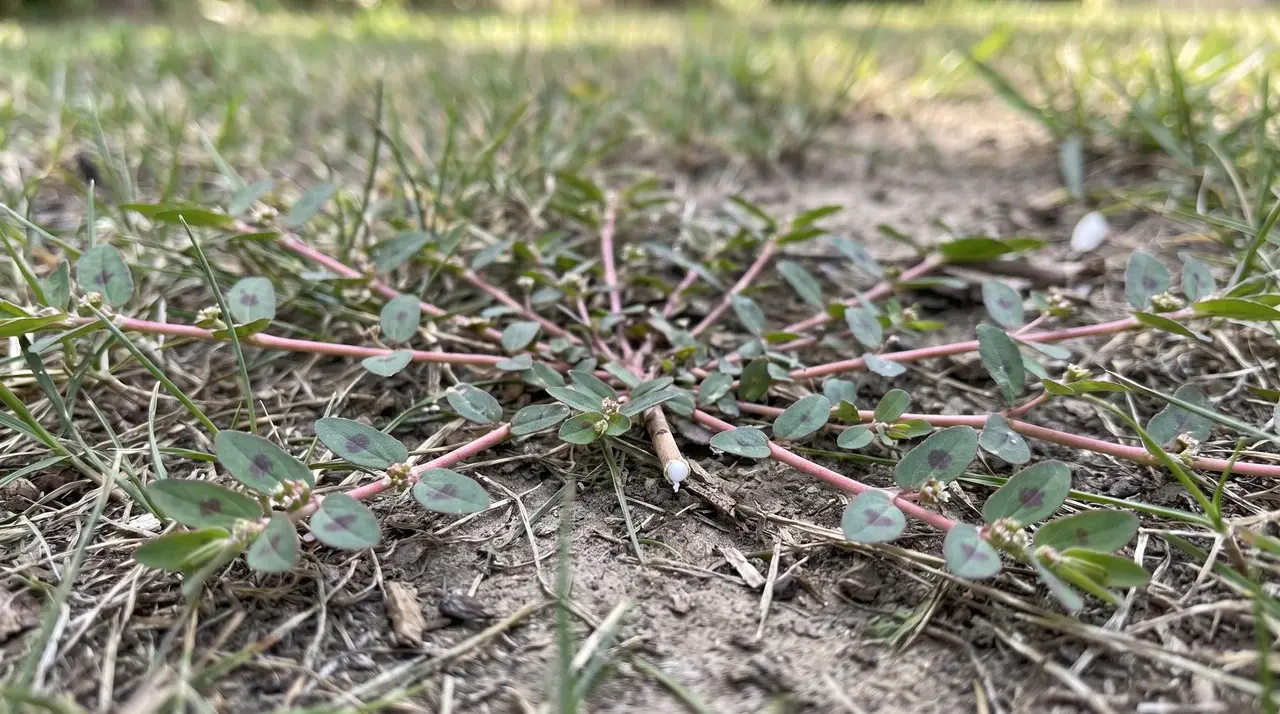
You’ve probably seen it: a low, spreading mat crowding out grass near a bed edge, gravel path, or crack in the pavement. That’s very likely spurge weed, a low mat-forming plant with spreading stems, small paired leaves, and tiny flowers. Break a stem and white, milky sap appears. That sap is the clearest sign.
Wear gloves first, since the sap can irritate skin. Pull young plants while the soil is moist, before they set seed. On lawns, use only a selective broadleaf product labeled for your grass type and spurge.
To stop it returning, patch bare spots, ease soil stress, and pull new plants early. Next, let’s confirm this really is spurge before you treat it.
A Closer Look at Spurge Weed
Spurge is a broadleaf plant from the Euphorbia group. The low, mat-forming lawn types, such as spotted and prostrate spurge, are summer annuals that die out each winter, while upright types like flowering spurge and cypress spurge are perennials that return from the same roots year after year. Most types grow close to the ground and spread outward into a dense mat, usually in hot, sunny areas where grass or other plants have thinned out.
Common locations include lawns, garden beds, gravel, driveways, sidewalk cracks, and disturbed soil. You can often spot it by these traits:
- Leaves: Small, oval leaves set opposite each other
- Stems: Reddish or pink stems that spread along the ground
- Flowers: Tiny flowers that are easy to miss
- Sap: White milky sap that appears when a stem breaks
The two common low-growing types found in lawns are spotted spurge and prostrate spurge. Spotted spurge has darker, more oblong leaves, often with a maroon mark near the center, and stems that spread from one central point, as detailed in the North Carolina Extension plant profile.
How to Identify Spurge Weed?
Identification comes before treatment because several low-growing weeds can look alike from a distance. Getting the ID right first saves you from using the wrong product or pulling a plant that wasn’t causing the problem at all.
Here is what to look for:
- Growth habit: Stems spread close to the ground and form a dense, flat mat.
- Leaves: Small oval leaves sit opposite each other along each stem.
- Stems: Often reddish or pink, with a fine, hairy texture.
- Sap: Broken stems release a white, milky sap right away.
- Flowers: Very small and easy to miss at a glance.
- Location: Thin lawns, bare soil, garden beds, gravel, and pavement cracks.
- Season: Most visible during warm summer growth periods.
Milky sap, opposite leaves, and a ground-hugging mat are the strongest quick signs of spurge, though upright species such as flowering spurge show narrower, more uniform leaves. Once you have confirmed those three traits, you are ready to move on to treatment.
Comparing Different Spurge Weed Types

Several plants are commonly mistaken for spurge, but a few key traits can help separate the main types and avoid confusion. Leaf shape, stem color, growth habit, and sap all shift slightly between types, so looking at each one closely makes identification much easier.
|
Type |
Growth Habit |
Leaves |
Sap and Flowers |
Quick Tell |
|
Spotted Spurge |
Flat, mat-forming, spreading close to the soil |
Oval to oblong, on reddish or maroon stems |
White milky sap, flowers too small to notice easily |
The most common lawn invader, forming a flat mat in thin turf and bare, sunny patches |
|
Prostrate Spurge |
Flat, spreading mat, similar to spotted spurge |
Rounder and smaller, on pink to reddish stems |
White milky sap, very small, inconspicuous flowers |
Checking leaf shape closely is the easiest way to tell it apart from spotted spurge |
|
Flowering Spurge |
More upright and slender, not a spreading mat |
Narrow and fairly uniform, on green to reddish stems |
White sap present, small, visible white flowers |
Its upright form alone sets it apart from the low, creeping spurge types |
|
Cypress Spurge |
Upright and bushy, unlike the low-growing types |
Thin and needle-like, on green to yellow-green stems |
White sap present, more visible yellow-green flowers |
The needle-like leaves are usually the fastest clue to spotting this one |
|
Knotweed (Lookalike) |
Low, spreading mat, similar in shape to true spurge |
Narrow and elongated, on green to reddish stems |
No milky sap, small, greenish flowers |
Breaking a stem and finding no sap confirms it isn’t spurge at all |
Spotted and prostrate spurge are the two most common lawn invaders, both forming low mats with milky sap. Knotweed is the easiest to rule out, since it never releases that sap when broken.
Cypress spurge behaves differently from the rest, since its spreading root system makes it a persistent perennial that the Wisconsin DNR lists as difficult to control by hand-pulling alone.
Suggested Methods for Getting Rid of Spurge Weed
Hand-pulling may not suit every location or infestation size. Some patches call for a different approach, so the list below breaks down which method fits which situation, from small garden beds to wide, weakened lawn areas.
- Many small seedlings in a garden bed: Use shallow hoeing to cut seedlings just below the surface without turning the soil deeply.
- Spurge growing in an established lawn: Apply a selective post-emergent treatment, spot-treating with a broadleaf product labeled for spurge and your grass type.
- Spurge returns in the same area each year: Apply a labeled pre-emergent treatment before the expected germination period to get ahead of new seedlings.
- Bare soil in beds: Add mulch over open soil after removing plants to reduce new seed germination.
- Spurge in pavement cracks or gravel: Pull it carefully by hand or use a product approved for that surface.
- Wide patches across weak turf: Use combined control, treating active plants, then repairing thin grass and compacted soil.
Post-emergent products target plants that are already growing, while pre-emergent products reduce seed germination but do not kill mature plants. Product labels must list both spurge and the intended lawn or surface, and newly seeded grass may be sensitive to some treatments.
The EPA’s guidance on reading pesticide labels is a useful reference before buying any product, since the label spells out exactly where and how it can legally be used.
How to Get Rid of Spurge Weed by Hand
Hand-pulling is the most commonly suggested method for young plants and small patches. It works best before the plant flowers or sets seed, and it becomes far less practical once large mats have spread across several lawn areas.
Step 1: Put On Gloves and Confirm the Plant

Wear garden gloves before touching the stems or leaves, since the sap can irritate skin on contact. Check for flat, spreading stems, small opposite leaves, white milky sap, and one clear central growth point before you start pulling.
Keep the sap away from your skin, eyes, and mouth, and keep children and pets away from the area while you work.
Step 2: Moisten the Soil Before Pulling

Water the area lightly before pulling, or work right after rainfall, since moist soil helps the root come out cleanly without breaking.
Avoid soaking the ground until it turns muddy, as that only makes the job messier without any real benefit. Skip deep raking too, since disturbed soil can bring buried seed closer to the surface.
Step 3: Find and Hold the Central Stem

Trace the spreading stems back to the point where they all meet the soil, rather than grabbing at the outer branches first. Hold the plant firmly close to this central growth point before applying any pressure.
Pulling from the outer branches instead can cause them to break away, leaving the central stem or part of the root behind in the soil.
Step 4: Pull Upward and Remove the Root

Pull upward with slow, steady pressure, aiming to remove the full spreading mat, the central stem, the main root, and any loose plant pieces around it.
Avoid shaking a mature plant over the soil, since flowers or seed capsules may already be forming on it. If the root breaks off partway through, loosen the soil gently around it and remove whatever section is left behind.
Step 5: Bag the Plant and Recheck the Area

Place the removed plant in a yard waste bag right away, especially if it already shows flowers or seed. Do not leave mature spurge sitting on open soil, since it can still drop seed even after being pulled.
Check the area every few days afterward, pull new seedlings while they are still small, and cover the bare soil once removal is done. A simple batch of homemade mulch works well here and costs less than a bagged product.
Hand-pulling works best when plants are young, the soil is moist, and the full root comes out before seed forms.
How to Keep Spurge From Returning
Keeping spurge away means closing bare spaces, removing seedlings early, and supporting thick grass, since a lawn on a steady fertilizer schedule is much harder for spurge to invade. Regular checks, careful lawn care, mulch, clean tools, and correctly timed seed prevention can all reduce the chance of another outbreak.
- Check and remove new growth: Inspect driveway edges, pavement cracks, gravel paths, bed borders, and thin lawn patches often, pulling young seedlings before they spread.
- Strengthen and repair the lawn: Mow at the right height, water deeply when needed, feed the grass, and patch bare or thin spots.
- Cover exposed soil: Add mulch after removing plants from garden beds, or fill space with desired groundcover plants.
- Limit seed spread and prevent germination: Clean mower wheels and tools after working near mature plants, and apply a labeled pre-emergent product before germination season in areas with yearly outbreaks.
Prevention works best when you remove new plants early, protect bare soil, and maintain healthy grass throughout the growing season.
Why Spurge Keeps Coming Back Anyway

Removing the visible plants does not always remove the seed already sitting in the soil. Several habits and conditions let spurge return year after year, even after a thorough cleanup.
A single mature plant can leave thousands of seeds behind, and a new plant may begin producing its own seed within about five weeks of sprouting, so waiting for a wide mat only gives it more time to spread.
Some seeds stay in the soil for several years, sitting through winter before sprouting when warm weather returns. Digging and deep raking can move buried seed closer to sunlight and moisture, so shallow soil work works better around young seedlings.
Since spurge grows close to the ground, mower blades often pass right over it, and mower wheels or cutting decks can even carry seed to new spots. Thin or stressed grass, compacted soil, and sunny pavement edges all give new seedlings room to take hold.
Common Spurge Removal Mistakes
Even careful gardeners run into a few recurring mistakes with spurge. Knowing these ahead of time can save you a repeat removal job later in the season, especially once plants start spreading across a larger area of the lawn.
|
Mistake |
Why It’s a Problem |
|---|---|
|
Pulling only the outer stems |
May leave the central root in the soil |
|
Removing plants from dry, hard ground |
The root is more likely to break |
|
Deeply raking the bed |
May bring buried seed upward |
|
Leaving mature plants on the soil |
Seed may remain in the area |
|
Relying on mowing |
The flat stems may stay below the mower blade |
|
Using the wrong lawn treatment |
Some grass types are sensitive to certain products |
|
Treating newly seeded grass |
Some products may harm new turf or stop seed germination |
|
Waiting too long |
Mature plants may produce thousands of seeds |
|
Using one feature for identification |
Leaf marks and colors can vary |
Confirm the plant, remove it early, and avoid disturbing more soil than needed. These small habits, done consistently, make repeat removal jobs far less likely as the season goes on.
Safety Notes
Spurge is usually manageable, but its sap and seed can cause problems when the plant is handled carelessly. A few simple precautions keep removal safe for you, your family, and any pets nearby.
- Wear gloves: The white sap may irritate the skin.
- Protect the eyes: Do not touch your face while removing the plant.
- Wash after contact: Rinse exposed skin and clean tools after use.
- Protect children and pets: Keep them away from fresh sap and treated areas.
- Read product labels: Confirm the treatment is approved for your grass or surface.
- Avoid spray drift: Keep lawn and bed treatments away from wanted plants.
The milky sap is a known skin irritant, so wearing gloves is a worthwhile precaution.
Frequently Asked Questions
Are spotted spurge and prostrate spurge the same plant?
They are closely related, and some botanical sources treat them differently. Since their appearance overlaps so much, it is best to check leaf shape, center marks, stems, sap, and growth form together rather than relying on any single trait alone.
What do spurge flowers look like?
Spurge flowers are very small and easy to miss. They tend to appear near the leaf joints and later form the seed capsules that keep the plant spreading across lawns, beds, and pavement cracks each season.
Can spurge grow in pavement cracks?
Yes. It often grows in pavement cracks, gravel, driveway edges, and other hot, dry spots where few wanted plants can compete, and once established there, it can be tough to remove without repeat treatment.
Can spurge seeds spread on mower wheels?
Sticky seed can move on footwear, tools, animal fur, and mower wheels. Cleaning your equipment after working near mature plants can help reduce how far seed travels between different parts of your yard each time you mow.
Can spurge grow back after hand-pulling?
Yes, if part of the root stays in the soil, or if fresh seedlings sprout from seed that was already sitting in the ground nearby. Checking the area again a few days later helps you catch either case early.
Wrapping Up
Spurge weed is easy to confirm once you know what to check for: a low, spreading mat, opposite leaves, reddish stems, and white milky sap. Comparing a few traits together, rather than relying on just one, helps you rule out lookalikes before you treat it.
For small patches, hand-pull young plants from moist soil, making sure the full root comes out. For larger or repeat infestations, another labeled method works better. Either way, act before seed forms, and repair thin grass or bare soil afterward to close the gaps that spurge likes to fill.
Early removal keeps things simple. The sooner you act, the less seed gets left behind to sprout again. Take a few minutes this week to walk your lawn and beds, and pull any new growth you spot before it has room to spread.
Please drop a comment below and let me know if you successfully removed your spurge weed.