Building a sliding barn door sounds like one of those projects that look tougher than they really are, but once you break it down, it stays pretty manageable.
I’ve worked on enough home builds to know that the real challenge isn’t the door itself. It’s knowing what to sort out before you even pick up a saw.
That’s where this guide helps. You’ll learn how to plan the build, pick the right materials, figure out the style, and follow a step-by-step path that keeps things steady from start to finish.
It all starts with a few simple details that make the whole project smoother.
Key Details to Sort Out Before Your Barn Door Project
You want to get this thing right from the start, because a barn door isn’t one of those projects you knock together without thinking.
I’ve seen people jump in fast, then hit some wall later because they didn’t slow down for a minute and figure out what they actually needed.
Is It Cheaper to Build or Buy a Barn Door?
A lot of people start here, and I get why. Money changes the whole vibe of a project. I’ve looked at store-bought barn doors, and some of those price tags feel like a joke. Making your own can save a bunch, but it depends on the route you take.
Here’s a simple breakdown so you can see the difference:
DIY Cost Range
- Low budget: around $60 to $120
- Mid budget: around $150 to $300
- Premium build: around $350 to $600
This depends on the wood, the hardware, and whether you already have the tools.
Pre-Made Store-Bought Doors
- Basic models: around $300 to $700
- Higher-end doors: $800 to $1,500
- Custom builds: easily over $2,000
Most people save money with DIY. Even the nicer builds usually end up cheaper than a store-bought version. And you get something solid, not a hollow door pretending to look rustic.
Best Wood Types for Barn Doors
This part matters more than people expect. The wood changes the look, the weight, and how long the door holds up. I’ve messed around with a few of these in the past, and each one has its own personality.
| Wood Type | Pros | Cons | Cost | Durability | Notes |
|---|---|---|---|---|---|
| Pine | light, easy to cut, budget-friendly | dents fast, softer feel | low | fair | good for beginners or simple builds |
| Cedar | stable, smells great, handles moisture well | more expensive | medium | strong | stays straight over time |
| Oak | strong, heavy, classic look | pricey, harder to work with | high | very strong | great long-term choice if weight is fine |
| Plywood | cheap, stable, smooth | less natural grain depth | low | good | nice for modern styles and avoids warping |
Recommended Thickness: one to one and a half inches keeps the door strong while still easy to move.
Choose Your Door Style
You’ve got a few solid options here. I’ve seen all of these used in homes, and each one fits a different vibe and skill level. Pick the one that matches what you want and what you’re comfortable building.
- Rustic X-Style: This one gives you crossed front boards and that steady farmhouse feel. It looks solid on the wall and needs clean angles, so the skill level sits around medium.
- Modern Flat Panel: This style stays smooth and simple with clean lines. It’s the easiest build because there’s no pattern work, and it works well with plywood or solid boards.
- Shiplap: This look uses tight horizontal boards that sit in a clear rhythm. It’s easy to put together, feels steady in any room, and keeps a relaxed but clean visual style.
- Glass Insert: This design uses a wood frame with a supported glass center. It’s a little trickier than the others, but it adds light and keeps darker rooms feeling more open.
Match the style with your skill level. If you’ve never built a door before, the flat panel or shiplap options keep things steady and simple. If you’re comfortable cutting angles and taking your time, the X-style or glass insert will feel more rewarding.
DIY Sliding Barn Door Guide for Beginners
Building a sliding barn door looks tough, but once you break it into clear steps, it stays pretty manageable. This guide walks you through it all:
Tools and Materials You’ll Need
- Circular saw
- Table saw
- Drill
- Brad nailer
- Sander and sandpaper
- Construction adhesive
- Plywood sheet
- Fence pickets or boards
- Screws and brad nails
- 3/16-inch steel flat bar
- Metal cutting tool (cut-off saw or reciprocating saw)
- Angle grinder
- Spray sealer for wood
- Spray sealer for metal
- Bolts, washers, and nuts for the hardware
- Handle hardware
- Metal rail and spacers
- Level
- Stud finder
Step 1: Measure the Opening and Cut the Main Panel
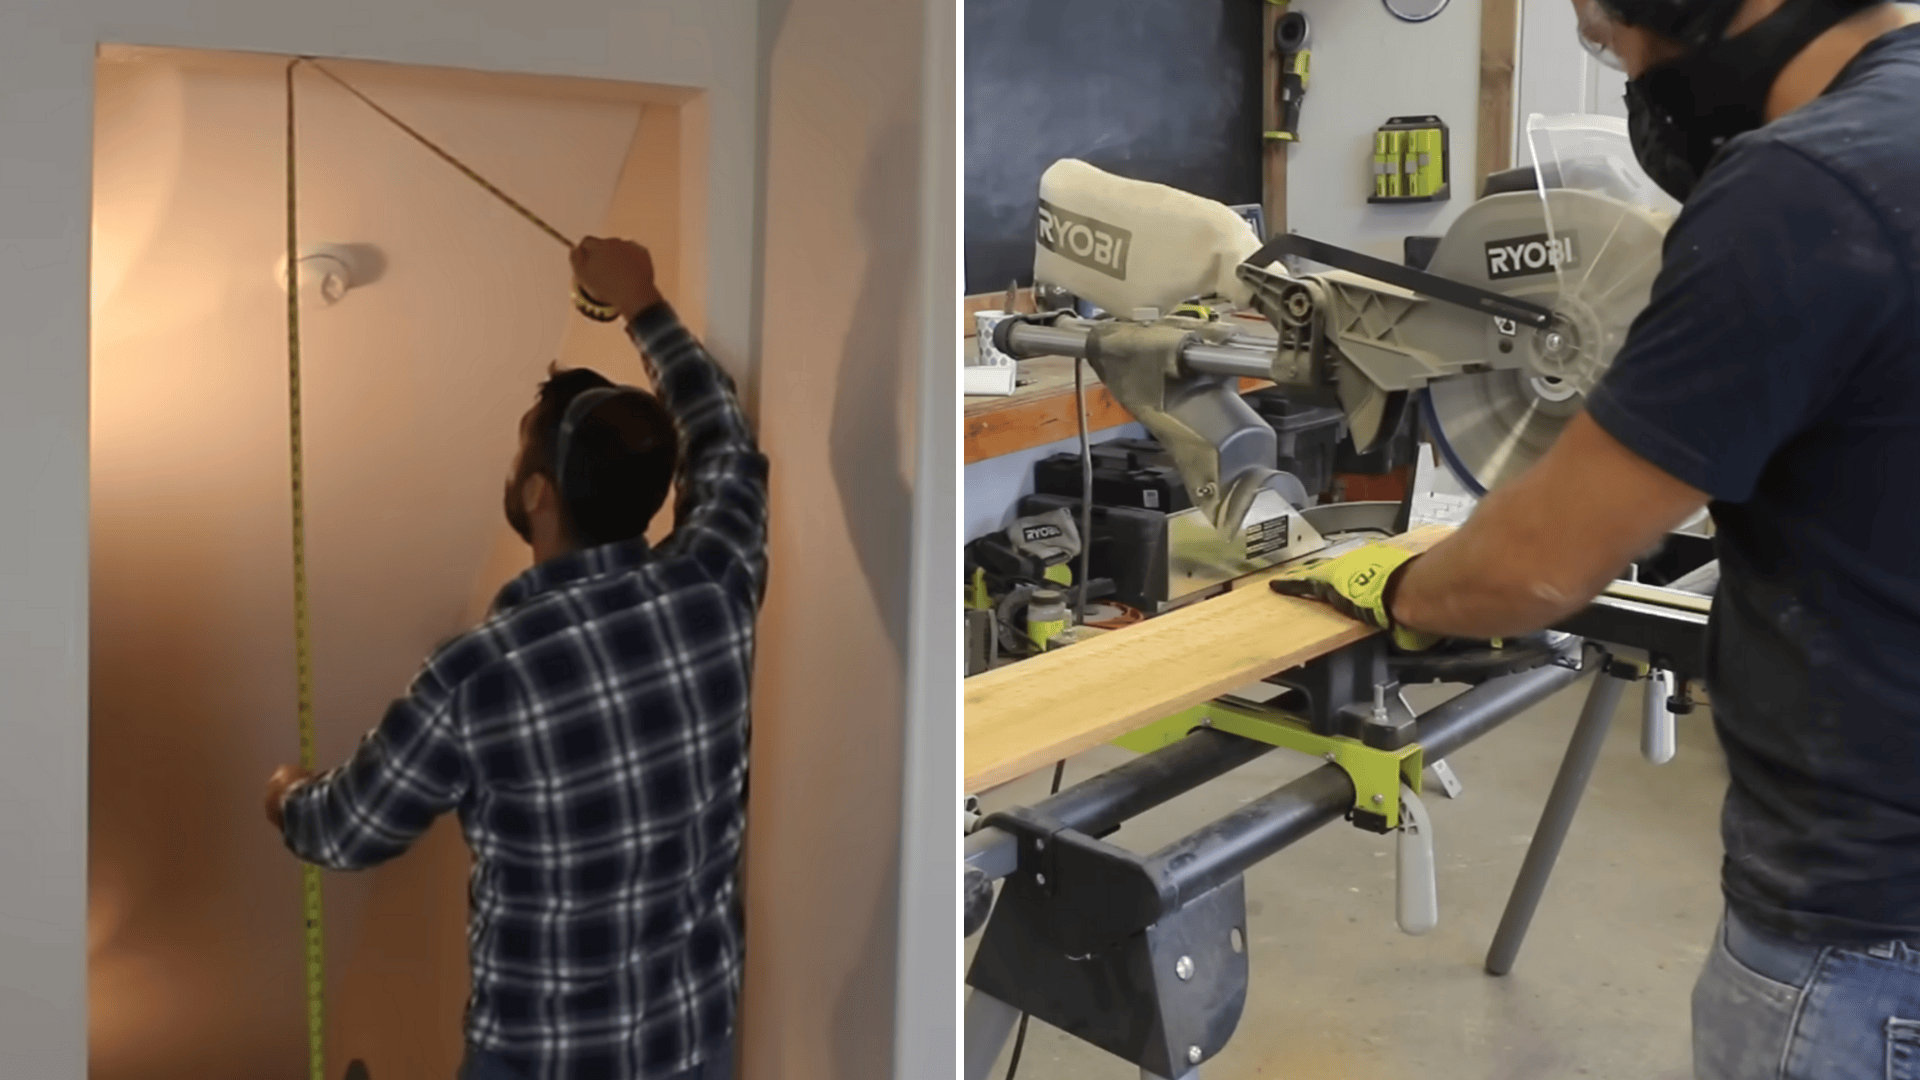
Start by measuring the height and width of your doorway. Make the door four inches wider and two inches taller so it covers the edges cleanly. Transfer those numbers to a sheet of plywood.
If you plan to wrap the door with metal trim, subtract a small amount from both measurements so the metal sits flush later. Use a circular saw to cut the plywood. A straight edge is helpful, but a steady hand works fine if you follow your line.
Step 2: Cut and Attach the Boards
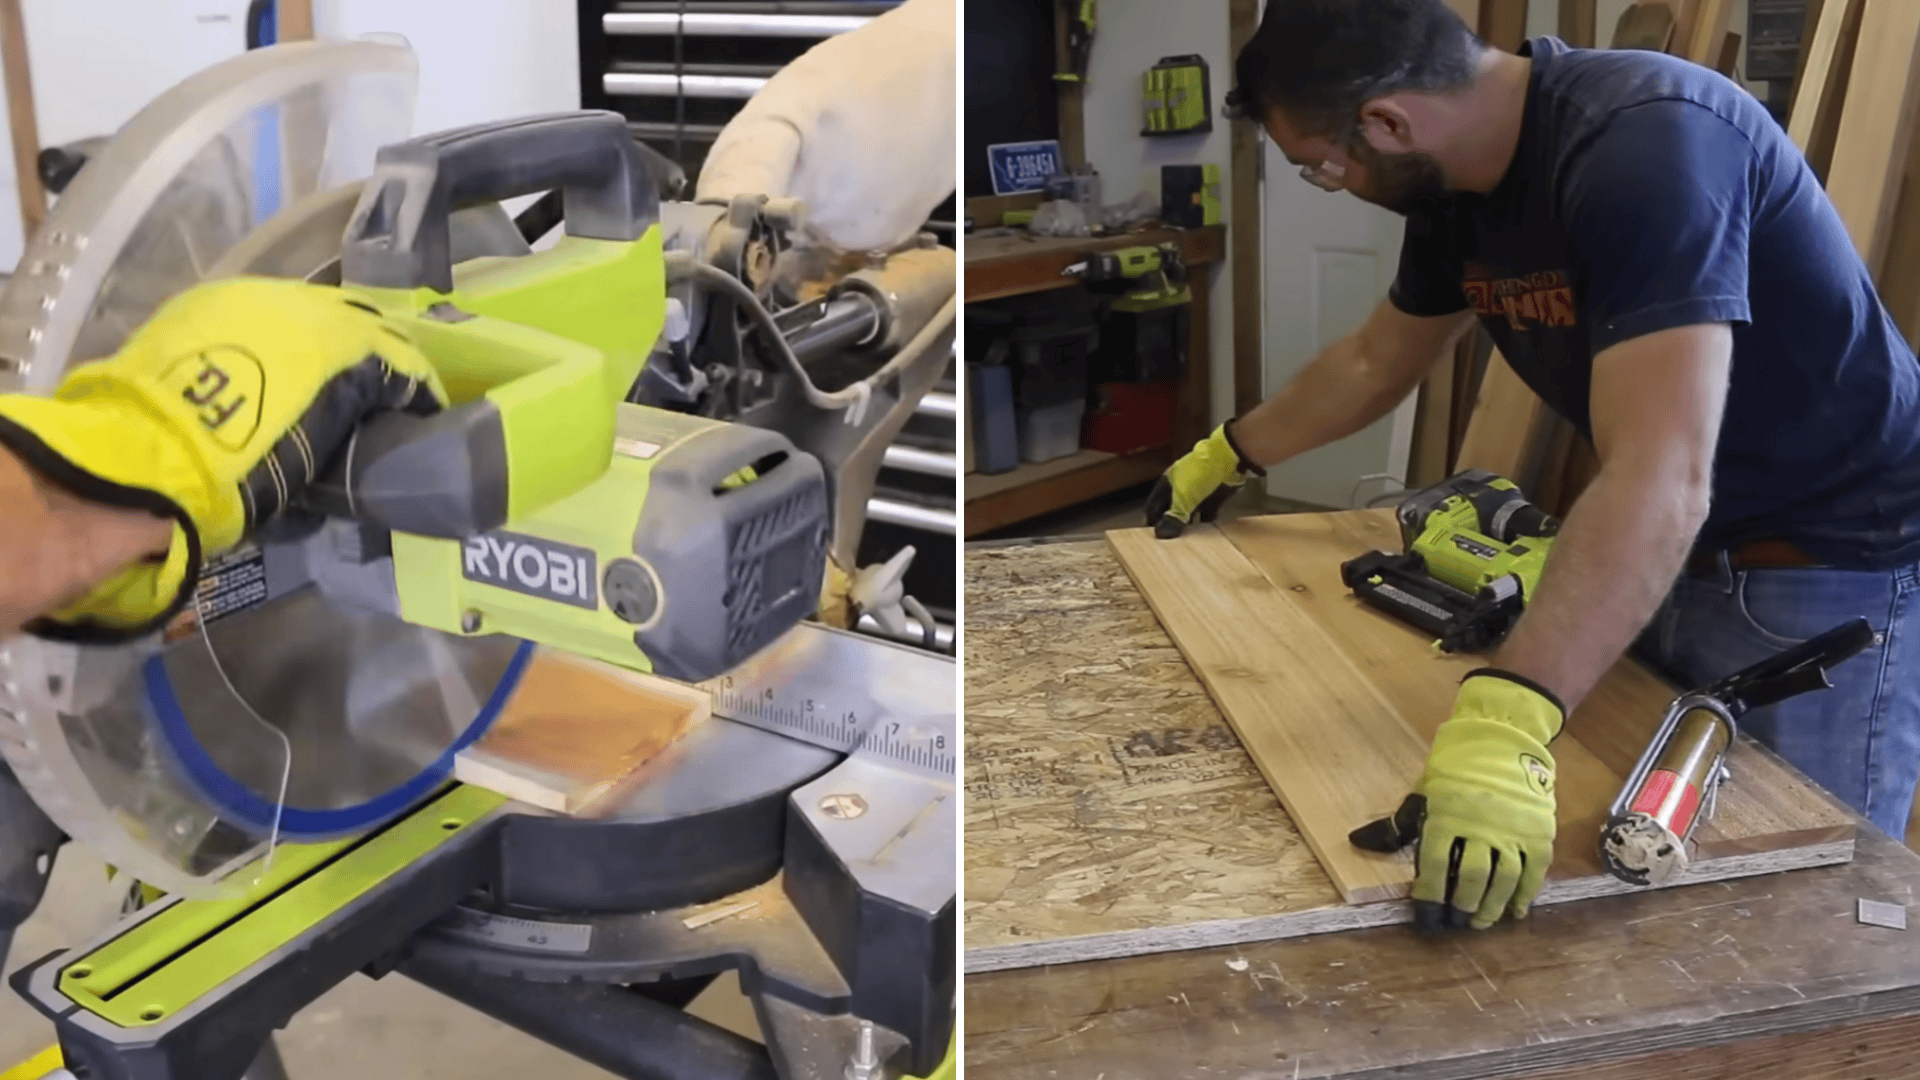
Cut your pickets or boards to length. Let them dry so they don’t shrink or leave gaps later. Rip the end boards if you need to adjust the width.
Lay everything out on the plywood so you can see the pattern before attaching anything. Run construction adhesive on the plywood and press each board into place.
Use brad nails to secure the boards, working from one edge to the other. Flip the door and repeat on the other side. Fit the last board by ripping it down so everything stays tight.
Step 3: Sand, Seal, and Clean Up the Door
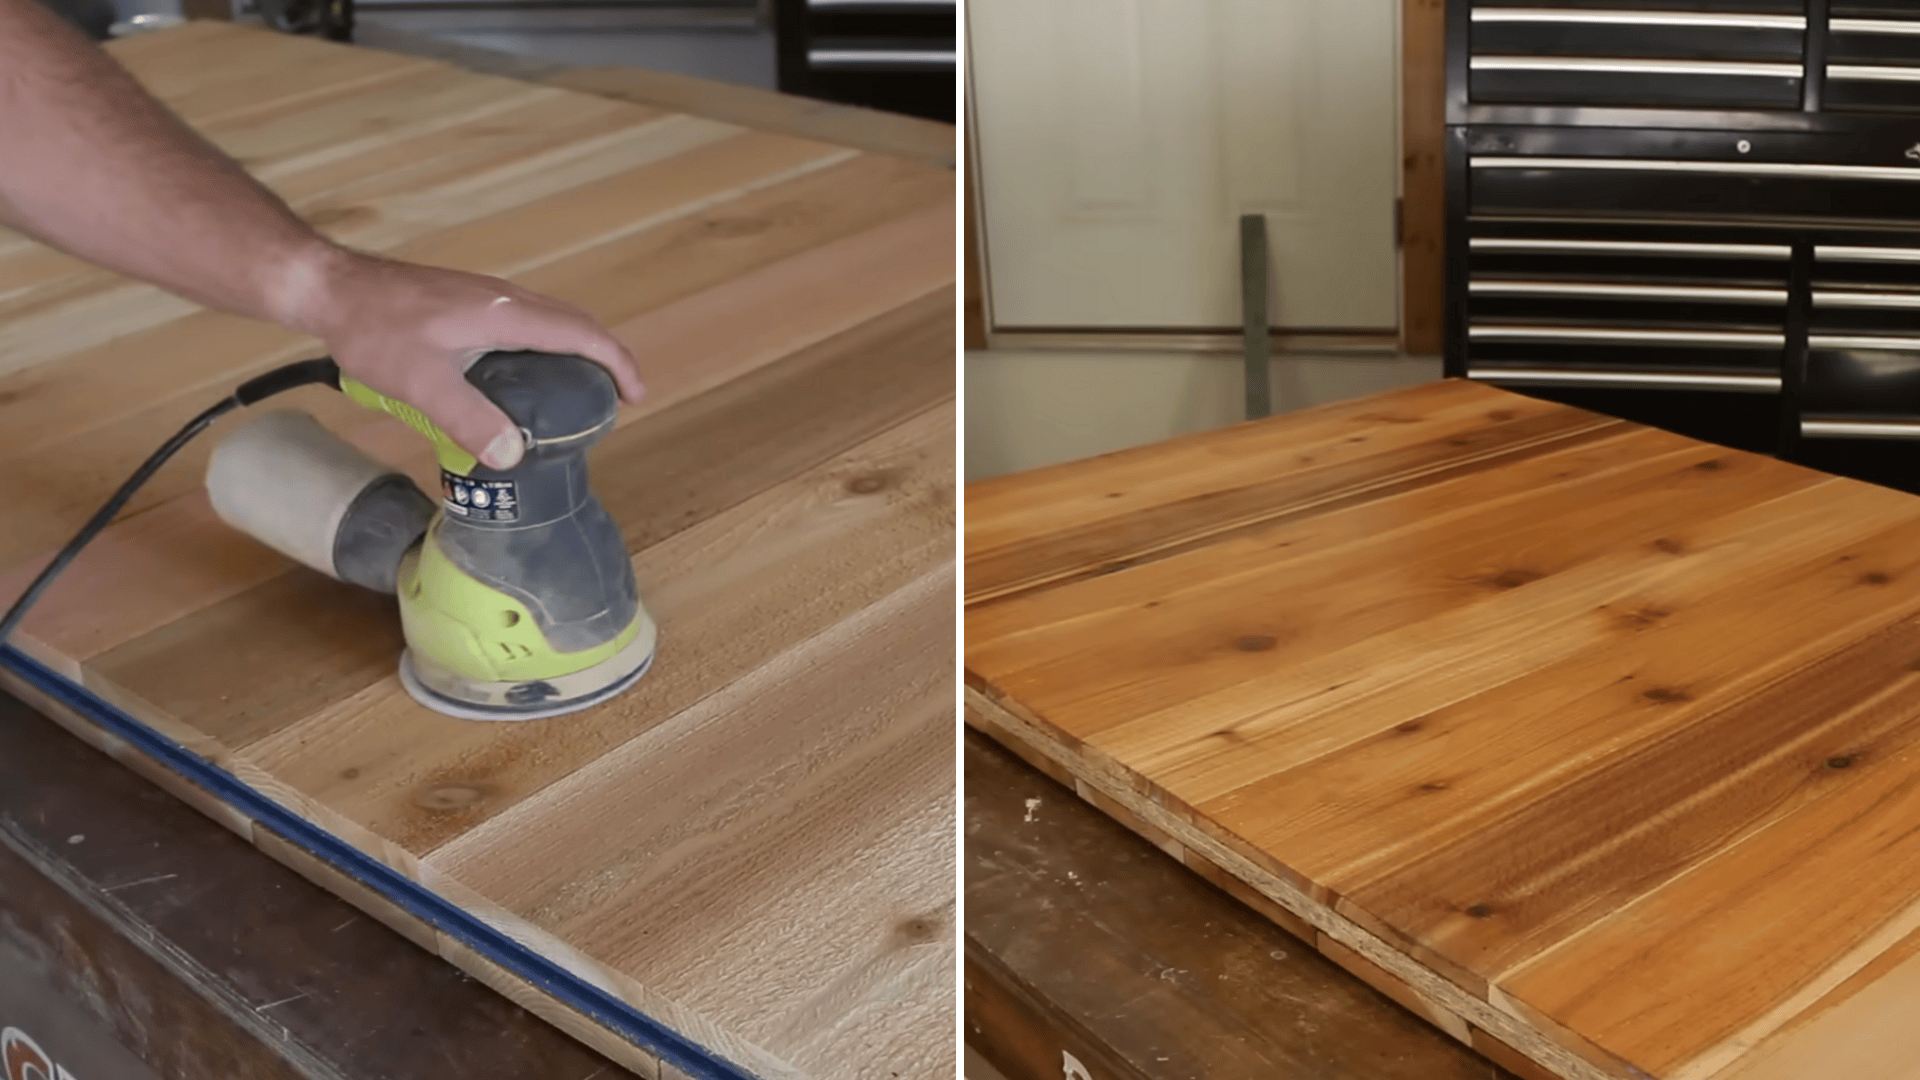
Fence boards are rough, so sand them with 120 grit to smooth the surface without losing the texture. Sand the edges of the door to clean them up.
Brush off the dust and apply a clear sealer or whatever finish you like. Let it dry, flip the door, and seal the other side. When everything dries, come back with fine sandpaper to calm any raised grain from the finish.
Step 4: Cut, Drill, and Mount the Metal Trim
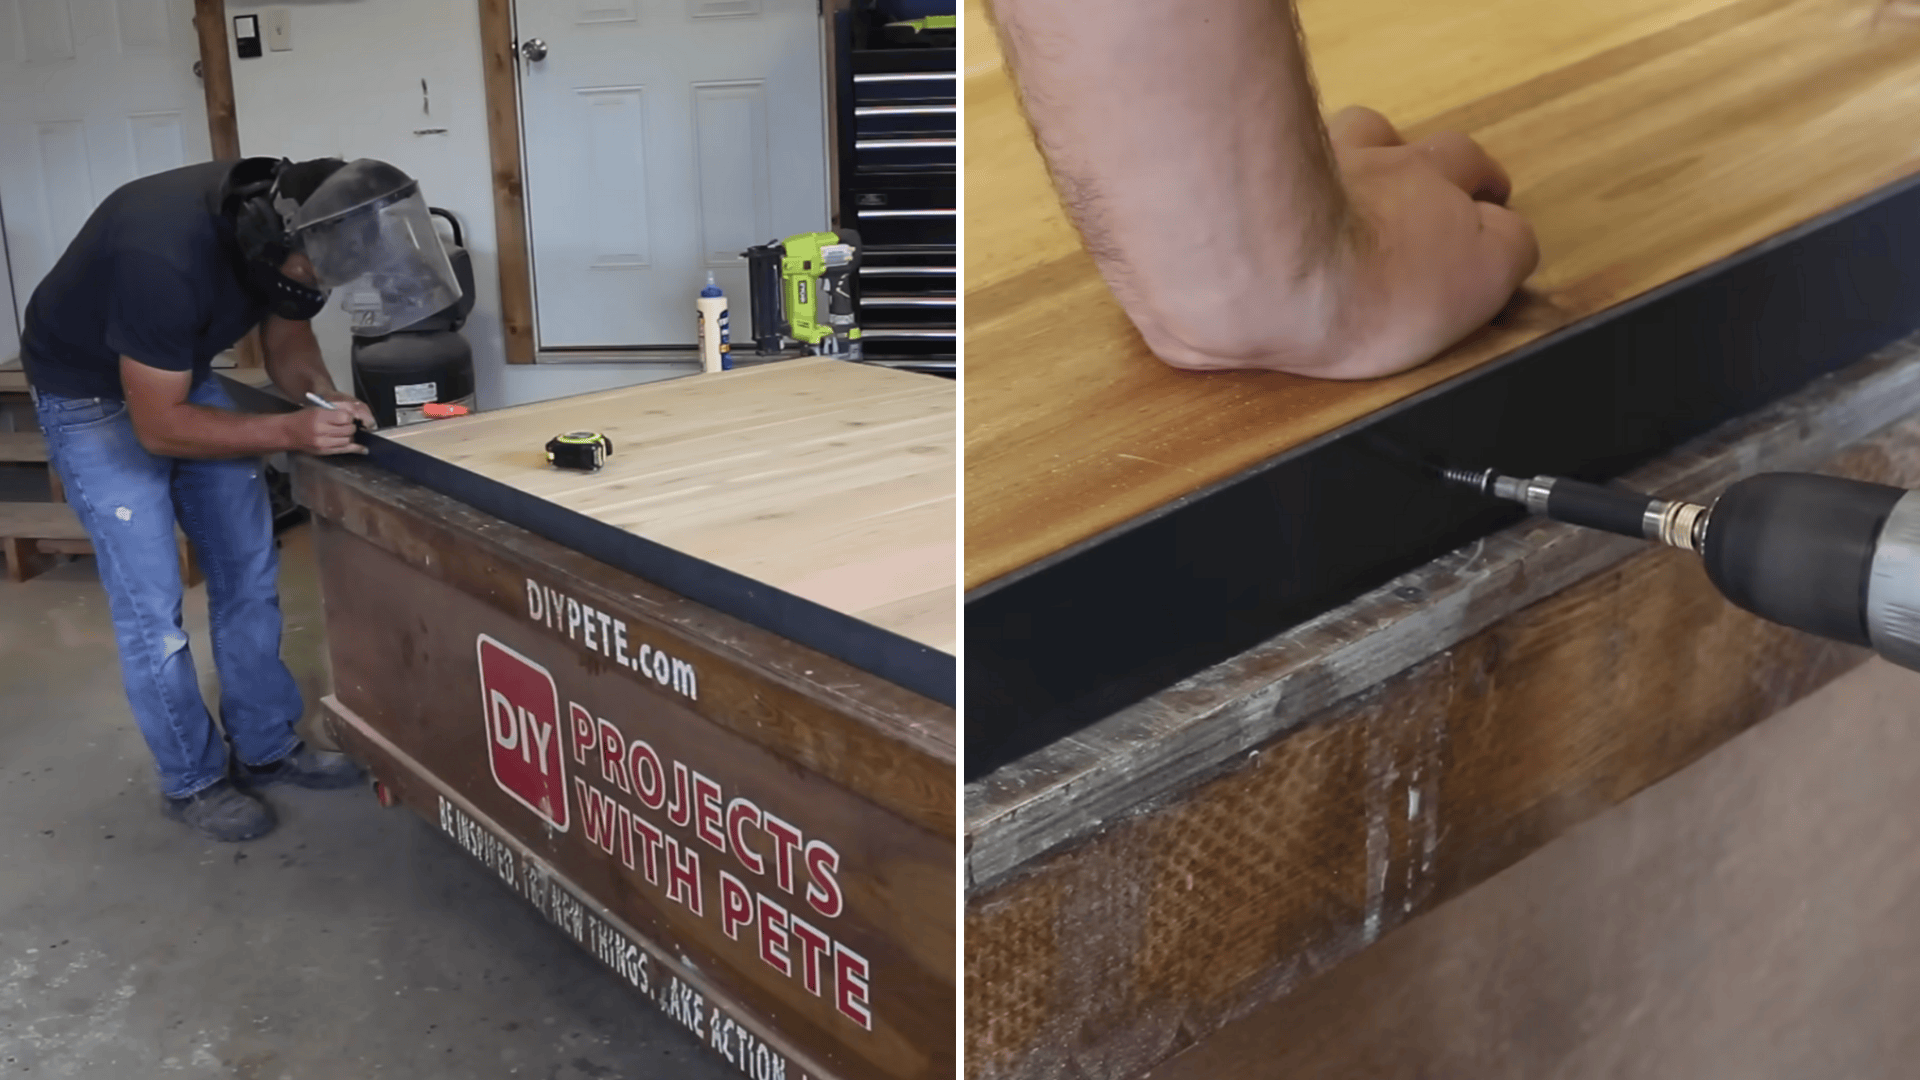
Lay metal flat bar around the edges of the door to figure out the lengths you need. Cut four pieces: two long verticals and two shorter horizontal pieces.
Clean the cuts with a grinder. Mark every spot where a screw will go. Drill all the holes with a drill press if you have one. A standard drill works too; it just takes longer.
Coat the metal with a clear sealer, and spray your screws so the colors match. Add construction adhesive to the back of each metal piece, line it up on the door, pre-drill into the wood, and attach it with screws. Work your way around until all four edges are wrapped.
Step 5: Build the Hardware and Install the Rail
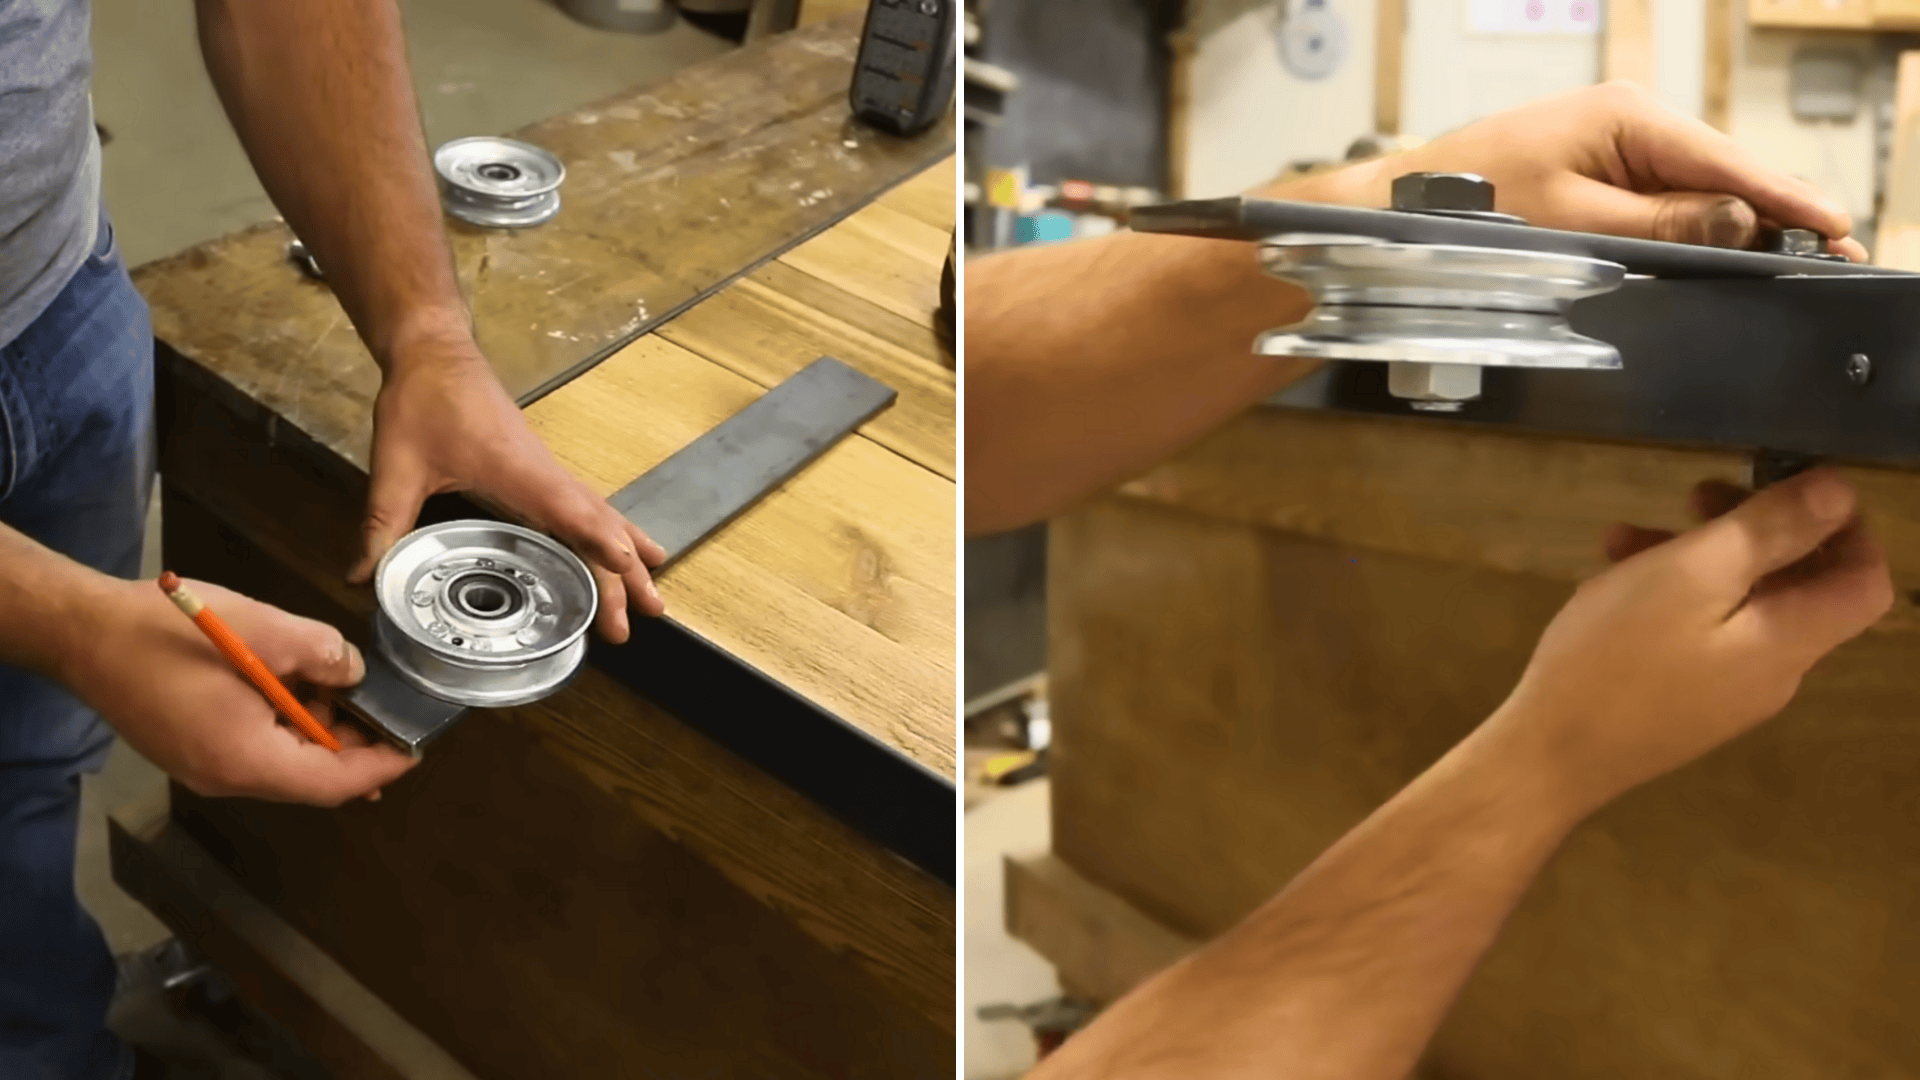
Cut two metal hangers to length. Drill the mounting holes for the bolts that hold the hardware to the door and the larger hole for the wheel. Paint the bolts, washers, and nuts.
Attach the hardware to the door with bolts, washers, and nuts so everything sits tight. Bring the door inside and figure out the rail height. Use a scrap board under the door to hold the door at the right height while you mark the wall.
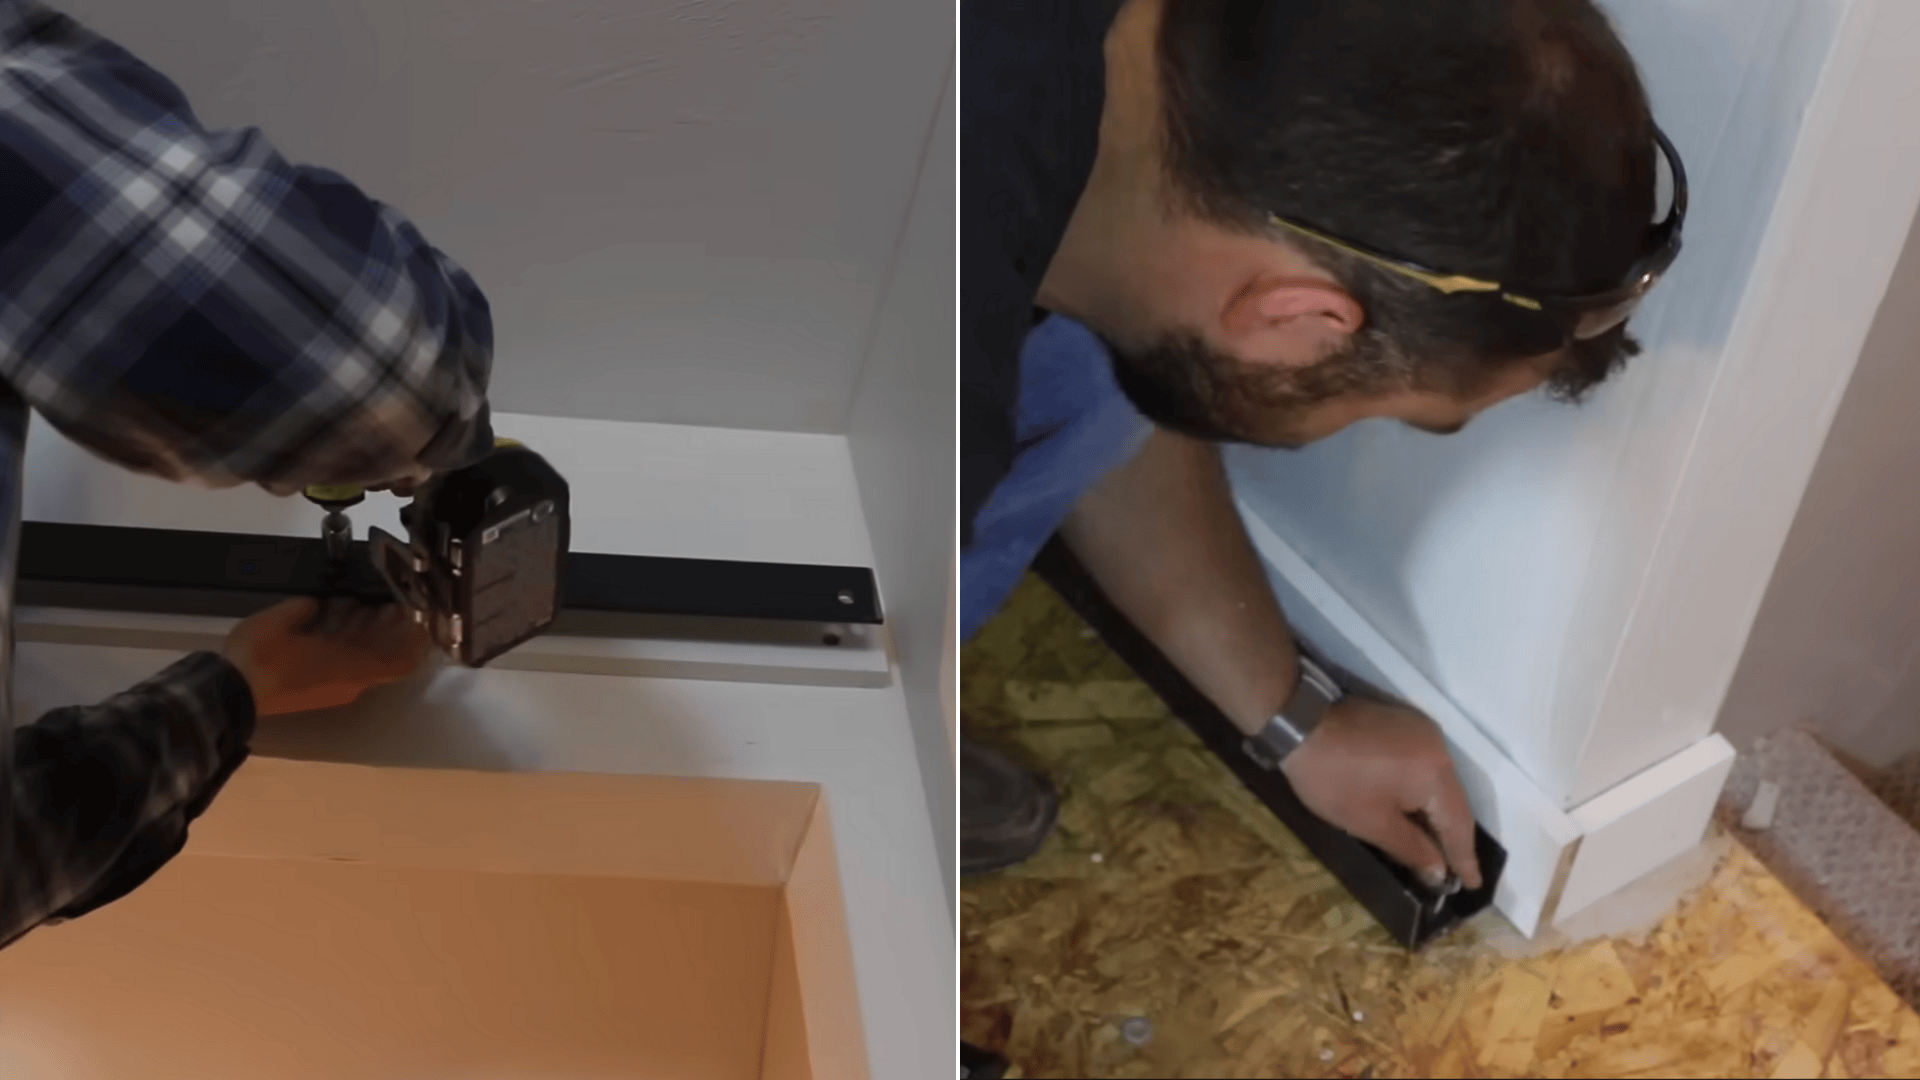
Install a spacer board across the studs so the door clears the wall. Drill pilot holes through the spacer board and secure the rail with lag bolts and wood spacers. Make sure every lag bolt goes into a stud so the rail can handle the weight.
Step 6: Hang the Door, Add Stops, and Set the Floor Guide
Lift the door and set the wheels on the rail. Roll it side to side to check for smooth movement. If the wheels rub, adjust the spacers until it glides.
Make two stops from angle iron and attach them to the rail so the door doesn’t roll off the ends. Add a floor guide or channel under the door to keep the bottom steady.
If your door needs to move farther because of switches or trim, make the channel longer. Finish by installing a handle on the front and a recessed pull on the back side.
If you want to see the whole build in action, here’s the video that walks through every step:
Common Sliding Barn Door Problems and Fixes
| Problem | Why It Happens | How to Fix It |
|---|---|---|
| Door wobbles while sliding | Bottom guide is too loose or too short | Tighten or replace the floor guide. Make sure it fits the door width and extends far enough for the full slide. |
| Door scrapes the wall | Rail spacers are not giving enough clearance | Add thicker spacers behind the rail. Check that the spacer board sits straight and the rail is not pulled inward by bolts. |
| Door drags instead of sliding | Wheels or rail are not level or hardware is too tight | Level the rail, adjust the wheel alignment, rotate spacers, and loosen the wheel bolts slightly so they spin freely. |
| Gap between door and wall | Spacer setup is too shallow or the wall has trim that pushes the door out | Increase spacer depth and recheck alignment. If the gap is uneven, level the rail again. |
| Door rolls too far to one side | Stops are not set in the right place | Slide the door to the limit you want, move the stop to match, and tighten the bolt. |
| Noisy sliding or metal sounds | Tight bolts, rough rail edges, or wheels rubbing hardware | Loosen wheel bolts slightly, add a washer if needed, smooth rough rail edges, and make sure only the wheels touch the rail. |
Once you dial in these simple fixes, the door runs smooth and stays that way.
Finishing Options for Your Sliding Barn Door
Finishing the door is where the look finally comes together, and each option gives the door its own feel. Here are the choices that work well and stay easy to apply:
- Paint: Good for a smooth, modern look. Covers flaws and keeps the color even. Works best with primer and two steady coats.
- Stain: Lets the wood grain show. Easy to apply and gives a warm, natural feel. Add a clear coat to protect it.
- Rustic Finish: Light sanding and a wire brush bring out texture. A warm stain keeps the door looking aged and settled.
- Clear Sealer: Keeps the wood close to its natural tone. Good when you want a clean look without changing the color.
- Matte or Satin Topcoat: Protects the surface and keeps the finish calm. Helps the door stay smooth without looking shiny.
- Warp Control: Seal both sides, let boards dry before use, and keep the door out of heavy humidity to stop movement.
Pick the finish that fits your space and your style, and the door will settle in like it was always meant to be there.
Barn Door Alternatives for Small Spaces
Some rooms just do not play nice with a full sliding barn door. Tight corners, switches, or short walls can get in the way. When that happens, these options still give you a clean look without needing the extra space a barn door usually needs.
1. Bi-fold Barn Doors
These fold in the center and take up less wall space. They work well in closets, pantries, and areas where a full slide is not possible. You still get the barn door look without the long travel path.
2. Bypass Sliding Doors
These are two doors that slide in front of each other. Good for narrow rooms or spots where the wall space is limited. They stay smooth and feel steady even when the space is tight.
3. Pocket Door Options
A pocket door slides inside the wall and stays completely out of the way. It takes more planning to install, but it saves the most space. Works well in bathrooms, offices, and hallways where every inch matters.
Wrapping Up
A DIY sliding barn door brings a strong mix of function and style, and once you understand the steps, the whole build feels a lot more approachable.
The biggest wins come from simple planning, the right materials, a clean layout, and steady hardware work.
When you dial in those pieces, the rest comes together fast, even if it’s your first time taking on a project like this.
If you’re ready to start your own build, use this guide as your base and take it one clear step at a time.
For simpler builds and home ideas, make sure to read other blogs on the website and keep your momentum going.