Ever noticed your water heater working overtime or strange noises coming from the tank? That’s sediment talking.
Flushing your water heater is like giving it a spa day, clearing away mineral buildup and gunk that accumulates over time.
This simple maintenance ritual keeps your heater running efficiently, extends its lifespan, and ensures you’re getting the hot water you deserve without unnecessary energy waste.
If you’re a hands-on homeowner or simply love maintaining a happy home, this guide will walk you through everything you need to know about refreshing your water heater.
Let’s get started on making your home systems sparkle and keeping that hot water flowing beautifully.
Why You Should Flush Your Water Heater?
Your water heater collects sediment and mineral deposits at the bottom of the tank over time, creating a barrier between the heating element and the water.
This forces your system to work harder, driving up energy bills and causing those unsettling rumbling or popping sounds.
Regular flushing keeps everything running smoothly and prevents premature wear.
Signs it’s time to flush:
- Rusty or discolored hot water flowing from your taps
- Rumbling or popping noises coming from the tank
- Inconsistent hot water temperatures throughout your home
Most heaters benefit from an annual flush, but if you live in a hard-water area, consider flushing every 6 months to stay ahead of mineral buildup.
Tools & Safety Equipment You’ll Need to Flush a Water Heater
Before you begin, gather everything you need to make the flushing process smooth and safe. Having the right tools on hand means you won’t have to pause midway through the job.
| Tool/Equipment | Purpose |
|---|---|
| Garden hose | Must reach from tank to drain location; check for kinks that reduce flow |
| Safety gloves and goggles | Water temperature often exceeds 120°F; sediment can spray during initial discharge |
| Bucket or drain pan | First few gallons reveal sediment severity; helps diagnose if a full flush is needed |
| Flathead screwdriver | Older drain valves may be corroded or stiff; also useful for prying stuck components |
| Pump or extension hose (optional) | Basement installations or uphill drainage require assistance; gravity alone won’t work |
Safety Tip: Turn off the power supply first and let the water cool slightly if possible. Sediment tends to settle at the bottom where the drain valve sits, so expect the dirtiest water in the first discharge.
Step-by-Step Guide to Flushing a Water Heater
Follow these steps carefully to safely drain sediment from your water heater and restore its efficiency. This process typically takes about an hour from start to finish.
Step 1: Turn Off the Heat Source
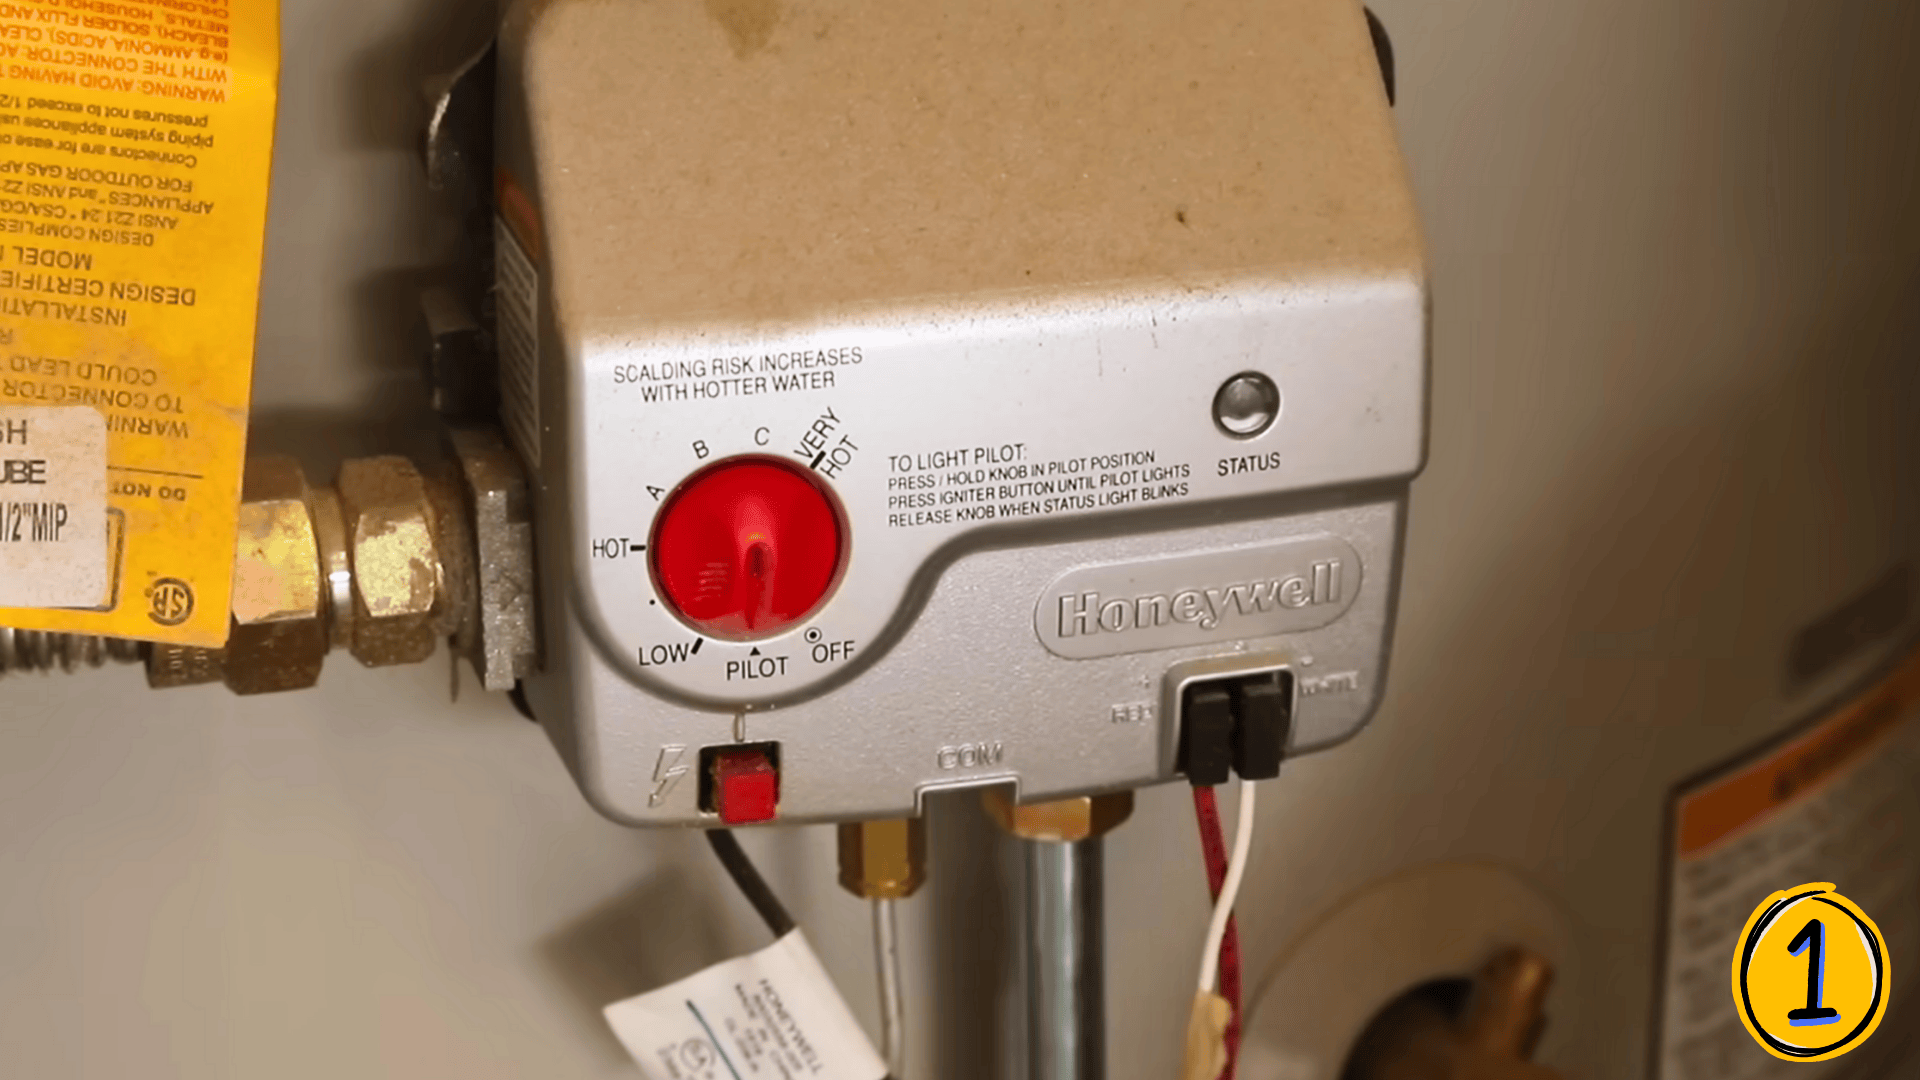
For gas water heaters, rotate the temperature dial down to pilot or vacation mode to prevent the burner from firing while the tank drains. This is crucial because heating an empty tank can melt the metal and cause catastrophic failure.
For electric models, flip the circuit breaker or unplug the unit entirely. Never skip this step, as it protects your system from irreversible damage during the flushing process.
Step 2: Shut Off Cold Water Supply and Prep for Drainage
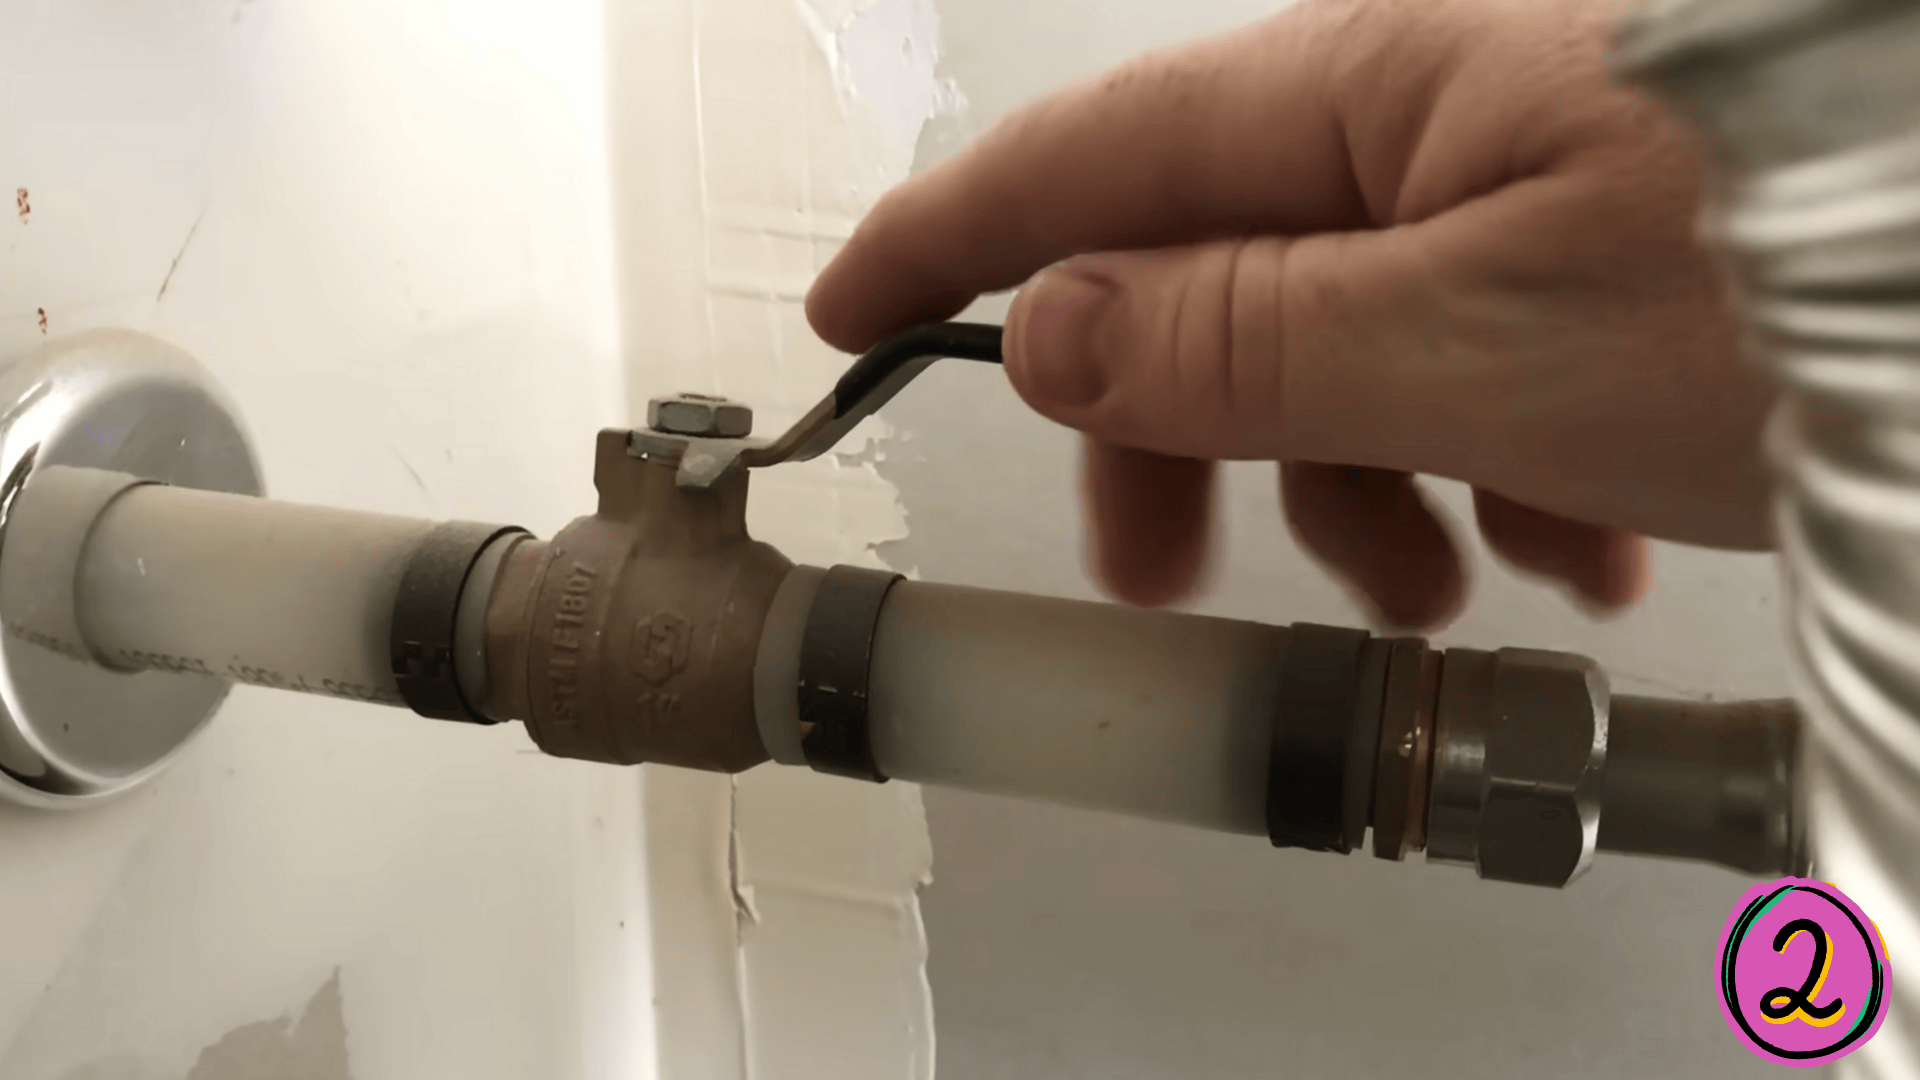
Locate the cold water inlet valve at the top of your tank and turn it to the closed position. Securely attach a garden hose to the drain valve at the tank’s bottom, directing it to a drainage area like a floor drain or outdoor space.
Open a hot water faucet anywhere in your house to allow air into the system, which enables proper drainage. Without this air inlet, the water won’t flow due to the vacuum pressure.
Step 3: Open the Drain Valve
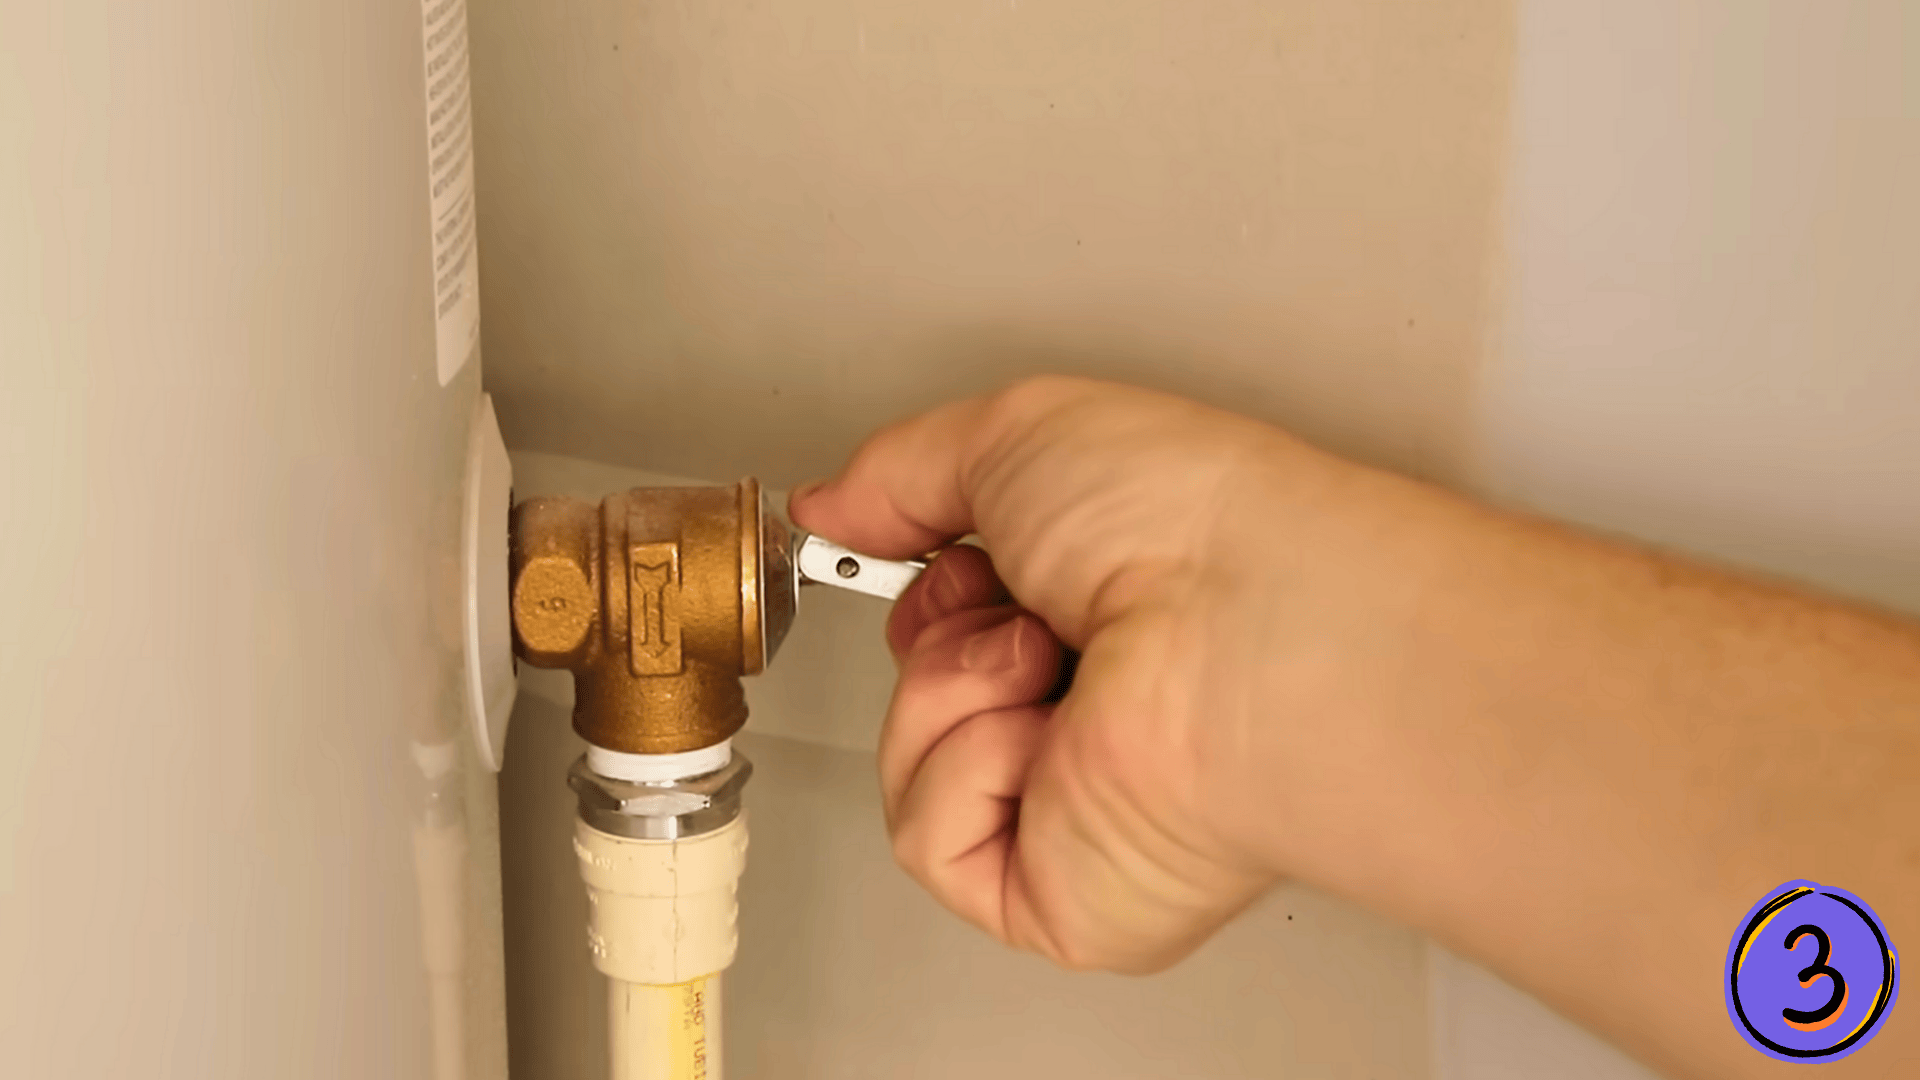
Turn the drain valve counterclockwise to start draining. If water doesn’t flow after opening a faucet, you likely have a backflow preventer. Lift the tank’s temperature and pressure relief valve lever to let air in.
Listen for the sound of air rushing in and water flowing out. Let the tank drain completely, which can take 15 to 20 minutes depending on your tank size.
Step 4: Agitate and Flush the Sediment

Once drained, briefly open the cold water inlet valve for 15 to 20 seconds to shoot fresh water into the tank, stirring up settled sediment at the bottom. Close the valve and let the loosened debris drain out through the hose.
Collect some water in a bucket to inspect the sediment level. Repeat this agitation process three to four times until the discharged water runs mostly clear with minimal particles visible.
Step 5: Final Rinse and Refill

For maximum cleanliness, close the drain valve, refill the tank completely with cold water, and keep the pressure relief valve open to release trapped air. Once full, drain the entire tank one more time to flush out any remaining sediment.
After this final drain, close the drain valve, remove the hose, and open the cold water supply to begin the final refill. As the tank fills, close the pressure relief valve before water reaches it to prevent overflow.
Step 6: Restore Power and Bleed the System
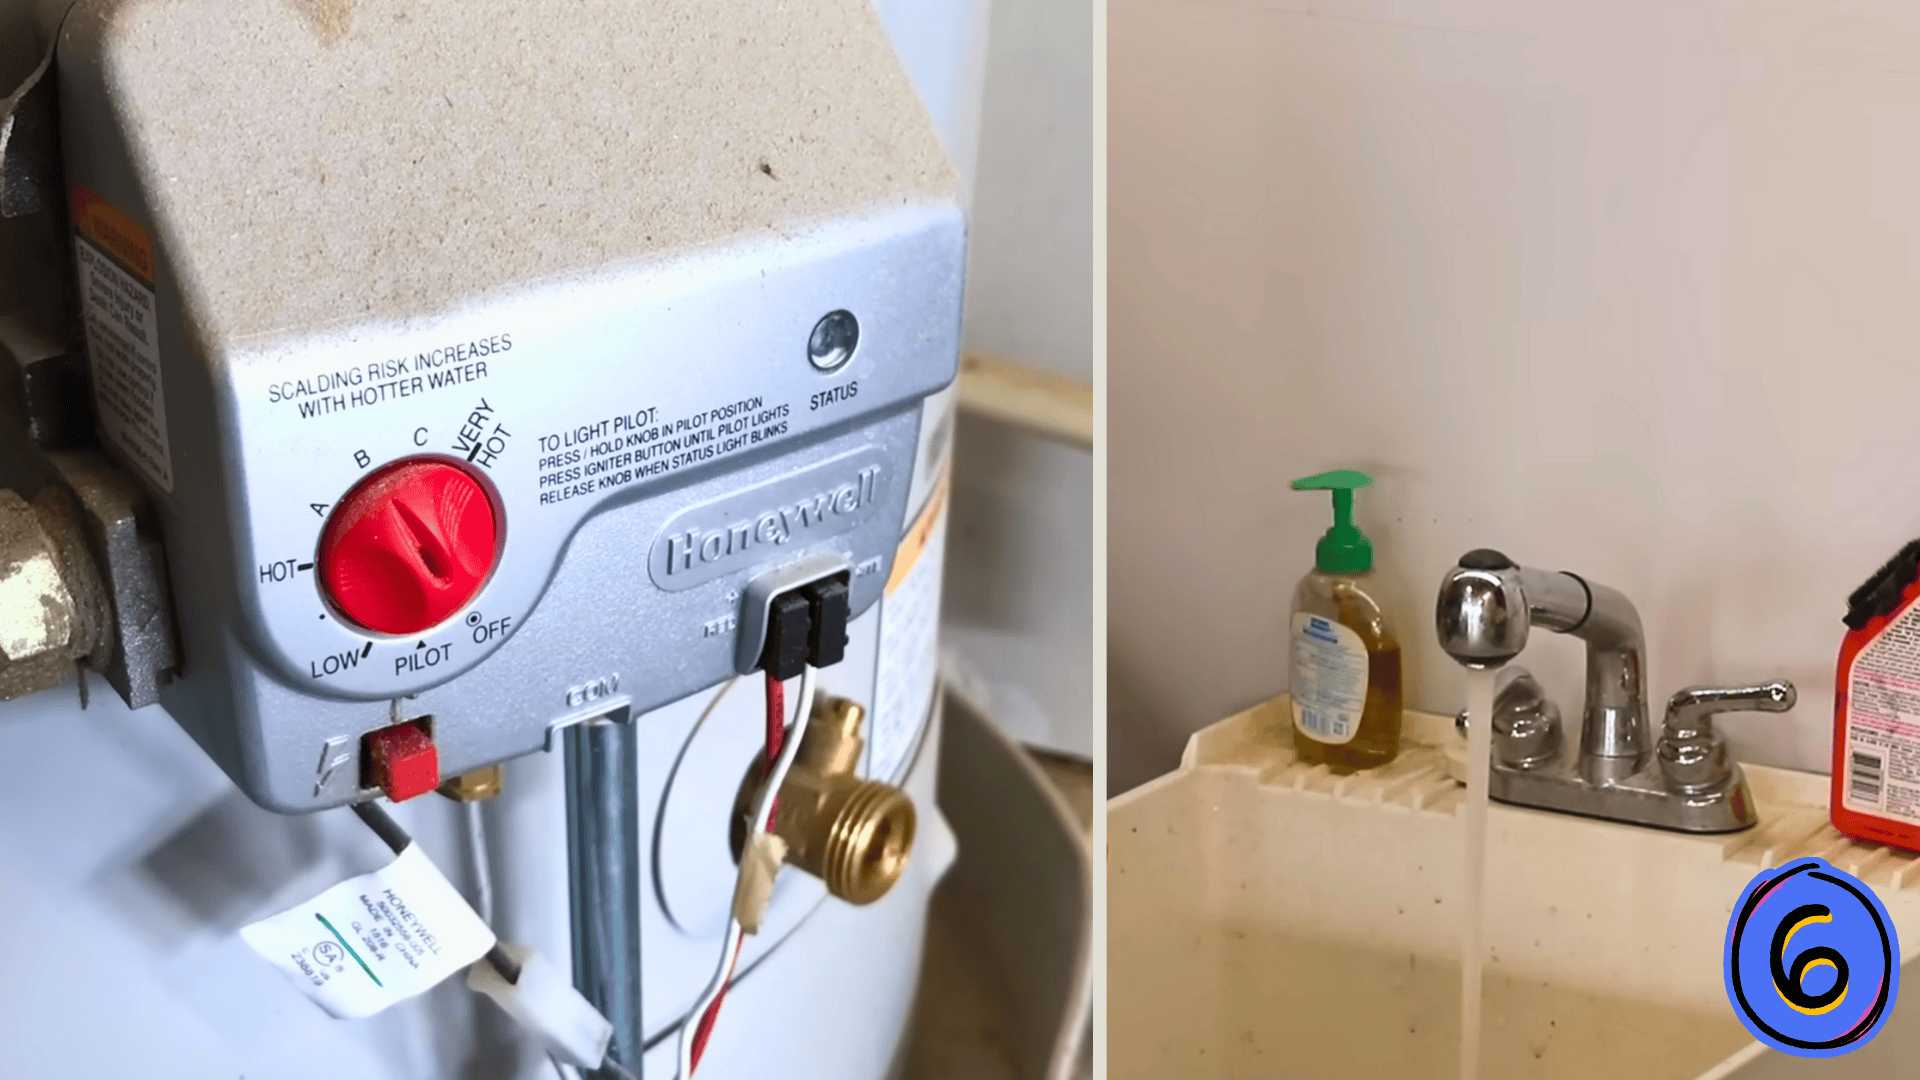
Once the tank is full, return the thermostat to your desired temperature setting to reactivate the heating element or burner. Open a hot water faucet and let it run until water flows steadily without sputtering, indicating all air is purged.
Close the faucet once the flow is consistent. Your water heater is now flushed, refilled, and ready to provide efficient hot water for another year.
For a more detailed walkthrough of the process, check out the complete video tutorial below by AmplifyDIY.
Mistakes to Avoid When Flushing Your Water Heater
Even a straightforward maintenance task can go wrong if you skip key safety steps or rush through the process. Here are the most common pitfalls to watch out for when flushing your water heater.
- Forgetting to Turn Off the Power or Gas First: Heating an empty tank can melt internal components and destroy your water heater permanently.
- Draining Hot Water onto Carpet, Flooring, or Landscaping: Scalding water can damage surfaces, kill plants, and create safety hazards for people and pets.
- Starting the Flush without Allowing the Water to Cool: Water temperatures exceeding 120°F can cause severe burns during hose connection or valve operation.
- Neglecting to Open a Hot Water Faucet or Relief Valve: Without air entering the system, vacuum pressure prevents proper drainage, and the tank won’t empty.
- Skipping the Air-Bleeding Step After Refilling: Trapped air in the lines causes sputtering faucets and reduces hot water flow until properly purged.
Take your time with each step and double-check your work. A few extra minutes of careful preparation prevent costly damage and keep you safe throughout the entire process.
Know When to Call a Professional Plumber
While flushing your water heater is typically a DIY-friendly task, certain situations call for expert help.
A drain valve that’s severely corroded or completely stuck may break off if forced, creating a bigger problem than sediment buildup.
If you notice rusty water that doesn’t clear after multiple flushes, this often signals internal tank corrosion rather than simple sediment.
Water heaters over ten years old deserve special attention, as aging tanks become more prone to failure.
If yours is showing persistent leaks, unusual noises even after flushing, or inconsistent heating despite your best efforts, a professional assessment can determine whether a repair or full replacement makes better sense.
Keep Your Water Heater Running Smoothly After Flushing
Flushing is just one piece of the maintenance puzzle. A few simple checks and adjustments after your flush will help your water heater run efficiently and last longer.
- Inspect the Anode Rod Every 2 to 3 Years: This sacrificial component protects your tank from corrosion and should be replaced when heavily deteriorated.
- Test the Pressure Relief Valve Annually: Lift the lever briefly to ensure it opens and reseats properly, as a faulty valve poses serious safety risks.
- Set Your Thermostat to 120°F: This temperature prevents scalding, reduces energy costs, and minimizes mineral deposits without sacrificing comfort.
- Listen for Unusual Sounds During Operation: Popping or rumbling after a flush may indicate remaining sediment or developing issues that need attention.
- Mark Your Calendar for Next Year’s Flush: Consistent annual maintenance prevents heavy buildup and keeps your system performing at its best.
These small habits make a big difference in your water heater’s performance. Treat your system well, and it will reward you with years of reliable hot water and lower energy bills.
The Bottom Line
Flushing your water heater might not be the most glamorous home task, but it’s one of those simple rituals that truly pays off.
With cleaner water, lower energy bills, and a system that lasts years longer, this annual hour of effort becomes an investment in your home’s comfort and efficiency.
Now that you know exactly how to flush your water heater like a pro, you’re equipped to keep everything running beautifully.
Have questions or tips from your own experience? Drop a comment below and share what worked for you. Here’s to happy homes and plenty of hot showers ahead.