Catching plant problems early is rarely about having perfect eyesight. It’s more about knowing what you’re actually looking at.
Mealybugs are a good example of this. They’re easy to miss, slow to show themselves, and often mistaken for something harmless.
Many people don’t notice them until the plant looks tired, sticky, or just off in a way that’s hard to name. That’s why understanding the signs of mealybugs matters more than memorizing treatments.
Once you know how these pests behave and how damage shows up over time, things make more sense. You stop guessing. You start noticing patterns. And that’s where real control begins.
What Mealybugs Are and Why They’re Hard to Spot
Mealybugs are small insects thatfeed on plant sap. They don’t chew leaves or leave obvious holes. Instead, they attach themselves to soft plant tissue and slowly drain energy from the plant.
They also protect themselves well. Mealybugs cover their bodies in a white, waxy coating. This helps them avoid drying out and makes them harder to kill.
It also lets them blend in with dust, mineral buildup, or bits of plant fuzz. On many plants, especially houseplants, they can sit in place for days without being noticed.
Another reason they’re tricky is where they choose to live. They don’t hang out in obvious spots. They tuck themselves into leaf joints, along stems, under leaves, and sometimes below the soil line.
By the time you see the insects themselves, the plant has often been dealing with them for a while. In many cases, the plant shows stress before you can spot the bugs.
Early Signs of Mealybugs
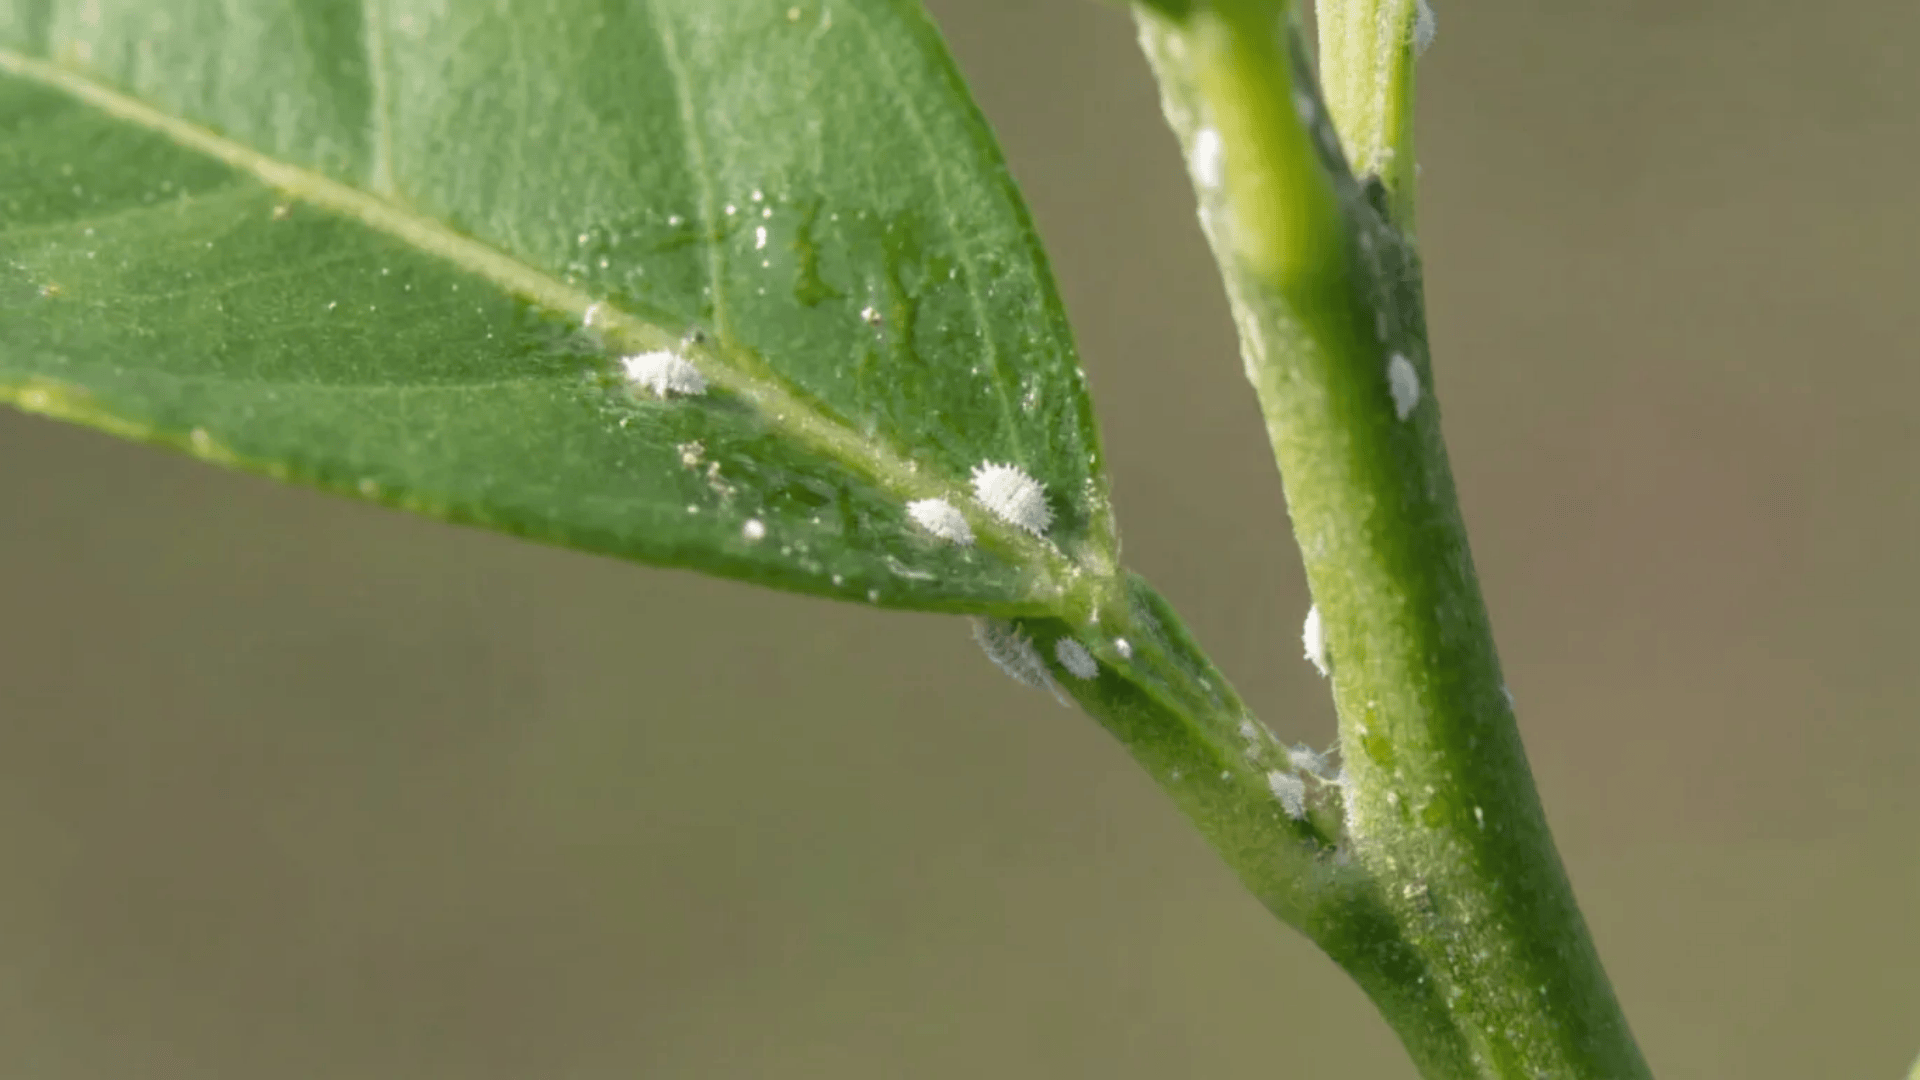
Early signs tend to feel subtle and easy to dismiss. This stage is where most confusion happens because nothing looks dramatic yet. Still, there are patterns worth paying attention to.
You might notice:
- Small white, cotton-like spots on stems or leaf joints that do not brush off easily
- Sticky residue on leaves (honeydew) even when mealybugs are not visible
- Ants on or around indoor plants, often climbing stems or gathering near pots
- Leaves turning dull, pale, or slightly yellow, losing their healthy color
At this point, the bugs are usually few in number or well hidden. The sticky residue comes from the sap the bugs process and release, not from the plant itself.
Ants are often the first outside clue because they’re drawn to that residue. When ants show up indoors, it’s often because something sweet is being produced nearby.
Advanced Signs of a Mealybug Infestation
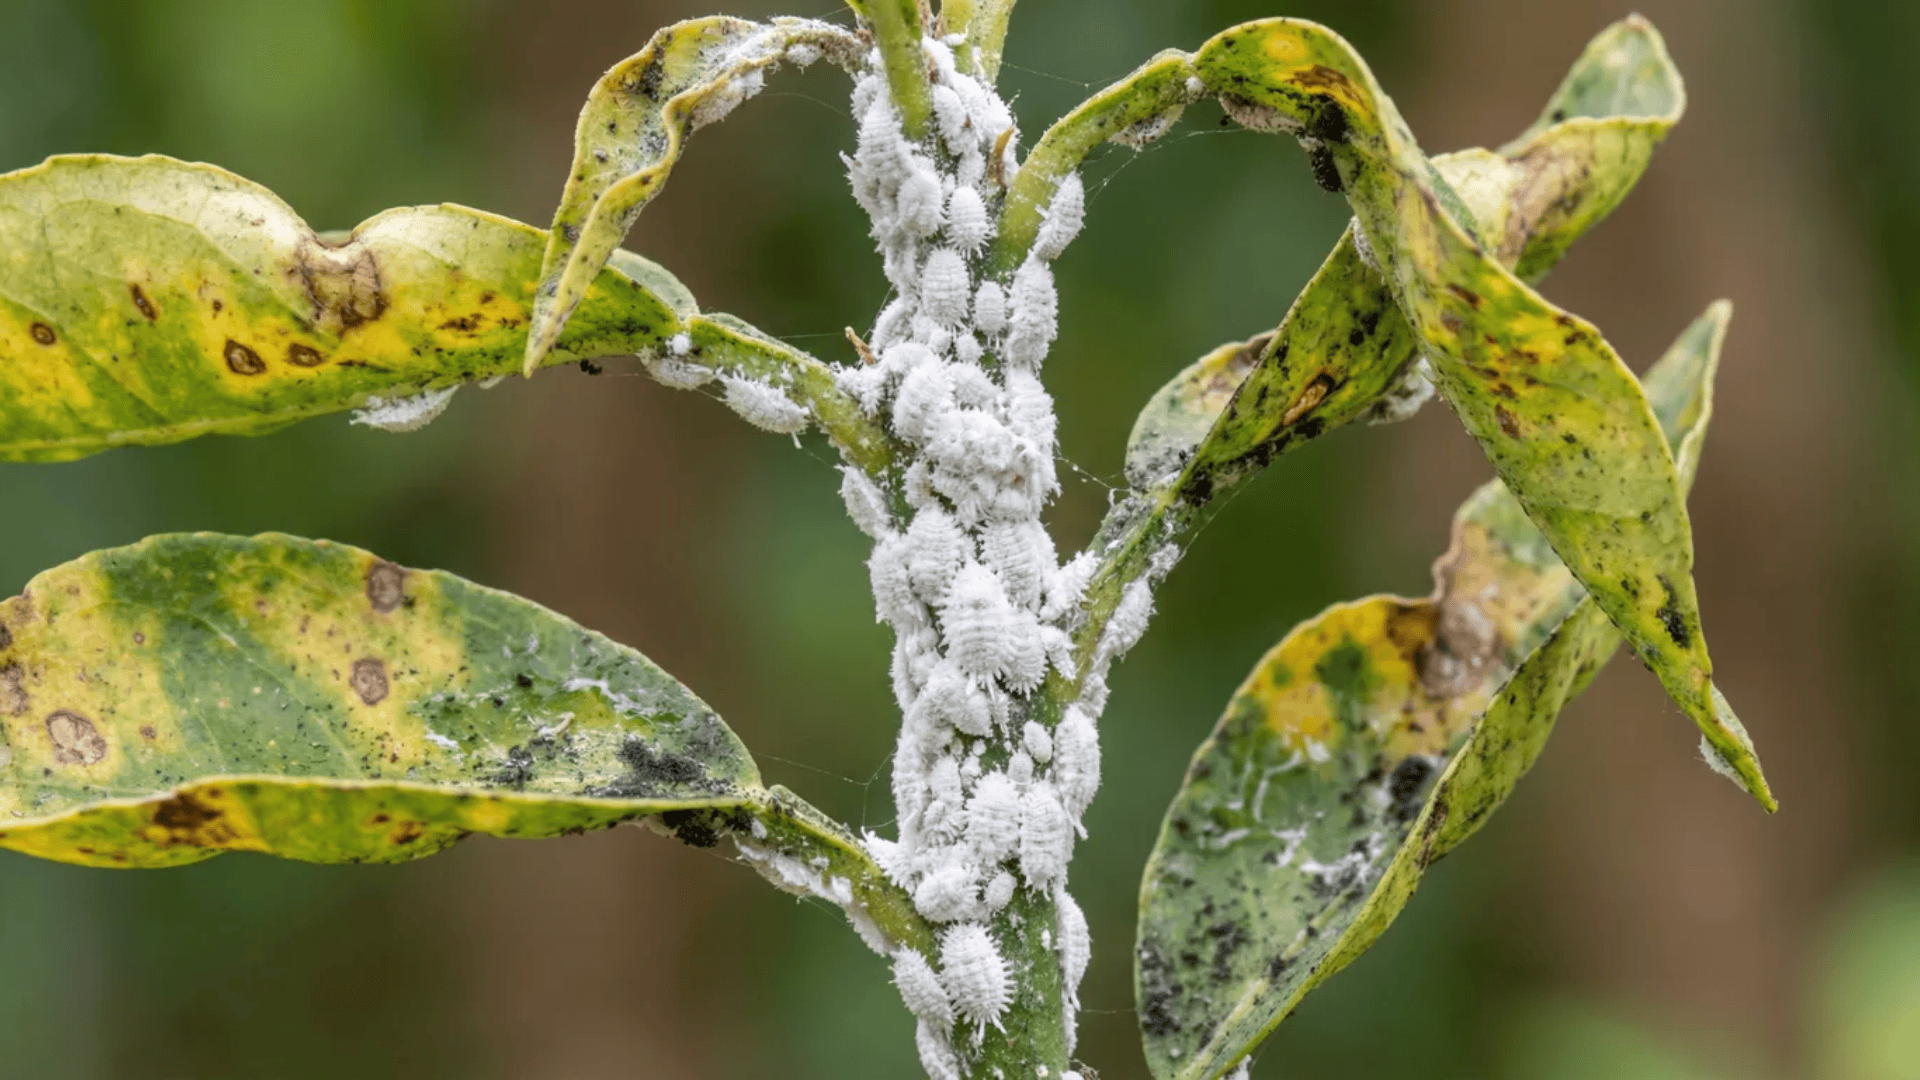
As time passes, the damage becomes easier to see. The plant has lost more sap, and the bugs have multiplied. This stage looks different because several effects start stacking on top of each other.
Common signs include:
- Thick white, cottony clusters packed into leaf crevices, joints, or along stems
- Black sooty mold on leaf surfaces, growing on leftover sticky honeydew
- Leaves dropping, curling, or growing deformed, with stunted new growth
- Heavy sticky residue (honeydew) covering leaves, pots, or nearby surfaces
The black mold isn’t eating the plant. It grows on the sticky residue left behind. Still, it blocks light and interferes with photosynthesis.
At this point, the plant is dealing with both feeding damage and surface stress. Growth slows down. New leaves come in smaller or deformed. Recovery takes longer, even after the bugs are removed.
Common Places Mealybugs Hide

Knowing where to look for mealybugs matters more than how closely you inspect a plant. These pests survive by staying out of sight, so a quick check of leaf tops often misses them.
Check these areas carefully:
- Leaf joints and nodes, where leaves meet stems at tight angles
- Undersides of leaves, especially near veins and edges
- The plant crown or center, where new growth forms
- Soil surfaces and drainage holes, especially around the pot rim
- Roots, when the plant declines but no pests appear above soil
On succulents and dense plants, these hiding spots offer even more protection. Mealybugs can live deep inside folds where air barely moves. That’s why removing visible insects can help in the short term but often fails to eliminate the infestation completely.
Signs of Root Mealybugs
Root mealybugs are often missed because the leaves look pest-free while the plant continues to decline. This commonly leads to changes in watering or light when the real problem is below the soil.
Common signs of root mealybugs include:
- Wilting despite evenly moist soil
- White, fuzzy residue near pot drainage holes or soil surface
- Slow growth and weak stems with no visible leaf pests
- Plants that never recover after normal care adjustments
Root mealybugs live below the soil line and feed directly on plant roots. This disrupts water and nutrient movement, which is why symptoms appear as general weakness rather than visible damage.
When a plant’s decline doesn’t match what you see above the soil, checking the roots becomes necessary.
What to Do Immediately if You See These Signs
Once you see signs of mealybugs, the goal is to stop the spread, reduce the population, and confirm the extent of the problem. This isn’t about fixing everything at once. It’s about making sure things don’t get worse.
Step 1: Isolate the Plant
Move the plant away from others right away. Mealybugs spread through contact, shared surfaces, and nearby foliage. Isolation buys you time and protects the rest of your plants.
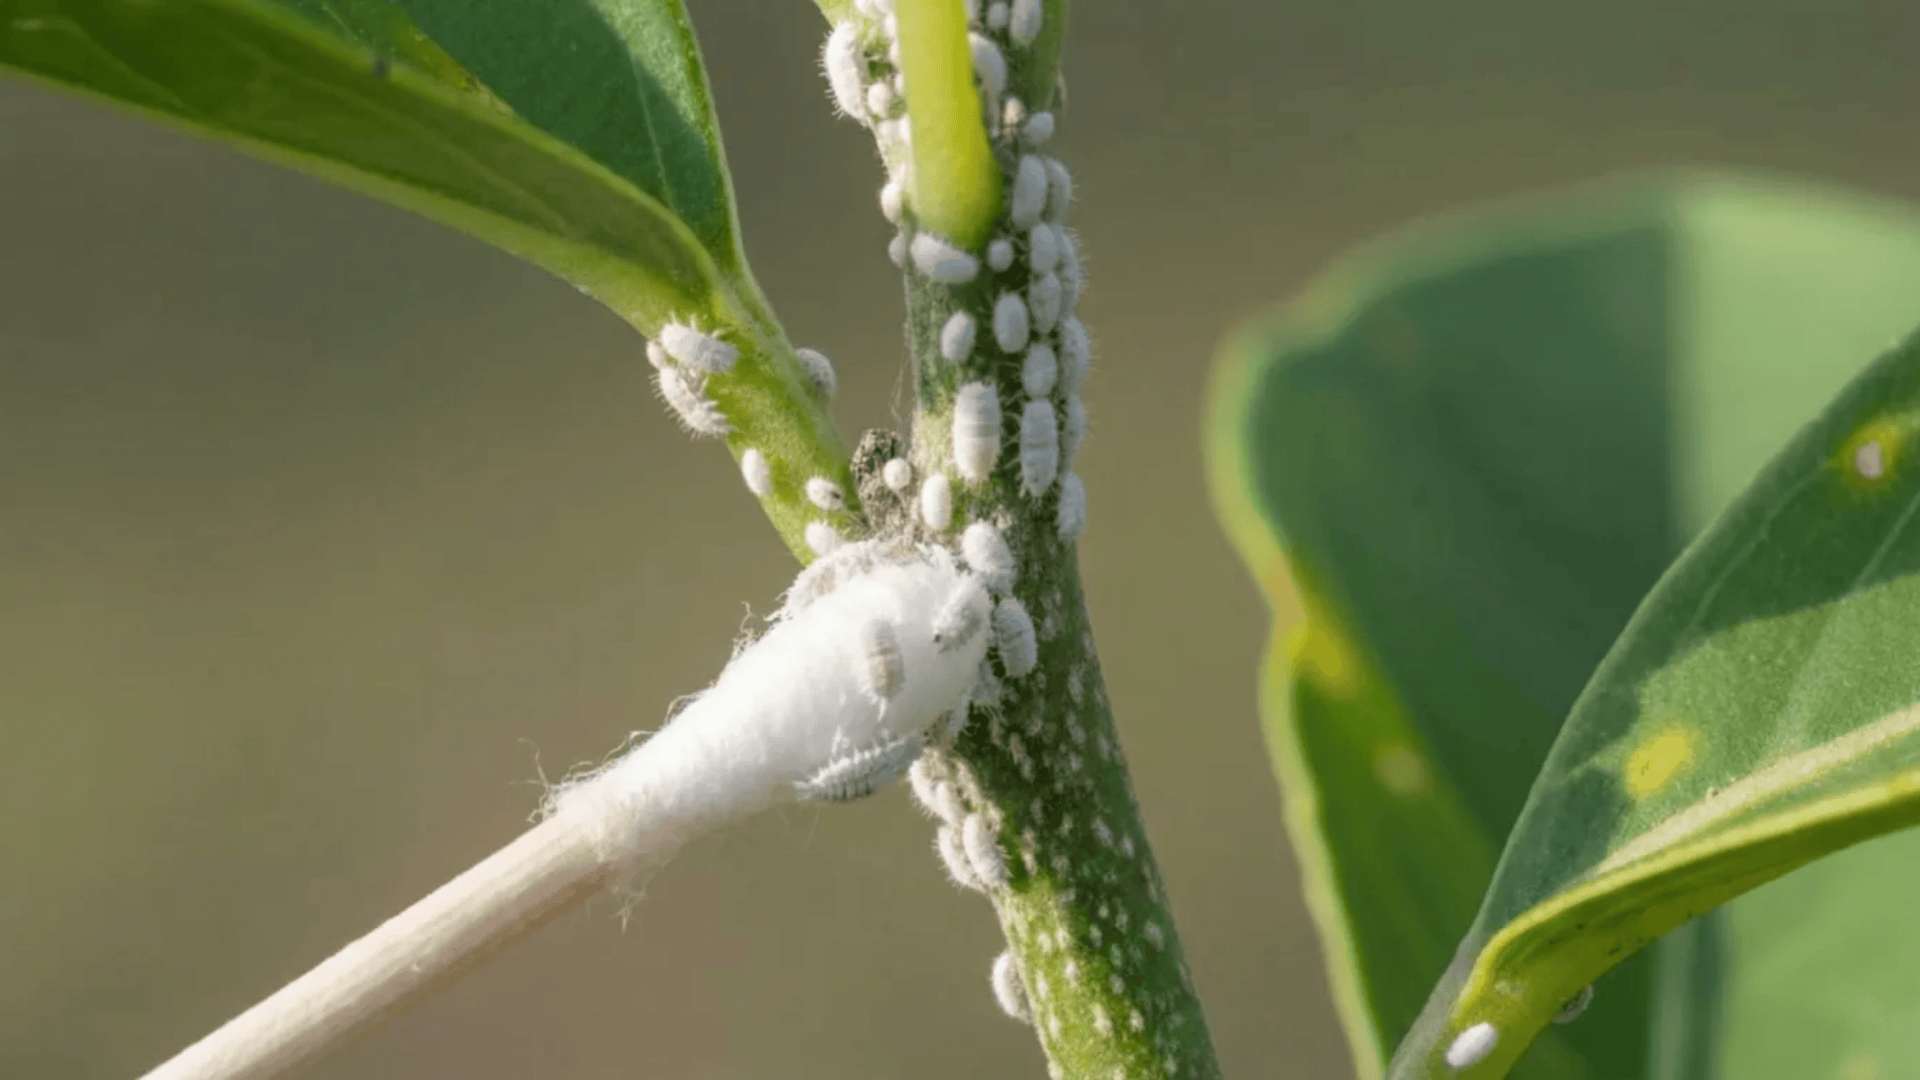
Step 2: Remove Visible Mealybugs by Hand
Use a cotton swab or soft cloth lightly dampened with rubbing alcohol. Gently wipe off any visible white clusters, focusing on leaf joints, stems, and hidden crevices. This doesn’t solve the infestation, but it immediately reduces numbers and slows damage.
Step 3: Inspect the Entire Plant, Including Soil and Roots
Check the undersides of leaves, the plant crown, and the soil surface. If the plant continues to wilt or decline without clear leaf pests, slide it out of the pot and look for white residue on the roots. This step determines whether surface treatment is enough or if deeper action is needed.
Step 4: Clean the Surrounding Area
Wipe down the pot, nearby surfaces, and shelves where sticky residue may be present. Honeydew attracts ants and can spread mold, which keeps the problem active even after bugs are removed.
Step 5: Decide the Next Level of Treatment
After visible bugs are removed and the plant is fully inspected, you can choose an appropriate follow-up treatment. Light infestations may respond to repeated manual removal, while widespread or root infestations usually require more thorough intervention.
These steps don’t eliminate mealybugs overnight, but they interrupt the cycle immediately. Most long-term failures happen because this initial containment and reduction phase is skipped.
How to Get Rid of Mealybugs
Getting rid of mealybugs isn’t about finding the strongest product. It’s about matching the treatment to where the bugs are and how far they’ve spread. When treatments fail, it’s usually because the approach didn’t match the situation.
Below are the three main treatment paths you can take:
1. Manual Removal for Minor Infestations
This approach works when mealybugs are limited to a few visible areas and the plant is otherwise healthy.
Manual removal means:
- Wiping visible mealybugs with rubbing alcohol
- Focusing on leaf joints, stems, and hidden crevices
- Repeating the process every few days
This method works because alcohol kills on contact and physically removes insects. The key is repetition. Mealybugs hatch in cycles, so one pass is never enough.
Where people go wrong is stopping too early or missing hidden areas. If new white spots keep appearing in the same places, the infestation isn’t fully cleared yet.
2. Topical Treatments for Moderate Infestations
When mealybugs appear across multiple areas or keep returning after manual removal, topical treatments become necessary.
This usually involves:
- Insecticidal soap or neem oil
- Thorough coverage of leaves, stems, joints, and undersides
- Reapplying according to the product’s instructions
These treatments work by smothering or disrupting the insects, including smaller or less visible ones. They help reach spots your hands can’t.
Failures usually happen because coverage is incomplete or applications are skipped. Mealybugs hidden in folds or crowns survive partial treatments and repopulate quickly.
3. Root-Level Treatment for Severe or Persistent Cases
If signs point to root mealybugs or the plant continues to decline without visible leaf pests, surface treatments won’t be enough.
Root-level treatment often includes:
- Removing the plant from its pot
- Rinsing roots to remove insects and old soil
- Repotting in clean, fresh growing medium
- In some cases, using a systemic treatment
This works because root mealybugs live entirely below the soil line. Treating leaves alone doesn’t reach them.
This is the most disruptive option, but it’s often the only effective one for advanced cases. Trying gentler methods here usually delays recovery and allows further damage.
How to Tell If the Infestation is Minor or Severe
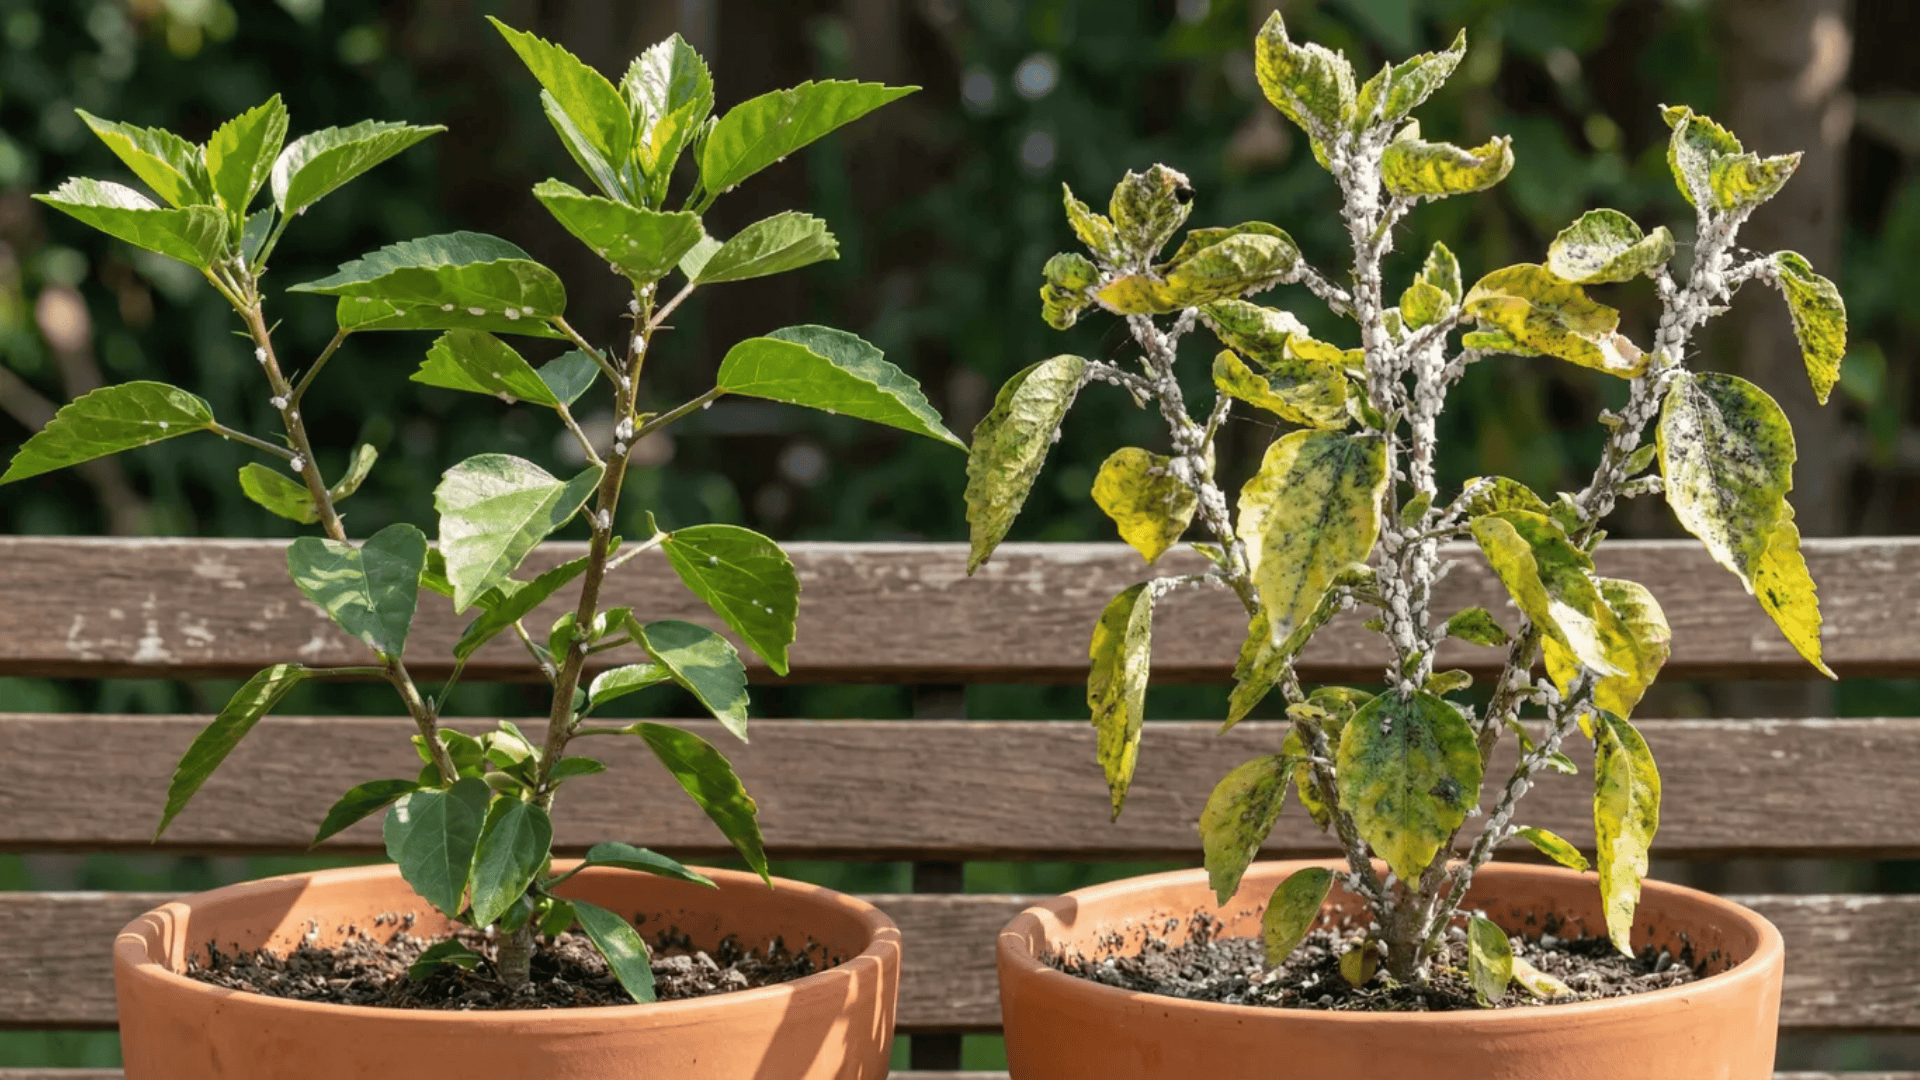
Not every mealybug problem requires the same response. Severity depends on spread, not just presence. Seeing one bug doesn’t mean the plant is doomed. What matters is whether the issue is contained or expanding.
Use the checklist below to assess the situation:
- Number of visible mealybugs across the entire plant
- How many leaves or stems show feeding damage
- Presence of ants or black sooty mold, which signal ongoing honeydew production
- Speed of decline, such as rapid leaf drop or stalled growth
A minor infestation is usually limited to one area and changes slowly. A severe infestation spreads across multiple growth points and begins to affect the plant’s overall structure.
Knowing the difference helps you choose responses that match the actual problem instead of overcorrecting or waiting too long.
Is It Definitely Mealybugs or Something Else?
Several issues look similar at first glance. Misidentification leads to frustration because the wrong fix never works.
Here’s how common look-alikes differ:
| Issue | What It Looks Like | Key Difference |
|---|---|---|
| Mealybugs | White, cottony buildup with a soft body underneath | Leaves sticky residue (honeydew) and may attract ants |
| Spider mites | Tiny speckles on leaves with fine webbing | Webbing present, but no cottony clusters |
| Scale insects | Flat, hard bumps attached to stems or leaves | Shell-like and firm, not fluffy or soft |
| Mineral residue | Chalky white spots on leaves or soil | Not sticky, does not spread, and attracts no ants |
If wiping a spot reveals a soft body underneath or leaves a sticky film on your fingers, you’re likely dealing with an insect rather than residue or dust.
How Mealybug Infestations Start and How to Prevent Them
Mealybug infestations don’t usually begin with an obvious outbreak. They start quietly, under conditions that allow a few hidden insects to survive long enough to multiply. When those conditions stay in place, the problem feels sudden even though it’s been building over time.
Most infestations begin and can be prevented in the following ways:
- Inspect new plants before placing them nearby: New plants are the most common entry point. Checking leaf joints, undersides, plant crowns, and soil edges helps catch hidden insects before they spread.
- Reduce ongoing plant stress: Inconsistent watering, sudden light changes, or crowded roots weaken plants over time. Keeping care steady helps plants resist feeding damage.
- Avoid heavy or frequent fertilizing: Excess feeding produces soft, fast growth that mealybugs prefer. Slower, balanced growth is less attractive and more resilient.
- Improve airflow around indoor plants: Still air and stable temperatures allow pests to reproduce without interruption. Even mild airflow and spacing plants apart reduce that advantage.
- Check plants regularly, not just when damage appears: Quick inspections during routine care catch problems early, often before visible decline begins.
Prevention works because it reduces opportunity. When conditions don’t favor hidden buildup, mealybugs have far less chance to establish themselves.
Wrapping Up
Understanding the signs of mealybugs is less about memorizing symptoms and more about learning how plants communicate stress.
These pests don’t announce themselves. They work quietly, hide well, and take advantage of small gaps in care. When you know what early changes mean and why damage unfolds the way it does, the situation feels less overwhelming.
So slow down, assess what’s really happening, and respond with intention instead of guesswork.
If you suspect an issue, take time to observe the whole plant, not just the obvious spots. That clarity is often the difference between a manageable problem and a long recovery.
Frequently Asked Questions
What kills mealybugs instantly?
Rubbing alcohol kills exposed mealybugs on contact, but it does not reach hidden insects or eggs. Repeated treatments are needed to fully interrupt the infestation cycle.
Why do mealybugs keep coming back?
Mealybugs return when eggs or hidden insects are missed. They hide in leaf joints, crowns, and soil, allowing new generations to appear after surface treatments stop.
Are mealybugs dangerous to humans or pets?
Mealybugs are not harmful to people or pets. They feed only on plants and do not bite, sting, or transmit disease.