A well-built deck becomes so much more than an addition to your home. It’s where lazy weekend mornings happen, where you’ll host impromptu dinners, and where everyday moments feel just a little more special.
Beyond the lifestyle upgrade, you’re adding genuine value and creating a safer outdoor space that flows seamlessly with your interior.
This deck-building guide is designed for DIYers ready to roll up their sleeves and homeowners who want to understand the process before hiring professionals.
You’ll learn to plan your perfect deck, understand local codes, choose suitable materials, master construction techniques, and maintain your outdoor sanctuary for years.
Deck Planning & Design Basics
Start by clarifying how you’ll actually use your deck. Will it be for hosting dinner parties, quiet morning coffee, or poolside lounging?
Your deck’s purpose directly shapes its size, layout, and material choices. Consider your available space carefully, noting sun exposure throughout the day, privacy concerns, drainage patterns, and how people will access the area.
Decide between a single-level design or multi-level zones for different activities.
Deck planning software can be invaluable here, helping you visualize layouts before breaking ground.
These digital tools generate accurate material lists, calculate proper joist spacing, estimate costs, and ensure your design meets local building codes right from the start.
Permits, Codes & Safety Standards When Building a Deck
Building codes exist to keep your deck safe and your investment protected. Here’s what you need to know about the legal side of deck construction.
- Permits are required for most residential decks and protect you from liability while ensuring structural integrity.
- The International Residential Code (IRC) sets national standards for deck construction, though local jurisdictions may have stricter requirements.
- Setback rules dictate how close your deck can be to property lines, while height restrictions may apply based on your location.
- Load capacity standards require decks to support at least 50 pounds per square foot, with specific requirements for joists and beams.
- Stair and railing codes mandate a 36-inch minimum railing height and a maximum 4-inch gap between balusters for safety.
Check your local building department’s website or the International Code Council’s resource page for specific requirements in your area.
Always schedule inspections at required stages to avoid costly corrections later.
Choosing the Right Deck Materials
Selecting the right materials can make or break your deck’s longevity and maintenance needs.
Here’s a comprehensive breakdown of your options for both visible surfaces and structural components.
| Component | Material Options | Pros | Cons | Lifespan |
|---|---|---|---|---|
| Pressure-Treated Decking | Southern yellow pine, hem-fir | Affordable, widely available | Needs maintenance, warps | 15-20 years |
| Cedar/Redwood Decking | Natural softwoods | Beautiful, rot-resistant | Expensive, fades | 15-25 years |
| Composite Decking | Wood-plastic blend | Low maintenance, durable | High upfront cost, hot surface | 25-30+ years |
| Ledger Boards | Pressure-treated lumber | Strong house attachment | Must be flashed properly | 20+ years |
| Beams & Joists | Pressure-treated lumber | Structural support | Size per code requirements | 20+ years |
| Posts & Footings | PT posts, concrete | Stable foundation | Below the frost line installation | 30+ years |
| Fasteners | Galvanized, stainless steel | Prevents failure | Match the decking material | Varies |
Deck Foundation and Footings: Building a Stable Base
A solid foundation is absolutely critical for deck safety and longevity. Without proper footings, your deck will shift, sag, or even collapse over time.
Here’s what you need to establish a stable base.
Footing Options:
- Concrete footings provide superior stability and are required by most building codes for permanent structures.
- Deck blocks work only for very low, freestanding decks in mild climates and aren’t code-compliant for most projects.
- Frost depth matters immensely in cold climates; footings must extend below the frost line to prevent heaving.
- Post anchors elevate wood posts above concrete, preventing moisture rot while securing the connection.
- Moisture barriers between concrete and wood are essential for extending your deck’s structural lifespan.
Framing the Deck Structure
The frame is your deck’s skeleton, and getting it right ensures everything above stays level, safe, and structurally sound.
Follow these essential steps for proper framing.
- Step 1: Attach the ledger board securely to your house framing using lag bolts or structural screws, ensuring it’s level and properly spaced from the siding.
- Step 2: Install flashing above the ledger to direct water away from the house connection, preventing rot and moisture damage behind the board.
- Step 3: Set posts and beams on your footings using post anchors, checking for plumb and securing beams at the correct height for your joist span.
- Step 4: Install joists at code-compliant spacing, typically 16 inches on center, using joist hangers for secure connections to the ledger and beam.
- Step 5: Add blocking and bracing between joists for lateral stability and to prevent twisting, especially important for longer spans.
Pro tip: Double-check that your ledger is attached to solid framing, not just sheathing or siding. This single connection point bears a tremendous load and is the most common failure point in deck collapses.
Installing Decking Boards
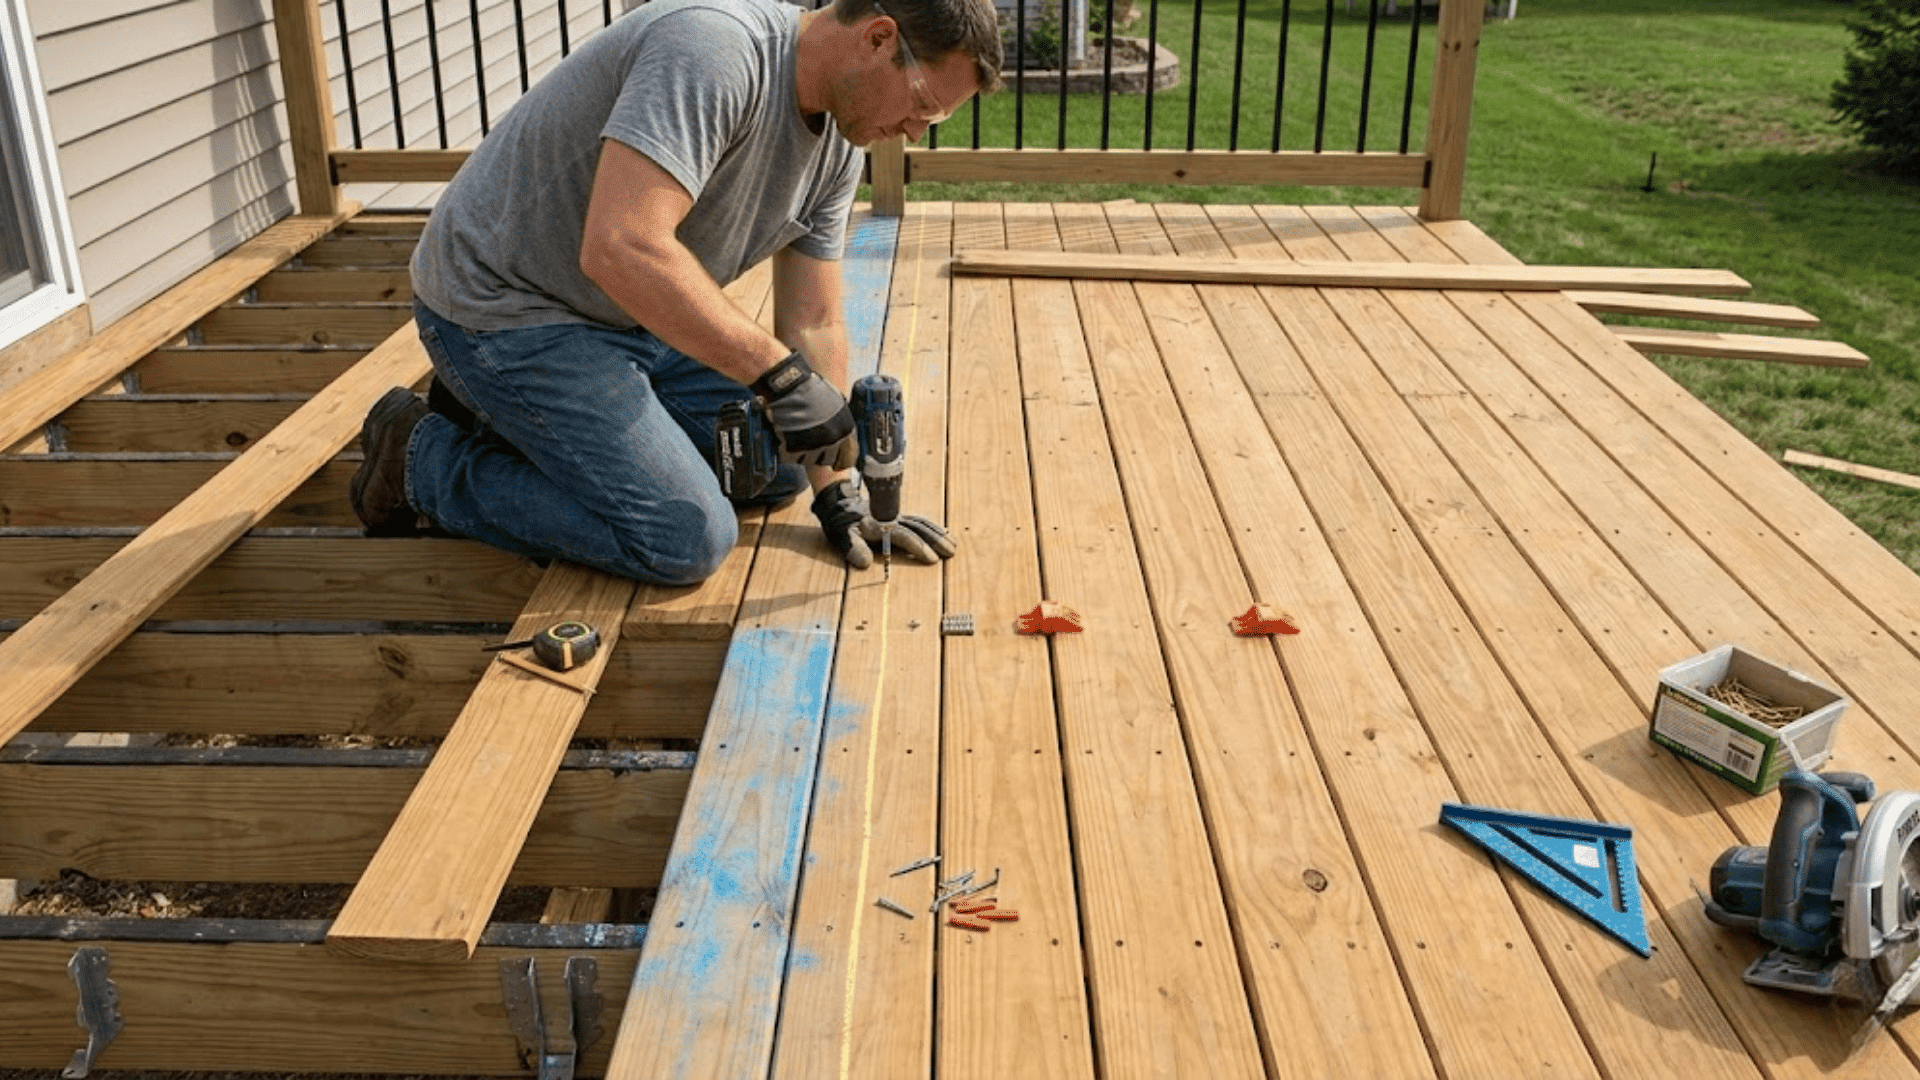
The moment your deck starts to look like a deck. Installing decking boards requires patience and precision for a professional finish that lasts.
Step 1: Plan Your Layout and Spacing
Decide on a straight or diagonal pattern before you begin. Straight boards are easier for beginners, while diagonal layouts add visual interest but require more cuts and waste.
Leave 1/8-inch gaps between boards for drainage and expansion, slightly wider for green or wet lumber that will shrink as it dries. Composite decking often requires specific spacing per manufacturer guidelines.
Step 2: Start with a Straight Reference Line
Begin along the house or straightest edge, ensuring your first board is perfectly straight and square. This board sets the template for everything that follows.
Snap a chalk line if needed and temporarily secure the board before final fastening. Check measurements at both ends to confirm parallel alignment with your framing.
Step 3: Choose Your Fastening Method
Face screwing with deck screws is most affordable and straightforward, using two screws per joist. Hidden fasteners create a cleaner look without visible hardware but cost more and take longer to install.
For composite decking, always use stainless steel or coated fasteners to prevent corrosion staining. Pre-drill near board ends to prevent splitting.
Step 4: Maintain Consistent Gaps Throughout
Use spacing tools like nails or commercial deck spacers to keep gaps uniform as you work across the deck. Check your spacing every few boards to catch any drift before it becomes noticeable.
Boards naturally vary in width, so minor adjustments may be needed. Consistent gaps ensure proper drainage and a professional appearance.
Step 5: Finish with Clean, Straight Edges
Let boards run long during installation, then snap a chalk line and cut all edges at once with a circular saw for perfectly straight lines. This method is faster and cleaner than measuring and cutting each board individually.
Sand any rough edges and seal the cut ends of wood boards to prevent moisture infiltration and premature rot.
Building Safe Deck Stairs, Railings, and Guardrails
Stairs and railings aren’t just functional additions; they’re critical safety features with strict code requirements.
Here’s what you need to know to build compliant, secure access and protection for your deck.
| Component | Code Requirements | Key Installation Notes |
|---|---|---|
| Stair Rise/Run | Max 7.75″ rise, min 10″ run | Keep all steps uniform to prevent tripping |
| Stringers | Minimum 3 for 36″+ wide stairs | Secure to deck frame with hangers or blocking |
| Railing Height | 36″ minimum (deck), 34″-38″ (stairs) | Install posts every 6 feet max, attach to framing |
| Baluster Spacing | Maximum 4″ gaps | Must pass the sphere test at the narrowest point |
| Handrails | Required for 4+ risers, 1.25″-2″ diameter | Continuous along stairs with end returns |
Deck Finishing Touches
The details that elevate your deck from basic to beautiful happen in the finishing stage. These thoughtful touches add polish, functionality, and personality to your outdoor space.
- Fascia boards wrap exposed framing for a clean, finished look while protecting structural components from weather exposure.
- Built-in seating and planters maximize space efficiency and create cohesive design elements that feel intentional rather than added on.
- Deck lighting improves safety and ambiance with options like post cap lights, recessed stair lighting, and under-rail strips.
- Decorative skirting conceals the area beneath your deck while allowing ventilation and providing potential access to under-deck storage.
- Trim details around posts, edges, and transitions to tie everything together and give your deck a custom, professionally built appearance.
These finishing elements convert a functional structure into an inviting outdoor room. Take time with these details as they’re what guests notice first and what you’ll appreciate every time you step outside.
Deck Building: Sealing, Staining & Weather Protection
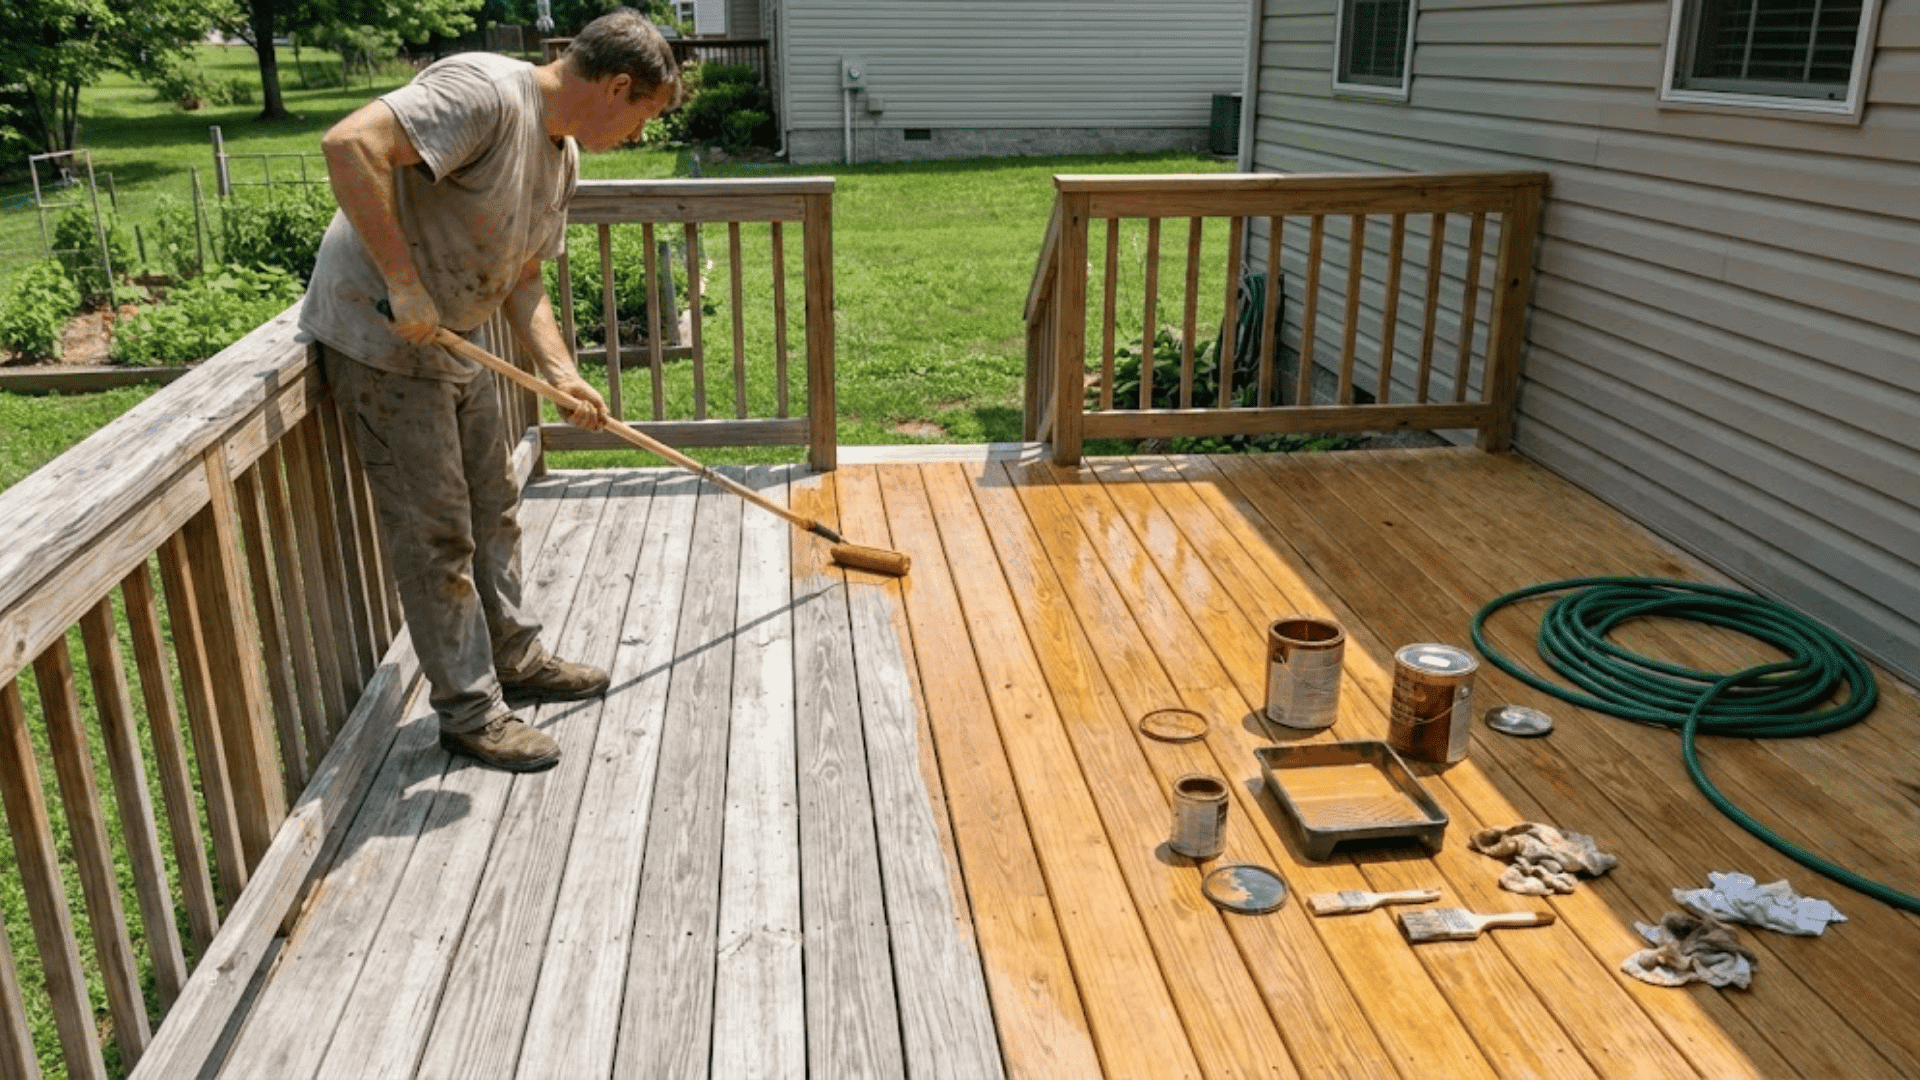
Proper finishing and ongoing protection keep your deck looking fresh and extend its lifespan significantly. Understanding when and how to seal or stain makes all the difference.
Choosing the Right Finish for Your Deck
Different finishes offer varying levels of protection and aesthetics. Here’s how to select the best option for your deck material and climate.
- Clear sealers protect wood while showcasing natural grain, but require reapplication every 1-2 years for optimal moisture resistance.
- Semi-transparent stains add color while letting wood texture show through and typically last 2-3 years before needing a refresh.
- Solid stains provide maximum UV protection and color consistency, lasting 3-5 years, but completely hide wood grain.
- Paint offers the longest-lasting finish for wood decks, but requires extensive prep work and hides all natural characteristics.
Maintenance Schedule and Protection Strategies
Regular maintenance prevents costly repairs and keeps your deck safe and attractive. Follow these guidelines based on your decking material.
- Pressure-treated wood needs initial sealing after 6 months of weathering, then resealing every 2-3 years with cleaning beforehand.
- Cedar and redwood should be sealed annually or biannually to prevent graying, checking, and moisture damage.
- Composite decking requires only periodic cleaning with soap and water; no sealing is needed, but watch for mold in shaded areas.
- UV and pest protection comes through quality sealers with UV inhibitors and keeping debris cleared to discourage termites and rot.
DIY vs. Hiring a Professional Deck Builder
Deciding whether to build your deck yourself or hire professionals depends on your skills, budget, and comfort level with complex construction.
Here’s an honest comparison to help you make the right choice for your project.
| Factor | DIY | Professional |
|---|---|---|
| Skill Level | Carpentry skills, code knowledge required | No skills needed |
| Cost | 40-60% cheaper (materials only) | Higher upfront, includes labor and warranty |
| Time | 2-6 weeks (weekends) | 1-2 weeks total |
| Permits | You handle all paperwork and inspections | Contractor manages everything |
| Liability | You’re responsible for all mistakes | Insured with workmanship warranty |
| Resale Value | Risk if unpermitted or poorly built | Maximum home value increase |
Deck Building Costs: What to Expect?
Deck building costs vary widely based on size, materials, and complexity. A basic 12×12 pressure-treated deck averages $3,000-$6,000 for DIY or $6,000-$12,000 professionally installed.
Materials typically account for 40-50% of total costs, with pressure-treated lumber being most affordable, composite running 2-3 times higher, and exotic hardwoods commanding premium prices.
Labor costs range $15-$35 per square foot, depending on your region.
Expect prices to climb significantly for second-story decks requiring taller posts, complex multi-level designs, custom railings, built-in features, and steep terrain requiring extensive foundation work.
Always budget an extra 10-15% for unexpected expenses and permit fees.
Avoiding Mistakes and Maintaining Your Deck
Building your deck right the first time and maintaining it properly ensures decades of safe, beautiful outdoor living. Here are the critical mistakes to avoid and essential care practices to follow.
- Improper ledger attachment is the leading cause of deck collapse; always bolt through house framing, not just siding, and install proper flashing.
- Inadequate footings below the frost line cause heaving and structural failure; never use deck blocks for permanent structures in cold climates.
- Wrong fasteners with composite decking lead to rust stains and corrosion; always match hardware to your decking material specifications.
- Poor drainage and ventilation trap moisture, causing rot; ensure proper board spacing, grade away from the house, and avoid solid skirting.
- Annual inspections should check for loose fasteners, rotted boards, wobbly railings, and pest damage, with immediate repairs as needed.
Maintenance Tip: Clean your deck twice a year with suitable cleaners, reseal every 2-3 years, and replace damaged boards promptly to prevent bigger problems. Catching small problems early saves thousands in major repairs later on.
Final Thoughts
Your deck is more than just boards and beams. It’s where summer evenings linger, where kids play safely, and where your home truly opens up to the outdoors.
With this deck-building guide in hand, you’ve got everything needed to create that space thoughtfully and confidently.
Ready to grab your tools this weekend or meeting with contractors next week, you’re equipped to build something lasting.
Have questions or want to share your deck-building experience? Drop a comment below. We’d love to hear what you’re planning and help troubleshoot any challenges along the way. Happy building!