Your air purifier has been running for months, but the air still feels stuffy. You notice dust settling faster than before. The device makes strange noises. Sound familiar?
Dirty filters are probably the culprit. When filters get clogged, your air purifier stops doing its job. It wastes energy and pushes dirty air back into your home.
Cleaning filters is simpler than you think. You do not need special skills or expensive tools. Just a few minutes of your time can make a huge difference.
This guide shows you exactly how to clean every type of air purifier filter. You will learn when to clean, when to replace, and how to spot warning signs early.
Let us get your air purifier working like new again.
What is an Air Purifier Filter?
An air purifier filter is a component inside an air purifier that captures harmful particles from the air.
It works by trapping dust, pollen, pet dander, smoke, mold spores, and even bacteria as air passes through it. Think of it as a net that catches tiny pollutants you cannot see with your eyes.
The filter keeps these contaminants from circulating back into your room. This helps you breathe cleaner, fresher air at home. Without a working filter, your air purifier cannot do its job properly.
Over time, these filters collect dirt and need regular cleaning or replacement to keep performing well.
Types of Air Purifier Filters
Not all air purifier filters are the same. Each type targets different pollutants and requires specific care.
- Pre-filters: These catch large particles like hair, lint, and dust before they reach the main filter, and most can be washed and reused multiple times.
- HEPA Filters: These trap 99.97% of fine particles, including pollen, bacteria, and smoke, but only some HEPA filters are washable, while others must be replaced when dirty.
- Activated Carbon Filters: These absorb odors, chemicals, and gases from cooking, pets, or smoke, making your indoor air smell fresh and clean.
- UV Filters and Other Types: UV filters use light to kill germs and bacteria, while ionic and electrostatic filters use electric charges to trap particles, and these usually need wiping or occasional replacement.
How to Clean Different Air Purifier Filters: Step by Step
Cleaning your air purifier filters properly keeps your device working at its best. Different filter types need different cleaning methods. Follow these simple steps to clean each type safely and effectively.
1. How to Clean Washable Pre-filters
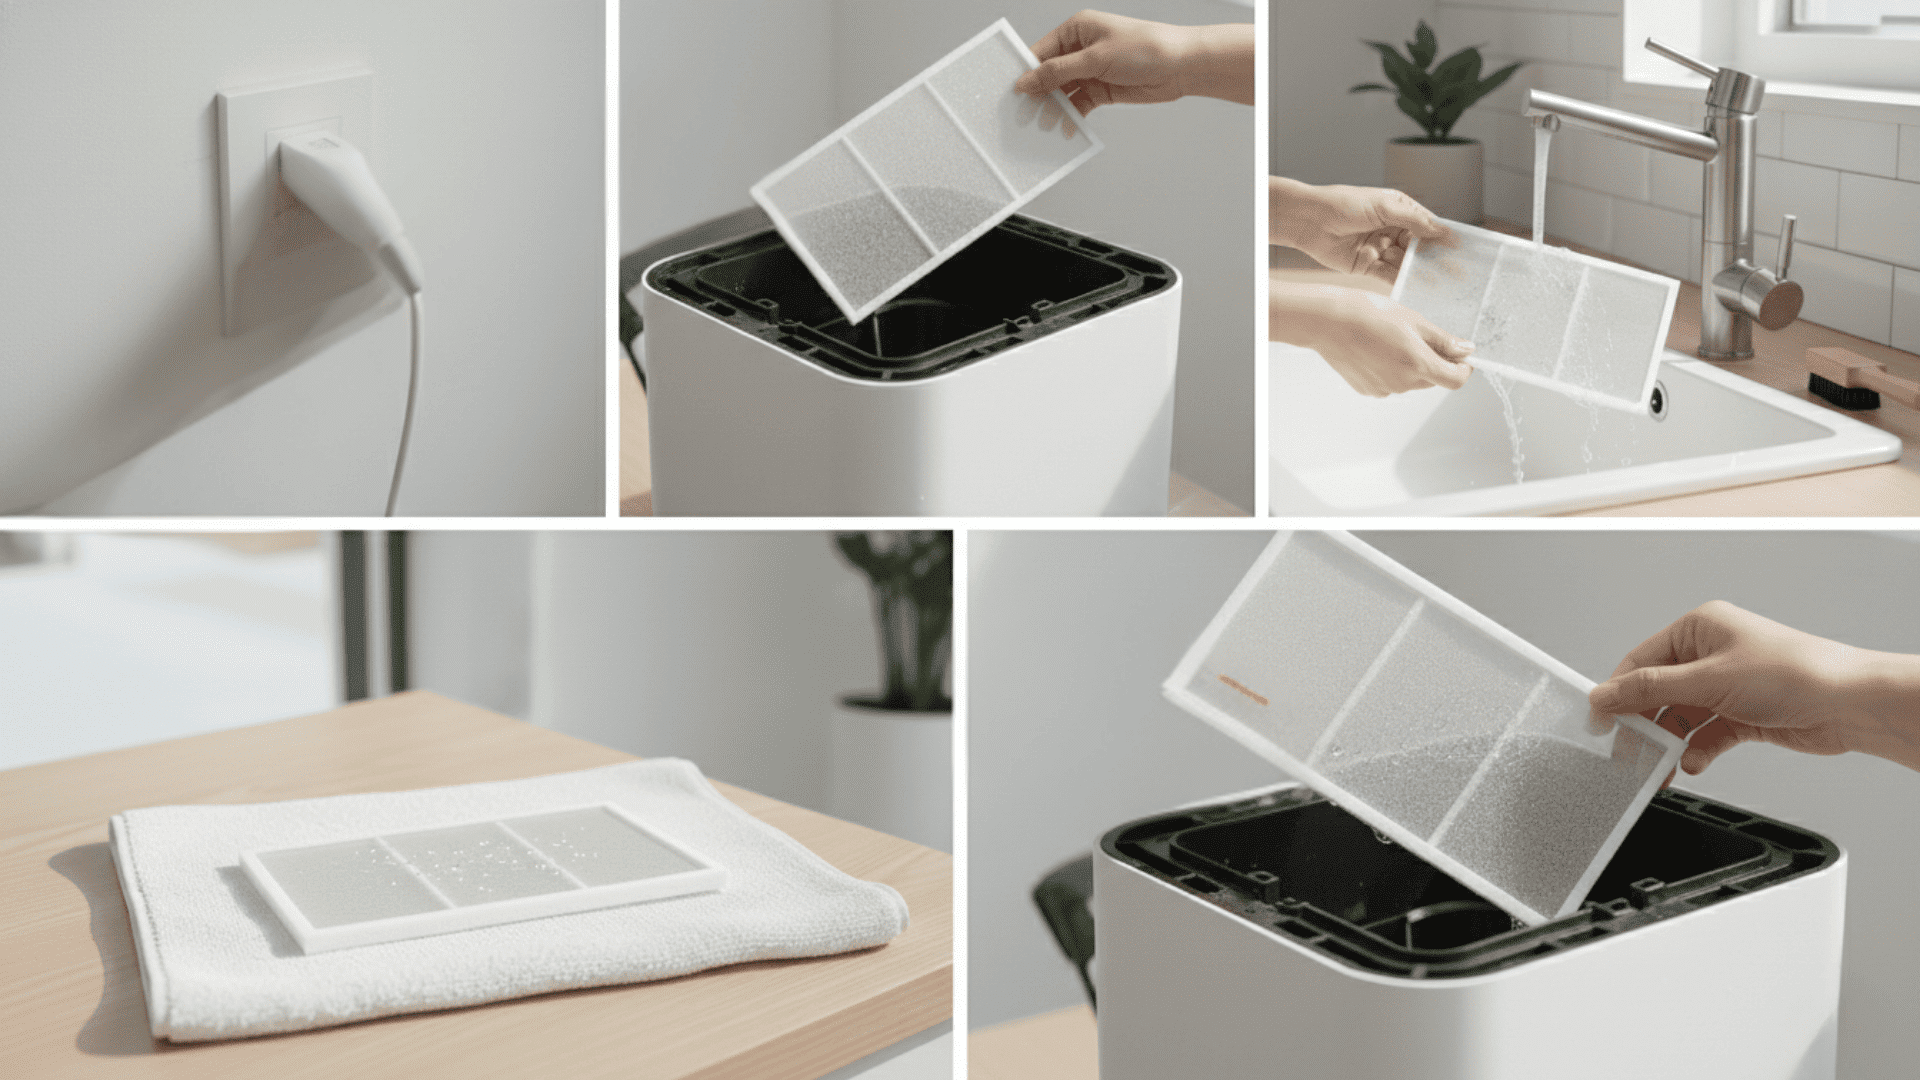
Pre-filters are the easiest to clean and maintain. Regular cleaning extends their life and keeps your air purifier running smoothly.
Tools and Materials Needed:
| Item | Purpose |
|---|---|
| Soft brush or vacuum with soft brush attachment | Removes loose dust and debris |
| Lukewarm water | Rinses away dirt safely |
| Mild soap (optional) | For heavy dirt only |
| Dry towel or cloth | Dry the filter after washing |
Step-by-Step Cleaning:
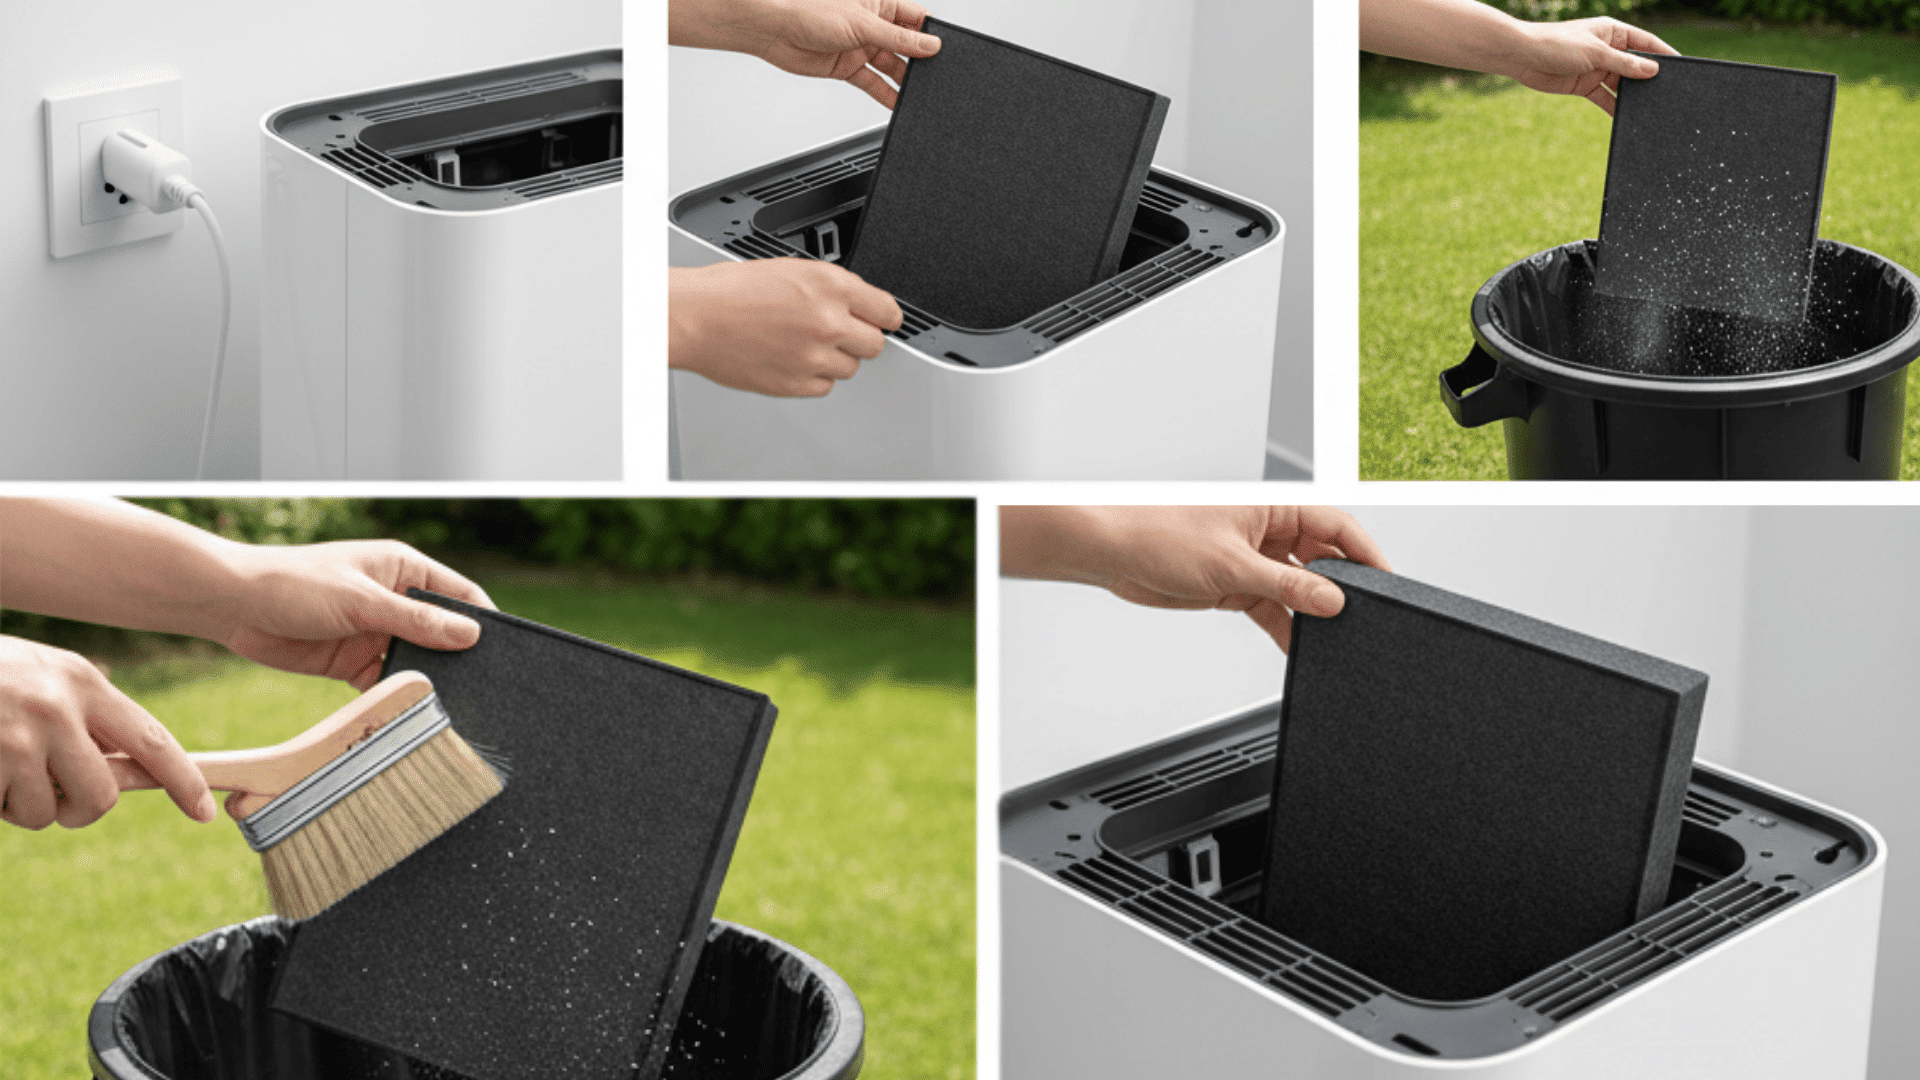
Step 1. Turn Off and Unplug the Unit
Always unplug your air purifier before you start cleaning. This keeps you safe from electrical shocks. Wait a few minutes for the device to cool down completely.
Step 2. Remove the Pre-filter Carefully
Open the front or back panel of your air purifier. Gently pull out the pre-filter without forcing it. Check your user manual if you cannot find it easily.
Step 3. Rinse with Lukewarm Water
Hold the filter under lukewarm running water. Use a soft brush to scrub away stubborn dirt or dust. Add a few drops of mild soap only if the filter looks very dirty.
Step 4. Air Dry Fully
Shake off excess water from the filter. Lay it flat on a dry towel in a well-ventilated area. Let it dry completely for 24 hours. Never reinstall a damp filter.
Step 5. Reinstall the Pre-filter Securely
Once the filter is bone dry, place it back in its slot. Make sure it fits snugly without gaps. Close the panel and plug your air purifier back in.
2. How to Clean a Washable HEPA Filter
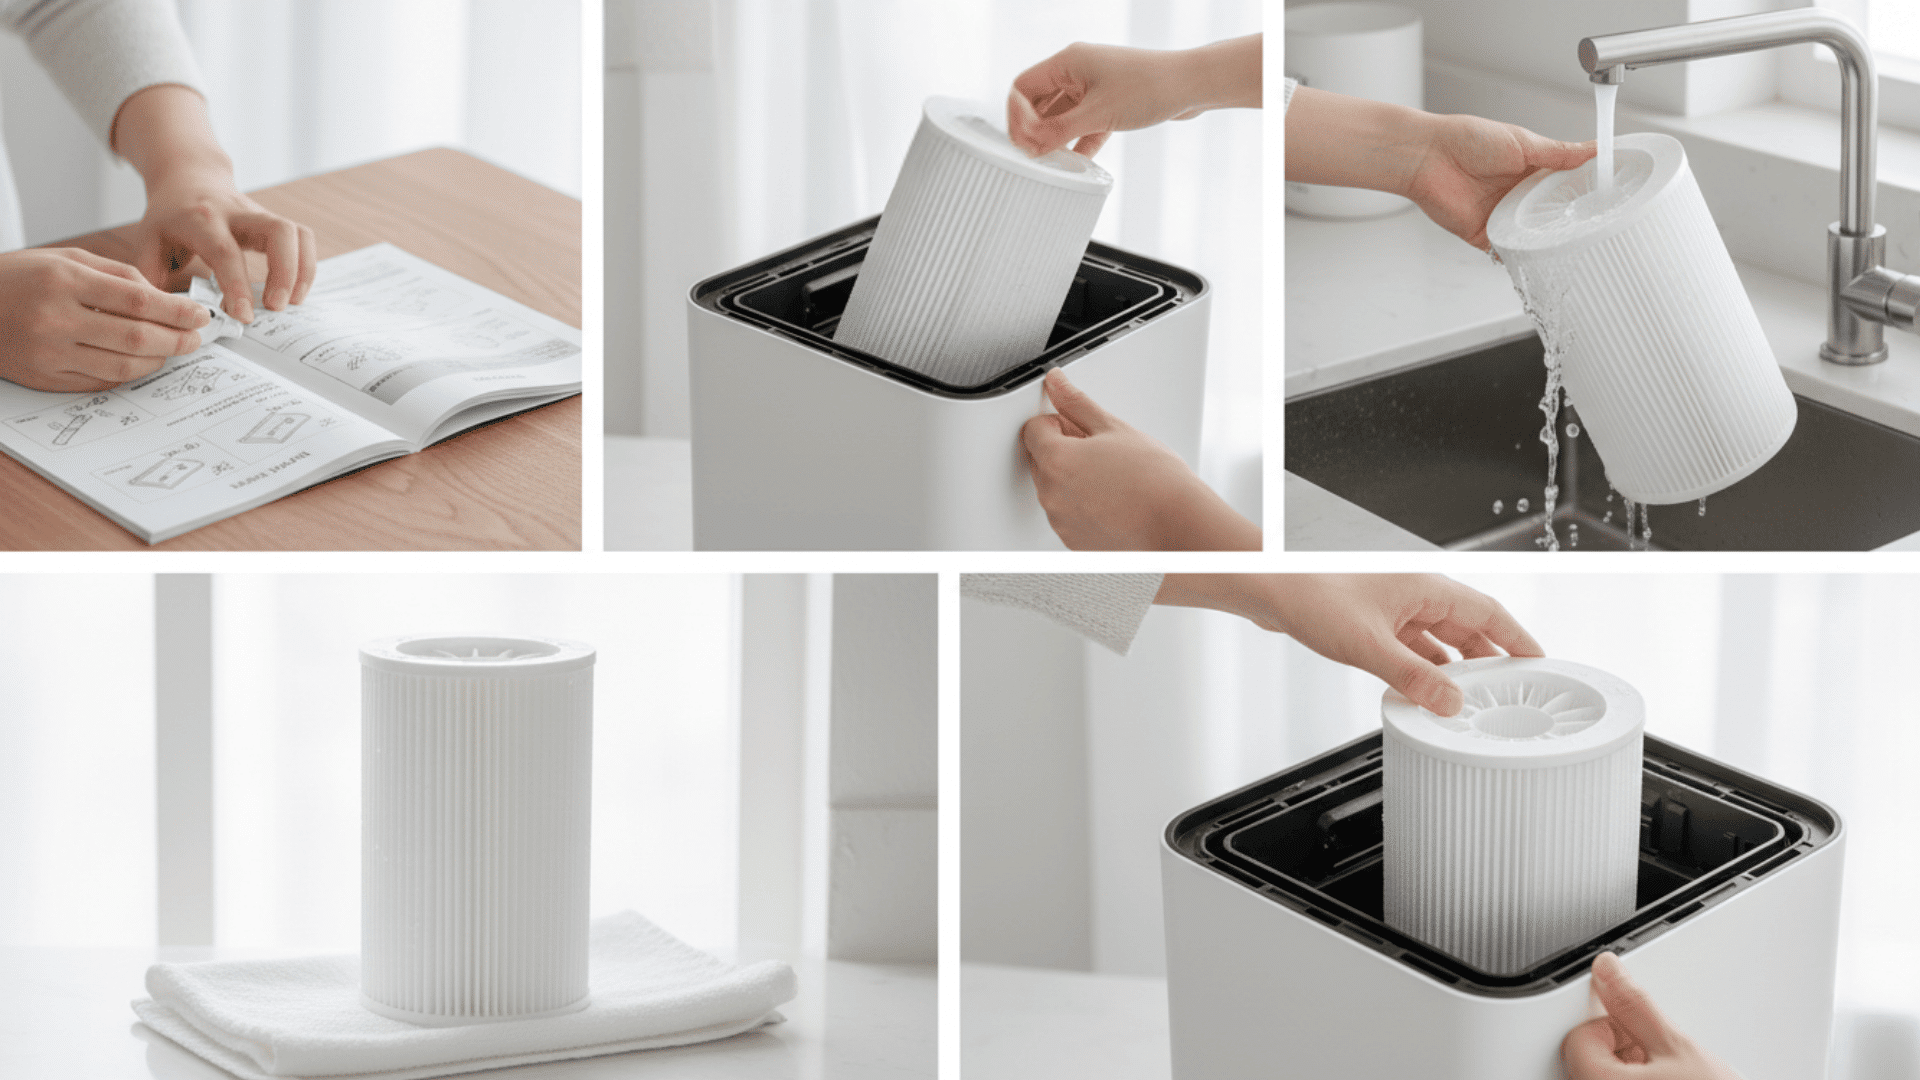
Some HEPA filters can be washed, but not all. Check your manual first to avoid damaging your filter.
Tools and Materials Needed:
| Item | Purpose |
|---|---|
| Lukewarm water | Rinse the filter gently |
| Mild soap (optional) | Only if the manufacturer recommends |
| Dry towel or cloth | Absorbs excess water |
| Soft brush (optional) | Removes loose debris before washing |
Step-by-Step Cleaning:
Step 1. Confirm It’s Washable
Look at your user manual or check the filter label. If it says “non-washable” or “replace only,” do not wash it. Washing a non-washable HEPA filter ruins it permanently.
Step 2. Remove the Filter from the Air Purifier
Turn off and unplug your device first. Open the panel and carefully take out the HEPA filter. Handle it gently to avoid tearing the delicate material.
Step 3. Rinse with Cool Water
Run cool or lukewarm water over the filter. Do not use hot water, as it can damage the fibers. Skip the soap unless your manual specifically allows it.
Step 4. Dry Completely
Gently shake off water and place the filter on a clean towel. Let it air dry naturally for at least 24 to 48 hours. Keep it away from direct sunlight or heaters.
Step 5. Reinstall the Filter
Check that the filter is totally dry before putting it back. Position it correctly in the slot. Close the panel and turn your air purifier on.
3. How to Clean a Non-Washable HEPA Filter
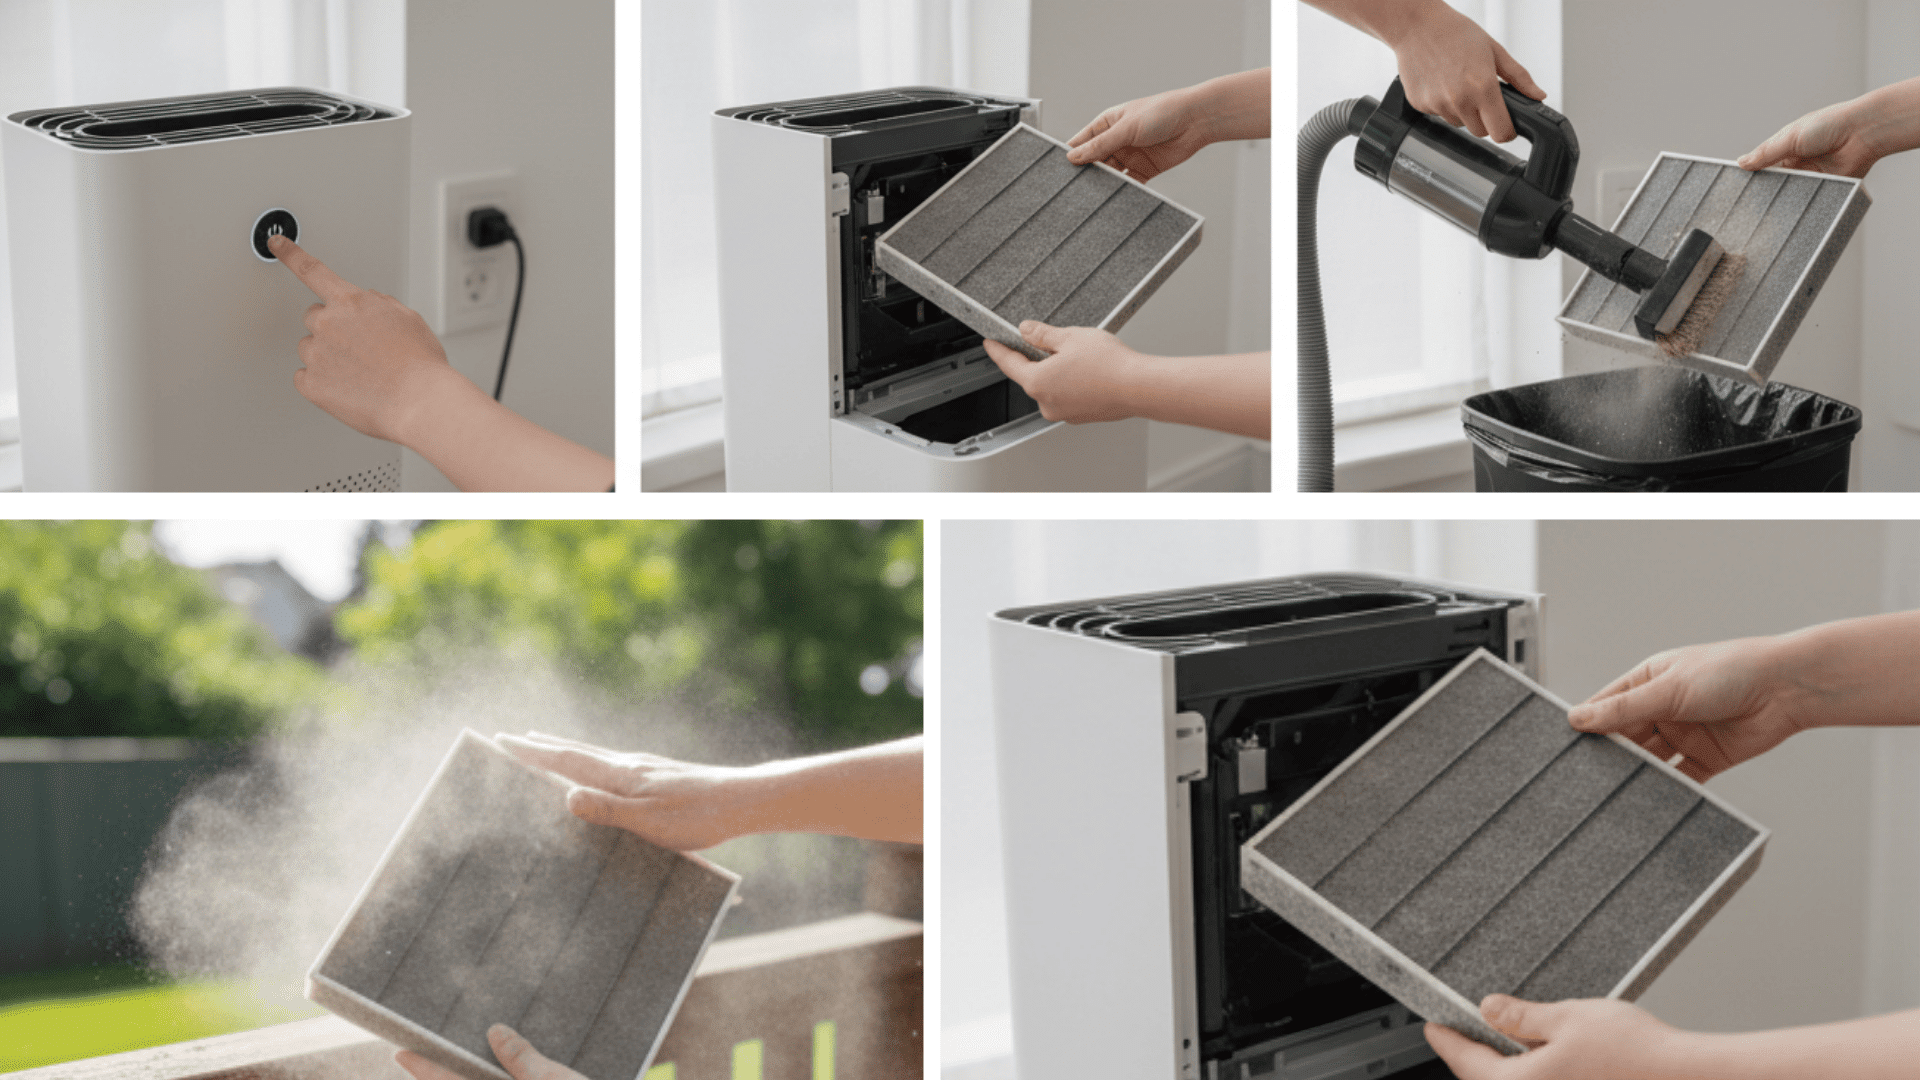
Non-washable HEPA filters need gentle care. You can extend their life with light cleaning, but they will need replacement eventually.
Tools and Materials Needed:
| Item | Purpose |
|---|---|
| Vacuum with soft brush attachment | Removes surface dust gently |
| Outdoor space (optional) | For a tapping filter without an indoor mess |
Step-by-Step Cleaning:
Step 1. Turn Off and Unplug the Air Purifier
Safety comes first. Always unplug your device before opening it. This prevents any electrical problems while you work.
Step 2. Remove the Non-Washable HEPA Filter
Open the air purifier panel and gently slide out the filter. Be careful not to shake it too much as dust might fall out inside your home.
Step 3. Vacuum the Filter with a Soft Brush Attachment
Use the soft brush setting on your vacuum cleaner. Gently run it over both sides of the filter. This removes surface dust without damaging the filter material.
Step 4. Tap the Filter Lightly Outdoors
Take the filter outside if possible. Tap it gently against a hard surface to release trapped debris. Do not hit it too hard, or you will damage the fibers.
Step 5. Reinstall the Cleaned Filter
Place the filter back into its slot carefully. Make sure it sits flat and secure. Close the panel and plug your air purifier in.
4. How to Handle and Clean Activated Carbon Filters
Most activated carbon filters cannot be washed. They absorb odors and chemicals until they are full, then need replacement.
Tools and Materials Needed:
| Item | Purpose |
|---|---|
| Replacement activated carbon filter | Most are disposable and need replacing |
| Gloves (optional) | Keeps hands clean during handling |
| Soft brush or cloth | Removes loose surface debris |
| Trash bin | For disposing of debris or an old filter |
Step-by-Step Cleaning and Handling:
Step 1. Turn Off and Unplug the Air Purifier
Always power down your device before you touch any filter. This keeps you safe and protects your air purifier from damage.
Step 2. Remove the Activated Carbon Filter
Open the panel and locate the carbon filter. It usually looks dark gray or black. Carefully pull it out without tearing it.
Step 3. Shake Off Any Loose Debris
Hold the filter over a trash bin outside if you can. Gently shake it to remove any loose dust or particles that have collected on the surface.
Step 4. Clean with a Soft Brush (If Reusing)
If your carbon filter is marked as reusable, use a soft brush to clean it lightly. This step is rare since most carbon filters are disposable.
Step 5. Install a Replacement
Carbon filters lose their effectiveness after 3 to 6 months. Replace it with a new one when it stops removing odors. Slide the new filter into place and close the panel.
How Often to Clean Air Purifier Filters
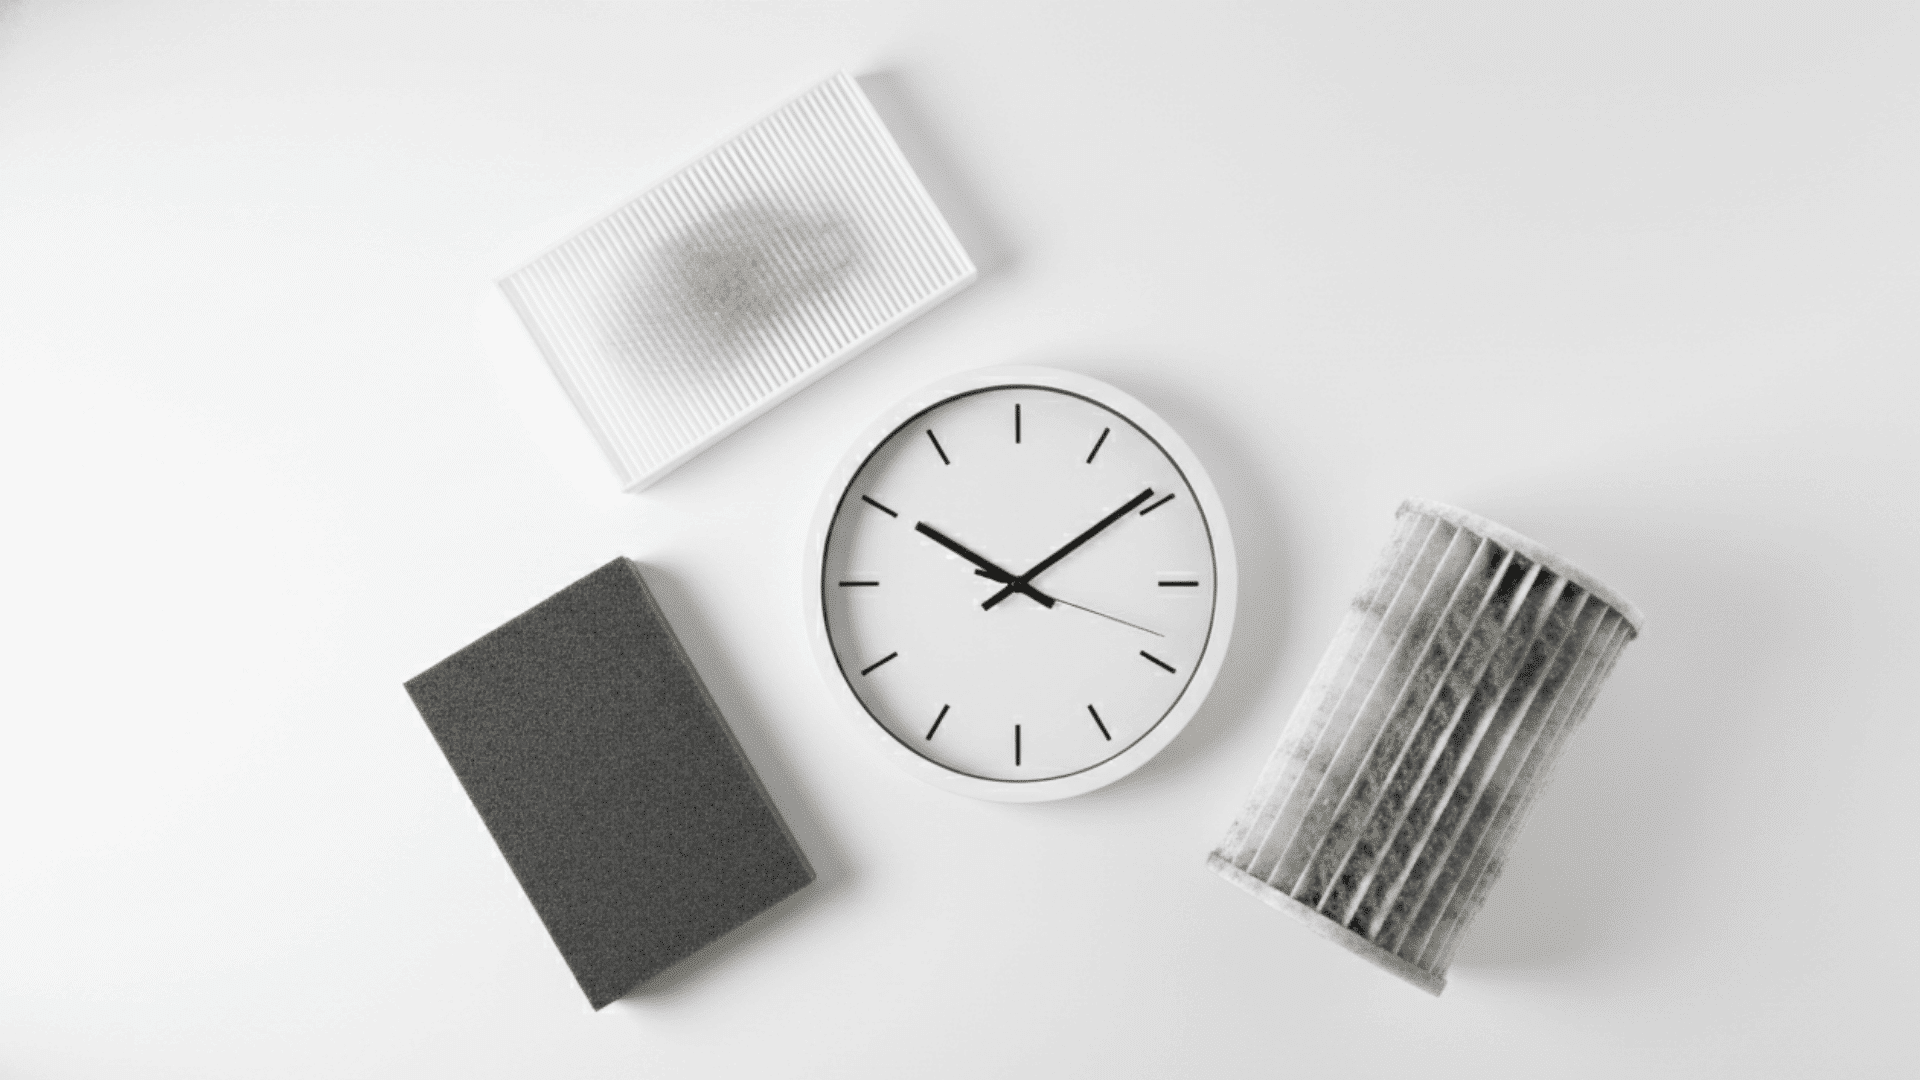
Cleaning or replacing your filters on time keeps your air purifier working well. Regular maintenance prevents poor air quality and extends your device’s life.
Pre-filters
Clean your pre-filters every 2 to 4 weeks for best results. If you have pets or live in a dusty area, clean them more often. Regular cleaning stops dirt from reaching your main filters and keeps airflow strong.
HEPA Filters
Washable HEPA filters need cleaning every 6 to 12 months, depending on usage. Non-washable HEPA filters must be replaced instead of cleaned. Check your manual to know which type you have and follow the recommended schedule.
Activated Carbon Filters
Replace activated carbon filters every 3 to 6 months without fail. These filters cannot be washed or cleaned effectively. Once they stop removing odors, they have reached their limit and need a fresh replacement.
Signs Your Filter Needs Cleaning or Replacement
Your air purifier gives you clear signals when filters need attention. Watch for these warning signs to keep your device running smoothly.
- Reduced Airflow: If air barely flows from your purifier or feels weaker than usual, your filters are probably clogged with dirt and need immediate cleaning or replacement.
- Unpleasant Odors: When you notice bad smells coming from your air purifier instead of fresh air, your carbon filter has stopped working and needs to be replaced right away.
- Visible Dirt and Dust Accumulation: If you can see thick layers of dust, hair, or debris on your pre-filter, it is time to clean it thoroughly or swap it for a new one.
- Indicator Lights: Most modern air purifiers have built-in lights that turn on when your filter needs cleaning or replacement, so check these alerts regularly and act on them promptly.
Brand-Specific Filter Cleaning Tips
Different air purifier brands have unique filter designs and cleaning requirements. Following your brand’s specific guidelines helps you avoid damage and keeps your warranty valid.
- Dyson: Most Dyson filters are non-washable and need replacement every 12 months. Some models have washable pre-filters you can rinse under cold water monthly. Never wash the main HEPA or carbon filter, as water destroys them.
- Honeywell: Honeywell’s washable pre-filters can be vacuumed or rinsed every 2 to 4 weeks. Their True HEPA filters are non-washable and must be replaced every 12 months. Check your product label to identify which filter type you have.
- Levoit, Coway, Blueair: Levoit filters need replacement every 6 to 8 months, with monthly pre-filter cleaning. Coway has washable pre-filters but non-washable HEPA filters that last one year. Blueair HEPASilent filters are non-washable and require replacement every 6 months.
Each brand designs filters differently, so your user manual is your best guide. When in doubt, contact customer support before washing any filter. Proper care based on your specific brand keeps your air purifier running efficiently for years.
Summing It Up
Cleaning your air purifier filters does not have to be complicated. Regular maintenance keeps your device running efficiently and your indoor air fresh.
Pre-filters need cleaning every few weeks, HEPA filters every 6 to 12 months, and carbon filters need replacement every 3 to 6 months.
Pay attention to warning signs like weak airflow or bad odors. These tell you when filters need care.
Clean filters mean better air quality for your family. They reduce allergens, remove odors, and help you breathe easier at home. Start checking your filters today. Set a monthly reminder on your phone so you never forget.
Have questions about how to clean filters for your specific model? Drop a comment below, and we will help you out.