Most plant problems don’t start loud or obvious. They start small, quiet, and easy to explain away. A few pale marks. A leaf that looks tired. A surface that feels slightly off.
What you’re seeing rarely matches the dramatic photos online, and most advice jumps straight to treatment without helping you understand what’s actually happening.
This blog focuses on how spider mite damage develops, how to confirm what you’re seeing, and how to separate real warning signs from look-alike issues.
Once you understand the pattern, decisions become much easier. Let’s start with what spider mites really are.
What Spider Mites Are and Why Early Detection Matters
Spider mites are tiny plant-feeding pests. They are not insects. They are closer to spiders and ticks.
Because of their size, they don’t announce themselves right away. They feed by piercing plant cells and sucking out the contents. Each bite removes chlorophyll from the leaf. While one bite is nothing, thousands add up fast.
They’re hard to spot early because they work quietly. No holes. No chewed edges. Just subtle damage that looks like stress.
Indoors, dry air and steady warmth help them multiply without interruption. Outdoors, hot spells can do the same thing.
Damage escalates fast because spider mites reproduce quickly. A small population can turn into a serious one in a short time.
If you catch them early, the plant is still strong… Leaves can recover… Growth can stabilize. If you miss that window, the plant spends energy just trying to survive.
The Most Reliable Early Signs of Spider Mites
The earliest signs usually appear before any webbing. That’s important, because many people wait for webs as confirmation. By then, the infestation is no longer early. The signs below show up while the mites are still building number:
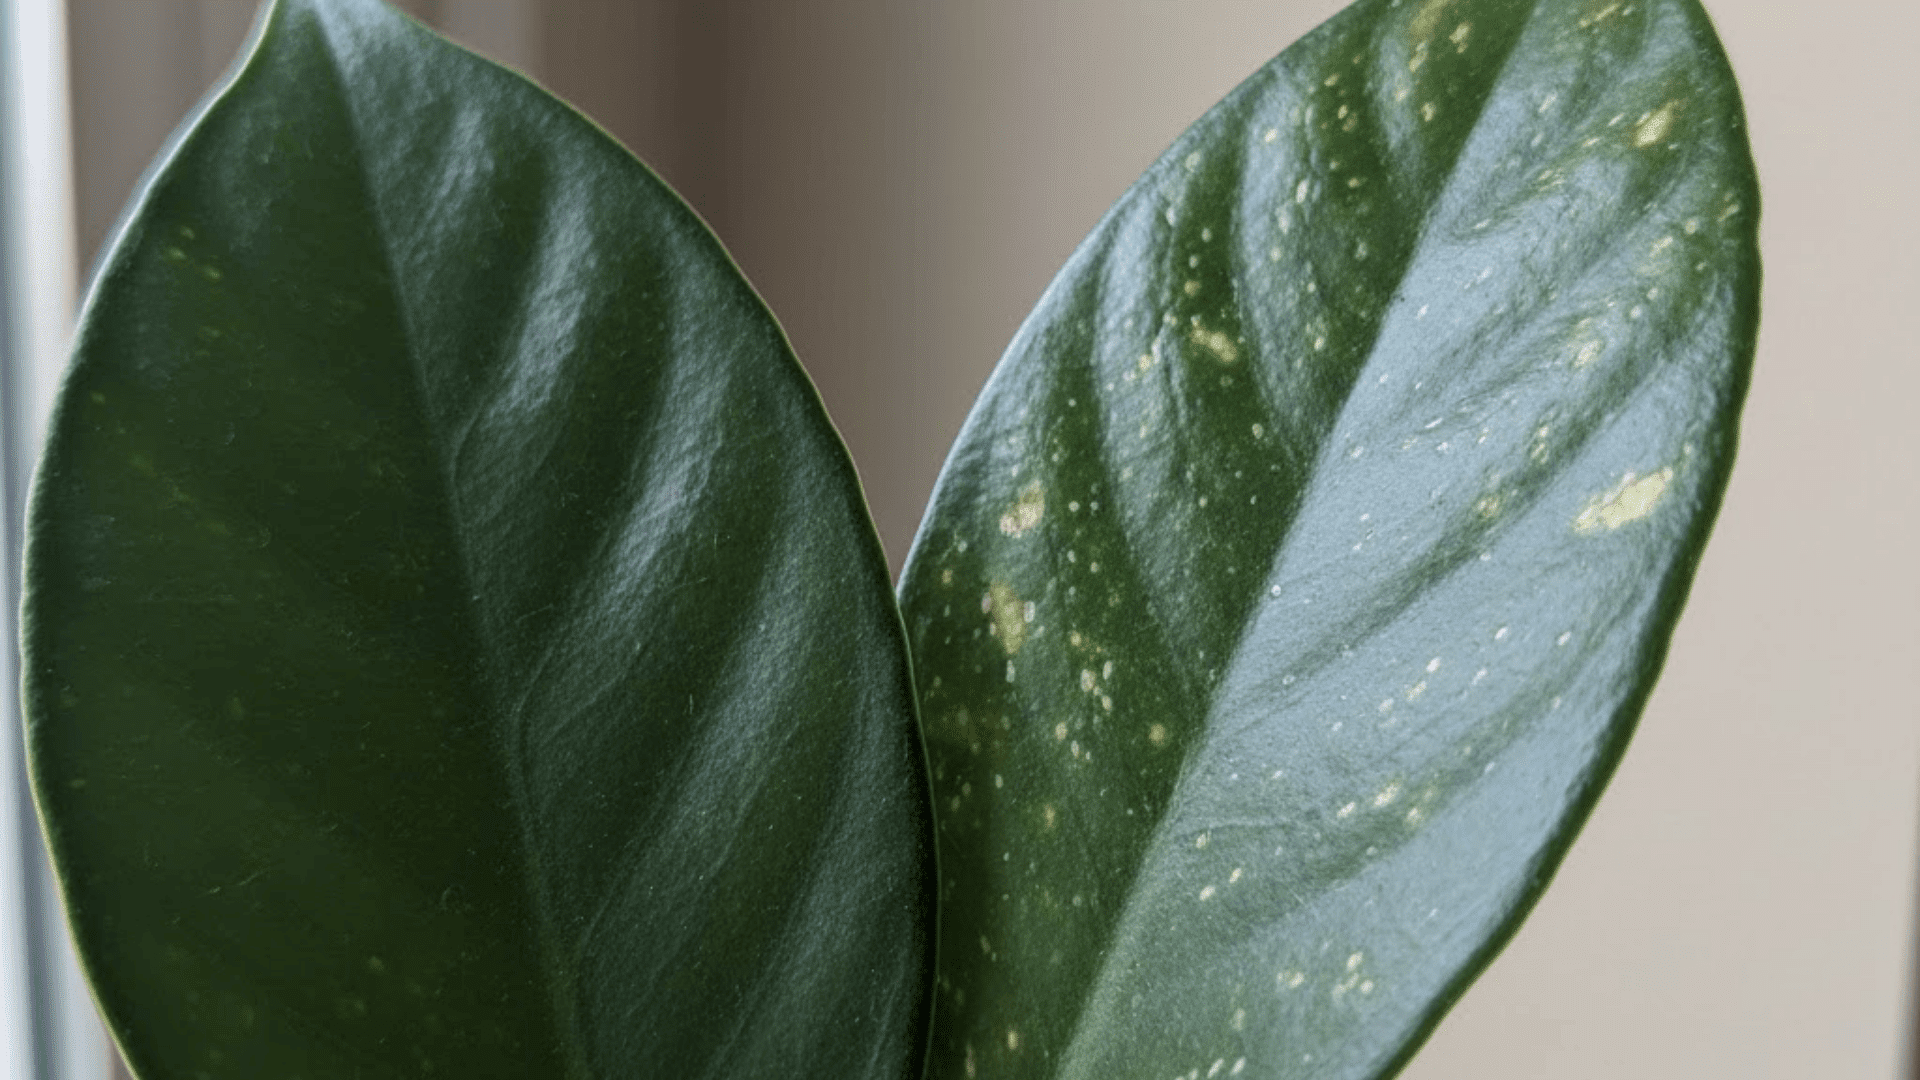
Tiny White or Yellow Speckles on Leaves
This is called stippling. Each speck is a spot where chlorophyll has been removed. It happens because spider mites feed cell by cell, not in large patches.
Stippling usually starts on older leaves first. That’s where mites settle while populations are small. You’ll often see it on the top surface of the leaf even though the mites are feeding underneath.
This damage is often mistaken for nutrient problems. That’s because it looks scattered and pale, not dramatic. The difference is pattern. Nutrient issues tend to affect whole leaves evenly.
Spider mite stippling looks random and uneven, like the leaf was lightly sprayed with paint.
Dull or Faded Leaf Color

Healthy leaves have a natural shine. Even matte leaves reflect light evenly. Early spider mite damage takes that away. Leaves start to look flat. The color feels tired.
Early bronzing can appear, especially on plants with darker green leaves. This isn’t rust or burn. It’s the result of many tiny feeding points blending together. The leaf still holds its shape, but the color looks muted.
This change is gradual. That’s why it’s easy to miss if you see the plant every day. Photos taken weeks apart often reveal it better than memory.
Dusty or Gritty Leaf Texture
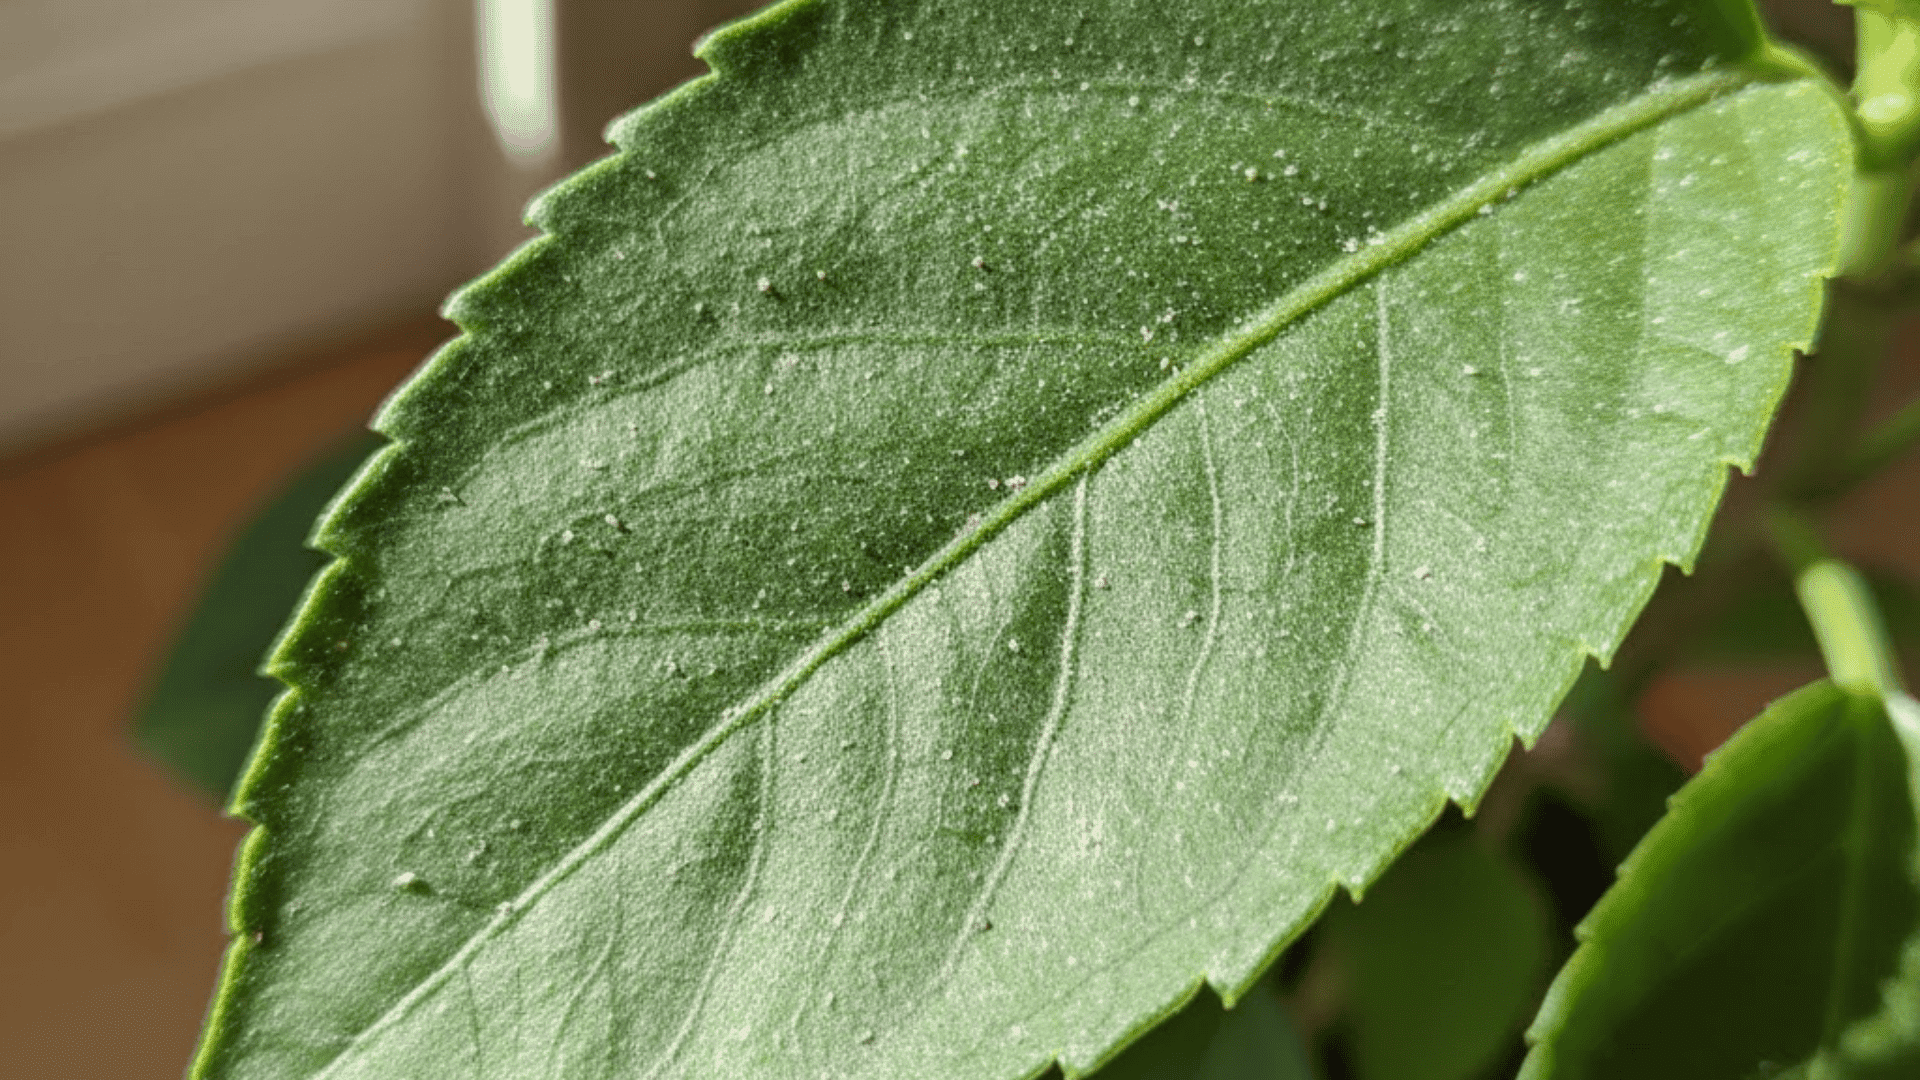
When you run your fingers lightly across an affected leaf, it may feel gritty. This isn’t dirt. It’s a mix of fine webbing, waste, and shed skins.
Actual dust sits on the surface and wipes away cleanly. Spider mite residue feels slightly sticky or uneven. It tends to cling near veins and leaf edges.
This texture change often shows up before webs are visible. It’s one of the most overlooked clues because people assume plants just get dusty indoors.
Signs that Confirm Spider Mites are Present
These signs remove doubt. If you see one or more of these clearly, you are no longer guessing.
1. Fine Webbing Between Leaves and Stems
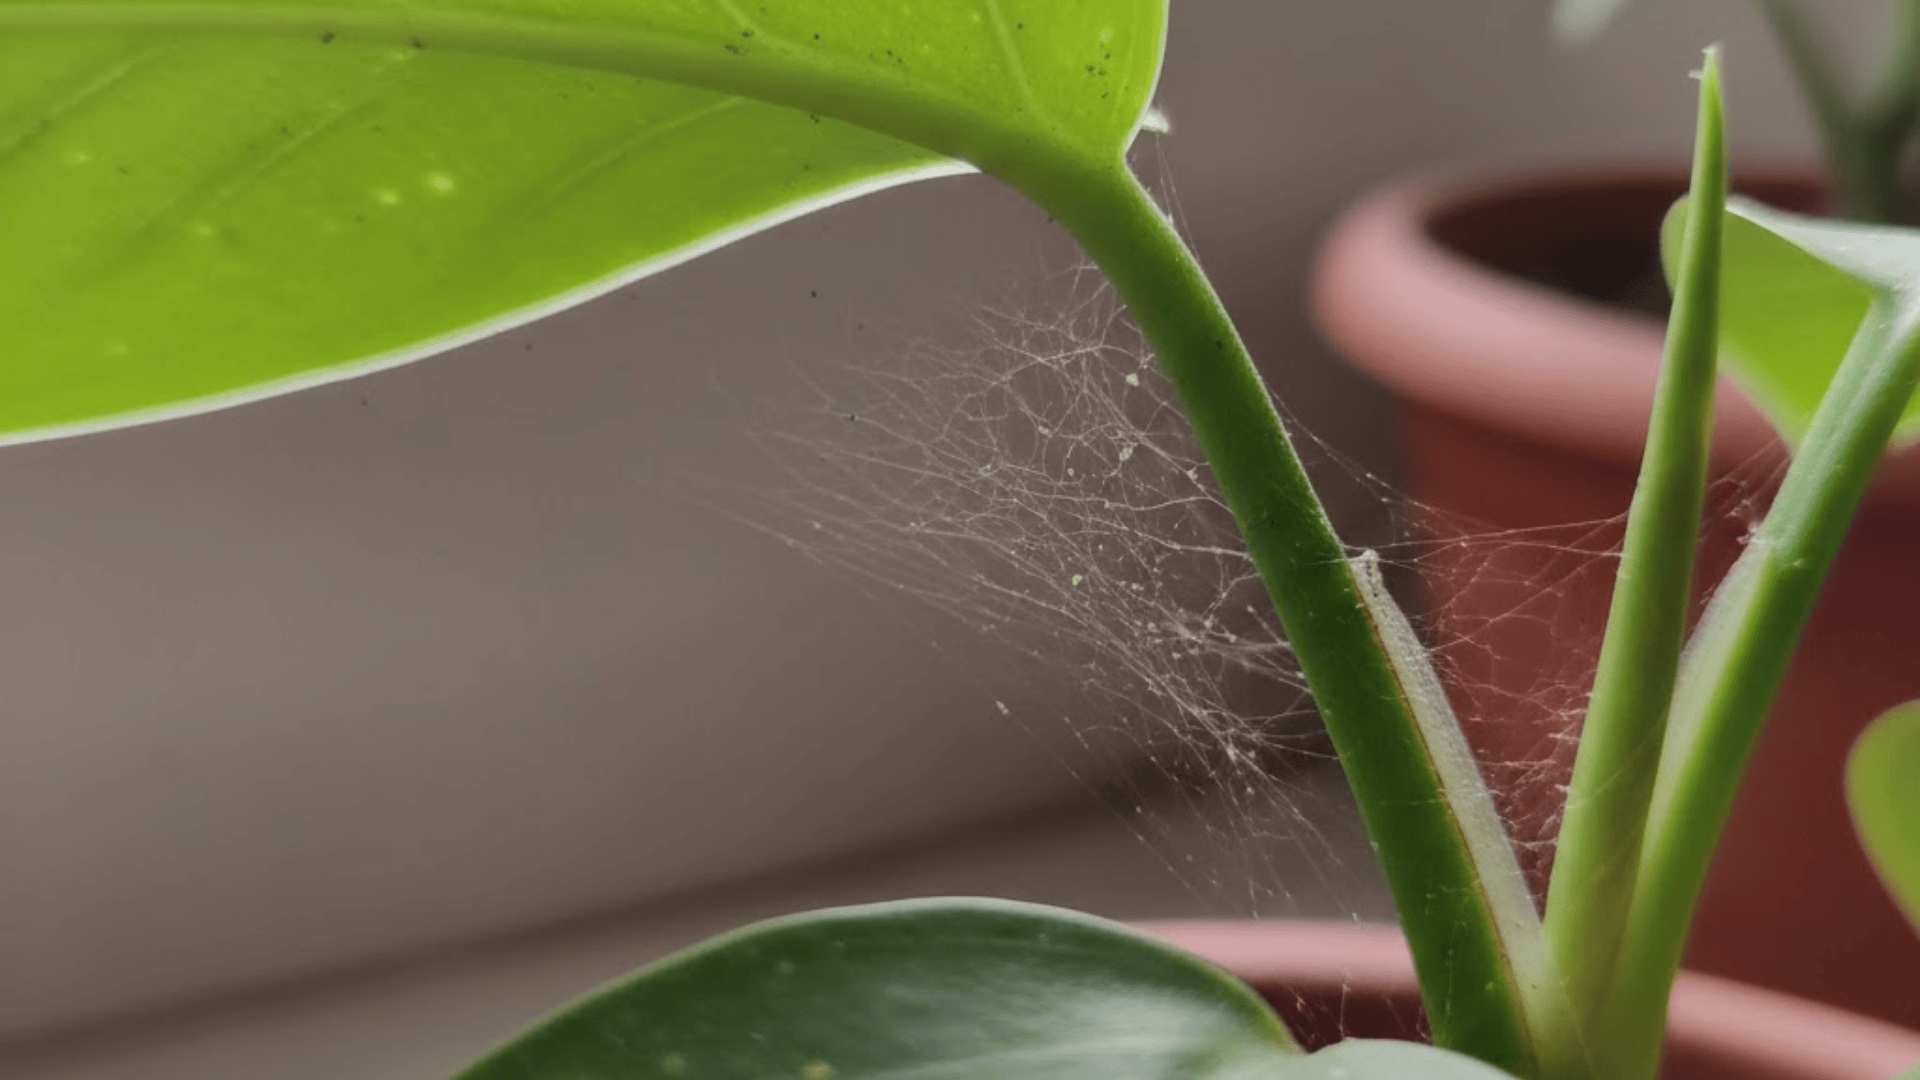
Webbing appears when spider mite populations increase. It protects them and helps them move. Early infestations may have no visible webs at all.
When webs do appear, they are very fine. Not thick like spider webs. They often show up where leaves meet stems or in tight growth points.
If you only check leaf surfaces, you may miss them. Tilting the plant and looking across it at an angle makes webs easier to see.
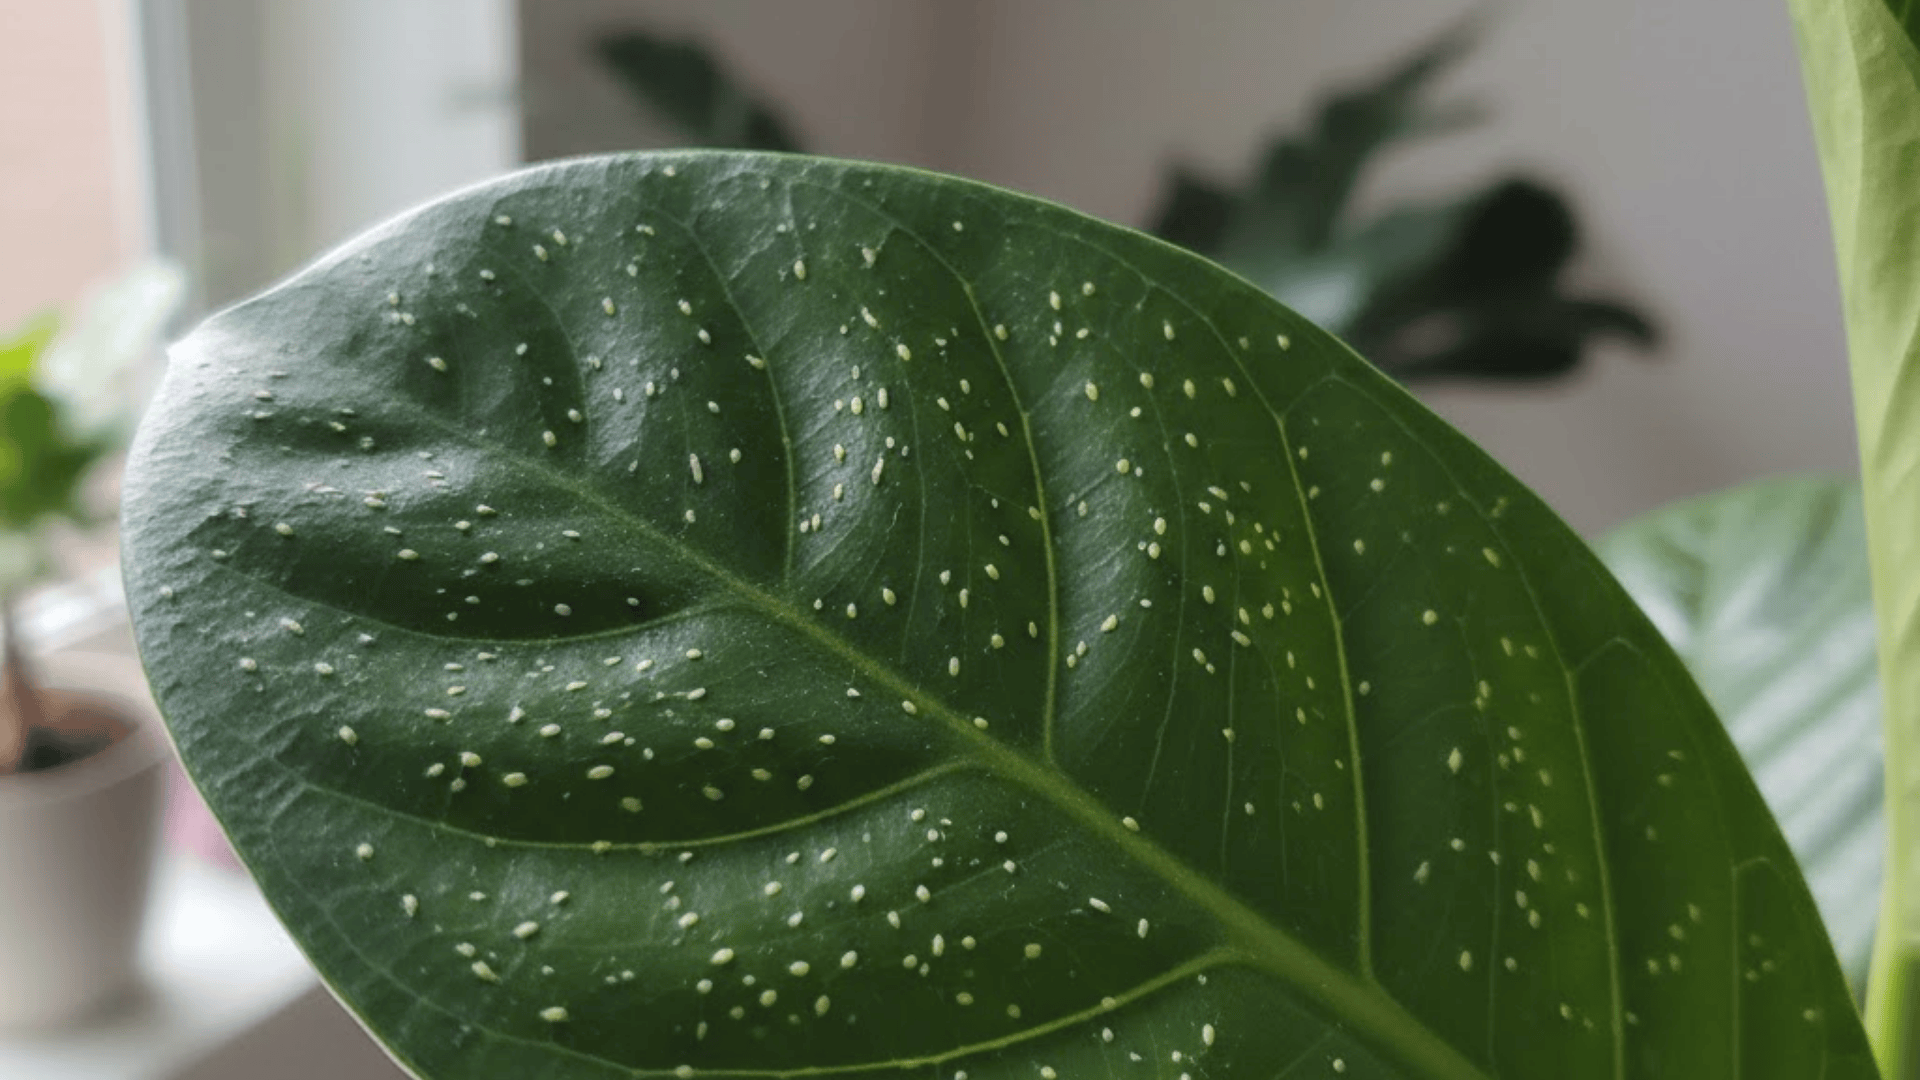
2. Tiny Moving Specks on the Underside of Leaves
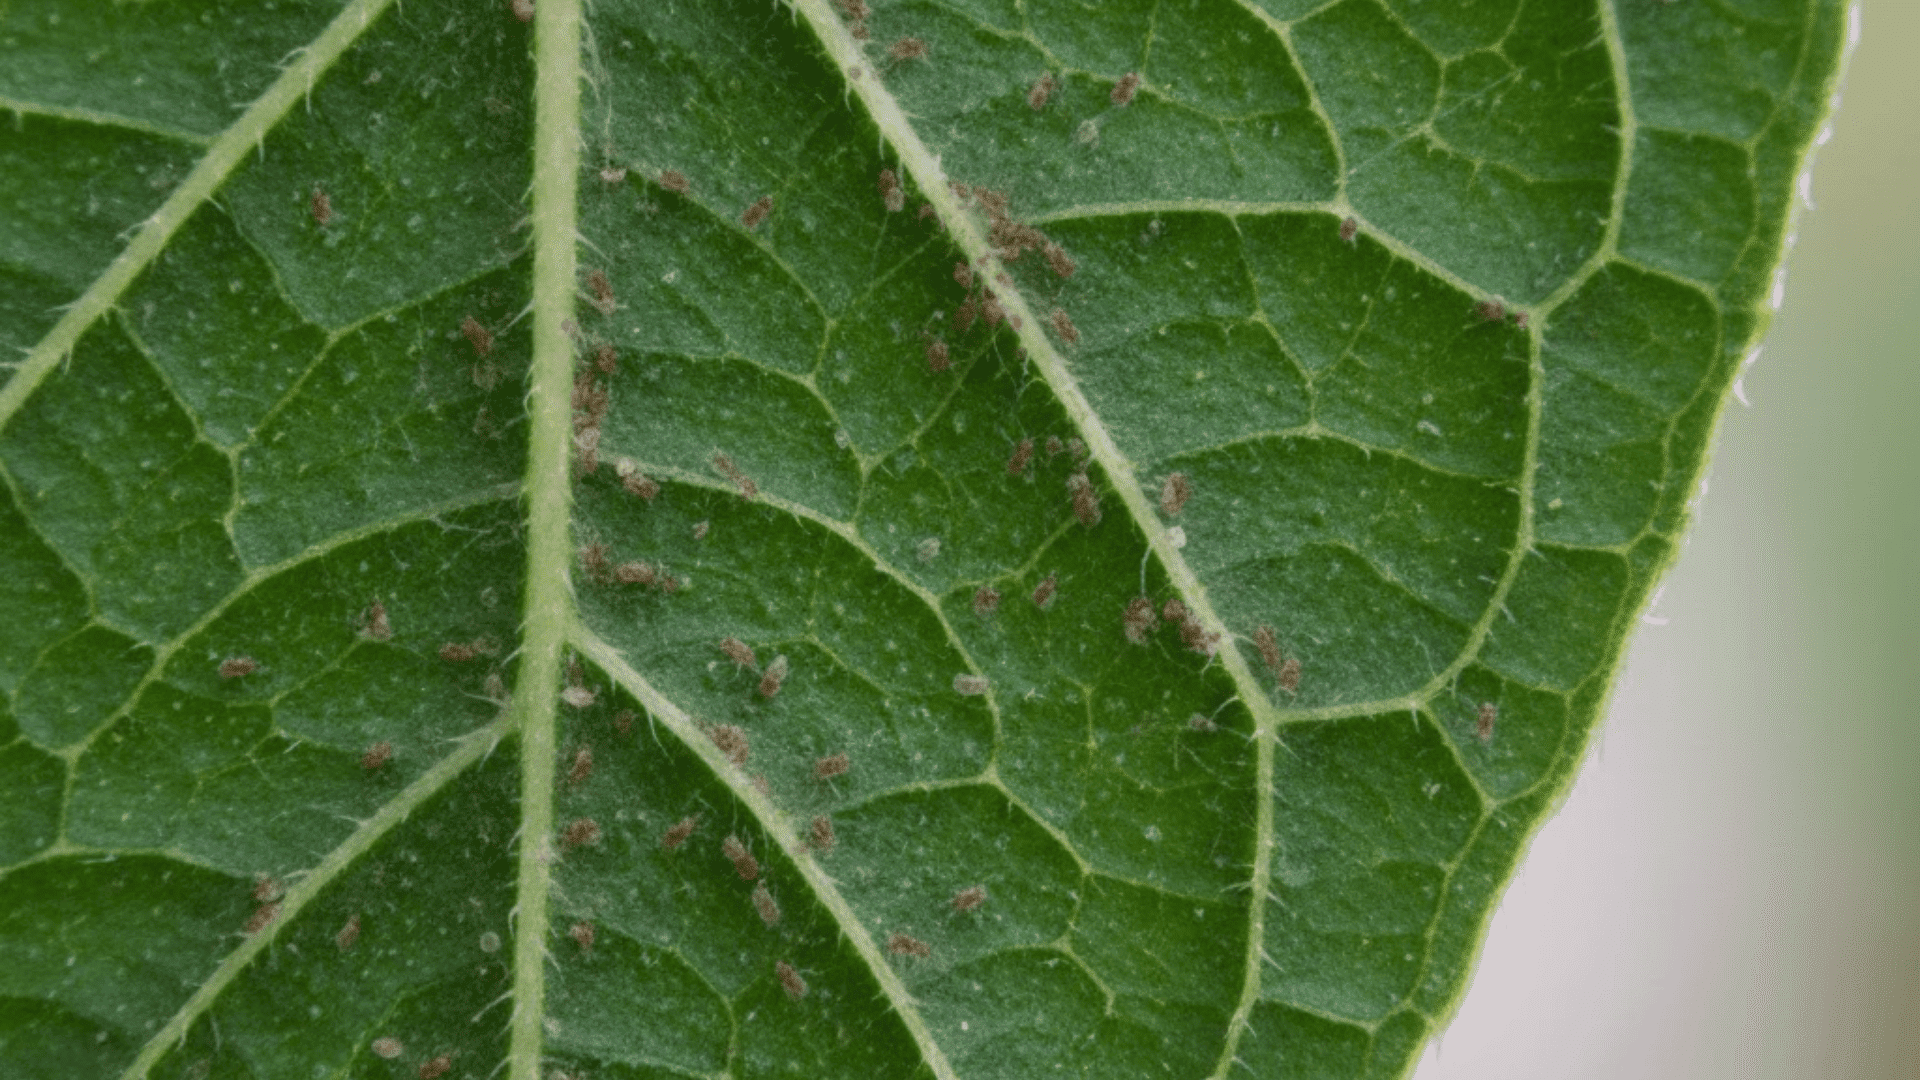
Spider mites come in different colors. Red, brown, tan, or pale green are common. They are extremely small. Most look like moving dots.
Magnification helps because movement confirms life. Static specks could be debris. Moving ones are not.
The undersides of leaves are where mites live and feed. If you only look from above, you are looking in the wrong place.
3. White Eggs Under Leaves

Spider mite eggs look like tiny white grains of salt. They are usually clustered along veins on the underside of leaves.
Eggs mean active reproduction. That matters because it tells you the population is growing, not just present. Even if damage still looks light, eggs signal momentum.
How to Check for Spider Mites (Simple At-Home Tests)
These checks help you confirm what you’re seeing instead of relying on guesswork.
The White Paper Test
Hold a plain white sheet of paper under a leaf. Tap the leaf gently with your finger.
If mites are present, tiny specks will fall onto the paper. Watch closely. Spider mites move slowly but clearly once you focus.
Movement looks like crawling dots, not jumping. If the specks smear green when crushed, that’s another sign.
Best Time of Day to Inspect
Bright, indirect light works best. Morning light near a window is ideal. Harsh midday sun can hide detail through glare.
Tilt leaves so light skims across the surface. This makes texture changes and webbing easier to spot. Always check from below, not just above.
Early Spider Mites vs. Look-Alike Problems
Misdiagnosis is common. These comparisons help separate similar issues.
| Issue | What It Looks Like | Key Difference From Spider Mites |
|---|---|---|
| Dust | Fine particles sitting on the leaf surface | Dust wipes away cleanly and leaves the leaf looking normal underneath |
| Thrips | Silvery streaks with tiny black dots (waste) | Thrips are larger, easier to see, and do not create fine webbing |
| Nutrient Deficiency | Even yellowing or discoloration following vein patterns | Spider mite damage is patchy, speckled, and uneven |
| Overwatering Stress | Drooping, soft leaves and weak stems | Spider mites cause stiffness, discoloration, and texture changes without early drooping |
These issues often get confused because the early symptoms overlap. Looking at one clear visual difference at a time makes it easier to rule things out without guessing.
Where Spider Mites Start on Indoor Plants
Knowing where to look saves time and frustration. Spider mites don’t spread randomly at first. They settle in predictable places where conditions work in their favor.
- Undersides of leaves: This is ground zero. Mites avoid light and disturbance, and the underside gives them both shelter and direct access to feeding sites.
- New growth: Tender leaves are easier to pierce and feed on. As populations grow, mites move into fresh growth and tight spaces where they’re harder to spot.
- Dry, warm locations in the home: Plants near heaters, sunny windows, or electronics are more vulnerable. Dry air speeds reproduction and slows the plant’s ability to recover.
Once you know these starting points, inspections become quicker and more accurate. You stop scanning the whole plant and start checking the places that matter most.
How Fast Spider Mites Spread and Why Early Action Matters

Spider mites multiply faster than most people expect. In warm, dry indoor conditions, eggs can hatch in just a few days. Those young mites mature quickly and begin feeding almost right away.
Within a short span of time, one small cluster can turn into many overlapping generations feeding at once. This is why damage seems to “suddenly” appear, even though it has been building quietly.
They don’t need to move far to spread. Mites crawl from leaf to leaf, but they can also travel on air currents. Fans, open windows, and even brushing past plants can help them relocate. Moving pots or grouping plants closely gives them new territory.
Early action matters because small populations are slower, more exposed, and easier to interrupt. Once numbers climb, control takes longer and plants need more time to regain strength
What to Do Immediately If You Spot Early Signs
This is about first response, not full treatment.
- Isolate the plant immediately. Move the plant away from others to reduce spread, since spider mites crawl easily and can transfer through contact, air movement, or nearby foliage.
- Clean the leaves gently. Rinse the plant with water or wipe both sides of the leaves using a damp cloth to remove mites, residue, and fine webbing buildup.
- Increase humidity around the plant. Raise humidity slightly using a humidifier or grouping plants together, since spider mites reproduce faster in dry, warm indoor air.
Wiping can be enough only when populations are very small and caught early. If eggs or repeated damage appear, wiping alone will not keep up.
Quick Spider Mite Diagnosis Checklist
- Speckled leaves that look uneven
- Activity on leaf undersides
- Positive paper test
- Webbing in joints or growth points
- Dry, warm environment
Conclusion
Spider mites cause stress because they work quietly and build momentum before they’re obvious.
The key isn’t reacting fast out of fear. It’s learning how to read the early signs of spider mites with a clear head.
When you understand how damage shows up, where mites hide, and how quickly small populations grow, the situation feels more manageable. You stop guessing and start observing.
That shift protects both your plants and your peace of mind. If something looks off, take a few minutes to inspect, confirm, and respond instead of rushing to extremes.
The next step is simple: check your plants today using what you’ve learned here, especially the undersides of leaves, and act while the problem is still small.