Your kitchen scraps can become the richest soil your garden’s ever seen. That’s what composting does, and building your own bin makes it happen on your terms.
Store-bought bins are fine, but they’re pricey and rarely fit your space the way a DIY version can.
With basic materials and a simple plan, you can create something that works better for less.
We’re covering the builds that actually hold up, the materials worth using, and the common mistakes that turn good intentions into a soggy, smelly disaster.
Keep it straightforward, and composting becomes one of those things that just works.
Can You Really Make an Effective Compost Bin at Home?
Yes, and it’s more straightforward than you’d think.
Composting is decomposition with a purpose. Microorganisms break down organic matter into nutrient-rich soil, but they need the right conditions: airflow, moisture, and a balance of green and brown materials.
Your bin is just the container that holds it all together.
A functional compost bin needs ventilation, drainage, and enough volume to generate heat. Store-bought options deliver this, but so can a homemade setup with the right design.
DIY bins cost less, adapt to your space, and often perform just as well. The difference isn’t in where you buy it. It’s in understanding what makes composting actually work.
What Makes a Compost Bin Work?
Your bin needs four things to turn scraps into soil:
- Airflow: Oxygen feeds the microbes doing the work. Without it, things get anaerobic and smell bad.
- Moisture Balance: Think damp sponge, not soaking wet or bone dry.
- Drainage: Excess water needs somewhere to go, or you’ll have a swamp.
- Size: At least 3 feet cubed gives you enough mass to generate heat.
Choosing the Right Location
Partial shade works best. Too much sun dries it out, too much shade slows decomposition. Keep it convenient but not right against your house.
Ground contact helps with drainage and lets worms in. Raised bins work too if drainage is built in.
Materials You Can Use for a Compost Bin DIY
Building a compost bin comes down to what you have and what fits your space. Each material has its trade-offs, but all of them can work if you set them up right.
| Material | Pros | Cons |
|---|---|---|
| Wood | Natural look, good insulation, sturdy | Can rot over time, needs untreated lumber |
| Plastic bins | Lightweight, weather-resistant, easy to move | Can crack in extreme temps, less airflow |
| Wire mesh | Excellent airflow, inexpensive, fast assembly | No insulation, exposed look, critters can get in |
| Pallets | Free or cheap, sturdy, modular | Requires assembly, check for chemical treatment |
| Repurposed items | Creative, eco-friendly, uses what you have | Variable durability, may need modifications |
Compost Bin DIY: Step-by-Step Builds
Choosing the right build depends on your budget, space, and how much effort you want to put in. Here are five solid options that actually work.
1. Simple Plastic Bin Compost Bin
This is the easiest entry point. Grab a large plastic storage bin, drill some holes, and you’re composting.
- Step 1: Get a plastic bin with a lid, at least 18 gallons. Drill ventilation holes around all sides and the bottom, spacing them about 3 inches apart.
- Step 2: Place the bin on bricks or a raised surface for drainage. Add a mix of brown and green materials to start.
- Step 3: Keep the lid on to retain moisture, but open it every few days to turn the contents with a garden fork.
- Step 4: Check moisture weekly. If it’s too dry, add water. Too wet, add more browns like shredded paper.
2. Wooden Compost Bin
A wooden bin looks better and lasts longer if you build it right. Use untreated lumber to keep chemicals out of your compost.
- Step 1: Cut four corner posts and build a frame roughly 3x3x3 feet. Use cedar or untreated pine.
- Step 2: Attach slats horizontally, leaving half-inch gaps between them for airflow. Make one side removable for easy access.
- Step 3: Add a hinged lid or leave it open. If you want weatherproofing, apply a non-toxic wood sealant to the exterior only.
- Step 4: Set it directly on the ground. The wood will eventually break down, but that takes years.
3. Pallet Compost Bin
Pallets are often free and stack together easily. Just make sure they’re heat-treated, not chemically treated.
- Step 1: Find four pallets. Check for the HT stamp, which means heat-treated. Avoid MB stamps, which indicate toxic chemicals.
- Step 2: Stand three pallets upright in a U-shape and secure the corners with heavy-duty zip ties or screws.
- Step 3: Use the fourth pallet as a removable front. Lean it against the opening or attach it with loose ties you can undo.
- Step 4: Line the inside with wire mesh or hardware cloth if you want to contain smaller materials.
4. Wire Mesh Compost Bin
This is the fastest build. It’s all about airflow, which means faster decomposition in the right conditions.
- Step 1: Get a 10-foot section of wire mesh or hardware cloth. Form it into a cylinder about 3 feet in diameter.
- Step 2: Secure the ends with zip ties or wire. Make sure there are no sharp edges sticking out.
- Step 3: Set it on bare ground. You can stake it down if it feels unstable.
- Step 4: Fill it and turn the pile regularly. The open structure makes access easy but offers no insulation, so this works best in warmer climates.
5. Tumbler-Style DIY Compost Bin
A tumbler speeds things up because turning is effortless. Building one takes more effort upfront, but pays off if you want finished compost faster.
- Step 1: Use a large plastic barrel with a tight lid. Drill ventilation holes all over, then mount it horizontally on a sturdy frame with a central rod through the middle.
- Step 2: Attach handles or grips to the outside so you can rotate it easily. Make sure the frame is stable, and the barrel spins freely.
- Step 3: Load it with your greens and browns, then rotate it every few days instead of turning with a fork.
- Step 4: Tumblers heat up faster and finish compost in weeks instead of months, but they have limited capacity and cost more to build than stationary bins.
Homemade Compost Bin Size Guide
The right size keeps your compost working efficiently without taking up more space than you need. Match your bin to how much waste you actually generate.
| Household Type | Recommended Size | Why It Works |
|---|---|---|
| Small households | 2x2x2 feet to 3x3x3 feet | Handles kitchen scraps and light yard waste without excess capacity that slows decomposition |
| Medium family gardens | 3x3x3 feet to 4x4x4 feet | Balances volume for steady heat generation with manageable turning and harvesting |
| Large yard or heavy compost users | 4x4x4 feet or larger, or multiple bins | Processes high volumes efficiently and allows for batch composting in rotation |
What to Put in Your Compost Bin?
Composting works when you balance nitrogen-rich greens with carbon-heavy browns. Knowing what goes in and what stays out keeps your bin productive and problem-free.
1. Green Materials
These add nitrogen and moisture to fuel decomposition.
- Fruit and vegetable scraps
- Coffee grounds and tea bags
- Fresh grass clippings
- Plant trimmings and weeds (without seeds)
2. Brown Materials
These provide carbon and structure, keeping airflow moving through the pile.
- Dried leaves
- Shredded cardboard and newspaper
- Straw or hay
- Sawdust from untreated wood
3. What to Avoid
Some materials attract pests, smell bad, or introduce pathogens into your compost.
- Meat, fish, and dairy products
- Oily or greasy foods
- Diseased or pest-infested plants
- Pet waste or kitty litter
How to Start Composting After Building the Bin?
Once your bin is ready, starting your compost pile correctly sets the foundation for everything that follows. Get the layers and ratios right from the beginning, and maintenance becomes straightforward.
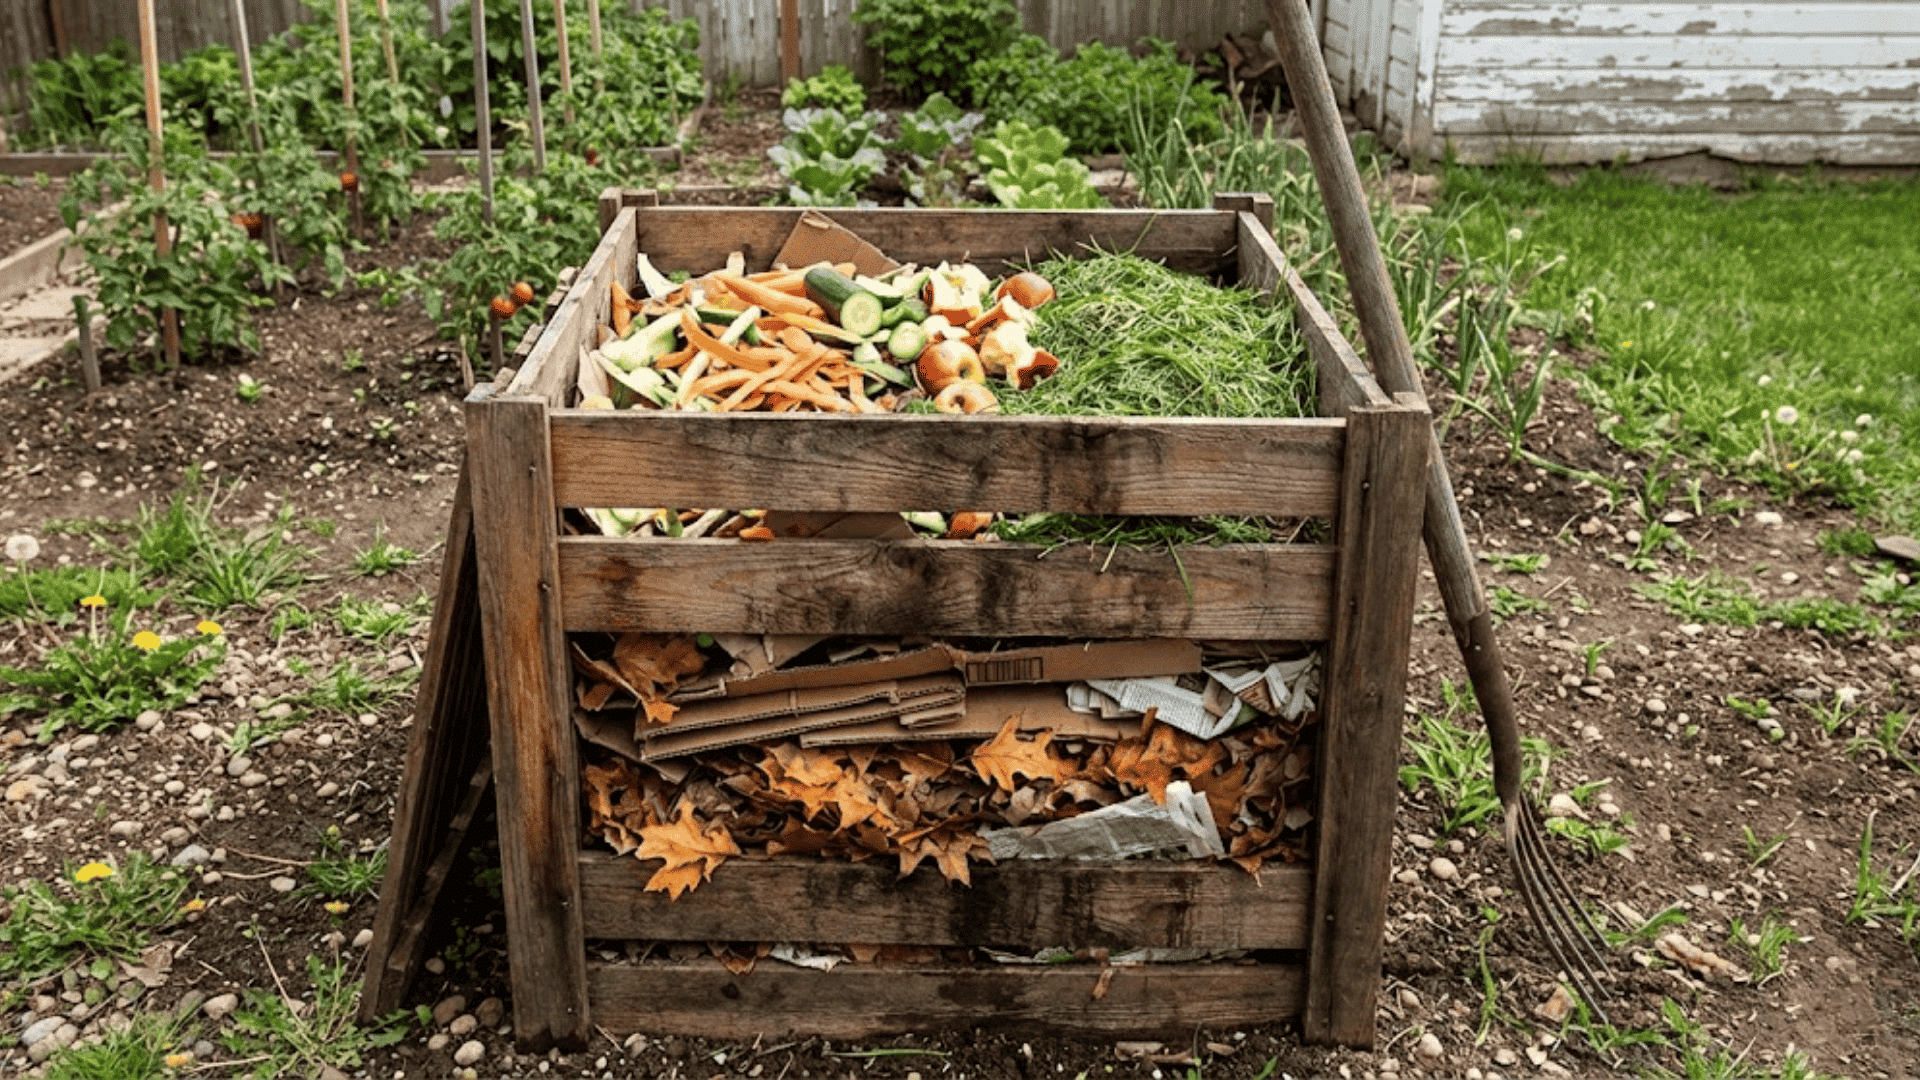
Setting Up Your First Layers
Start with a base layer of coarse browns like twigs or straw. This creates airflow at the bottom and prevents compaction.
Then alternate greens and browns as you add material. Aim for a ratio of roughly one part greens to three parts browns by volume.
Greens are wet and nitrogen-rich, browns are dry and carbon-heavy. Too many greens create a slimy, smelly mess. Too many browns slow everything down.
Check moisture by grabbing a handful of compost and squeezing it. It should feel like a wrung-out sponge. A few drops of water are fine, but if it’s dripping wet, add more browns. If it’s dry and crumbly, add water or more greens.
Turning Schedule
Turning adds oxygen and speeds up decomposition. How often you turn depends on how fast you want finished compost.
| Turning Frequency | Compost Timeline | Best For |
|---|---|---|
| Every 3-4 days | 3-4 weeks | Hot composting, fast results, requires effort |
| Once a week | 2-3 months | Active composting with moderate effort |
| Every 2-3 weeks | 4-6 months | Low maintenance, slower, but less work |
| Rarely or never | 6-12 months | Cold composting, minimal effort, longer wait |
Keeping Your Compost Bin Running Smoothly
Building the bin is just the start. Maintaining it properly and avoiding common mistakes keeps your compost healthy and your yard pleasant.
- Turn your pile every week or two to add oxygen and speed decomposition. Skipping this creates compacted, slow-decomposing material.
- Balance moisture and materials. Too many greens or too much water causes slime and smell. Add browns and turn it to fix the problem.
- Bury food scraps under browns and skip meat, dairy, or oily foods to keep pests out and odors down.
- Don’t place your bin on concrete. It blocks drainage and keeps beneficial organisms out. Bare ground works best.
- Winter slows things down but doesn’t stop composting. Insulate with straw or keep adding material so it’s ready to heat up in spring.
Get these basics right, and your compost practically takes care of itself. A little attention goes a long way toward turning scraps into something your garden will love.
Compost Bin DIY vs. Best Compost Bins
Not everyone needs to build from scratch. Comparing DIY and store-bought bins helps you decide what actually makes sense for your situation.
| Factor | DIY Compost Bin | Store-Bought Compost Bin |
|---|---|---|
| Cost | $10 to $50, depending on materials | $50 to $300+ for quality bins |
| Durability | Varies by material. Wood rots, plastic cracks, but repairs are easy | Engineered for longevity, but harder to fix when damaged |
| Convenience | Requires time and effort to build, fully customizable to your space | Ready to use immediately, standardized design |
| Best For | People who want to save money, have specific size needs, or enjoy hands-on projects | Renters, beginners who want simplicity, those with limited time or tools |
The Bottom Line
A compost bin DIY doesn’t require perfection, just a solid plan and the right materials.
Pallets, plastic, or wire mesh all work toward the same goal: turning waste into something useful. Your garden gets richer soil, your trash bin gets lighter, and you’ve built something functional with your own hands.
Start small if you need to. Adjust as you learn. Composting is forgiving like that.
Got questions or tips from your own setup? Drop a comment below. We’d love to hear what’s working in your backyard.