There’s a quiet satisfaction in pressing a single garlic clove into the soil and watching it become an entire bulb of aromatic goodness.
Growing garlic at home is genuinely easy and incredibly rewarding, giving you access to flavors that store-bought varieties simply can’t match.
Imagine trimming your grocery costs while enjoying the pure satisfaction of growing your own food.
Garlic delivers on every front!
This guide will walk you through selecting the perfect clove, nurturing it through the seasons, and harvesting those beautiful papery bulbs that make it all worthwhile.
Can You Grow Garlic From a Single Clove?
Yes, you can absolutely grow garlic from a single clove. Each clove you plant becomes a full bulb with multiple cloves. It’s garlic’s natural way of reproducing, making it one of the most beginner-friendly crops you’ll ever plant.
While grocery store garlic can work, seed garlic from nurseries or online suppliers is your best bet. It’s certified disease-free and chosen for reliable growth.
Grocery store bulbs are often treated to prevent sprouting, which can hinder your success.
For home gardens, hardneck varieties thrive in colder climates and offer bold flavors, while softneck types suit milder regions and store beautifully for months.
Types of Garlic to Know Before Planting
Before you plant, it helps to know the two main garlic types and what makes each special.
Hardneck garlic loves the cold and thrives in northern climates. It sends up curly scapes in spring (bonus harvest!) and produces fewer cloves per bulb, but they’re wonderfully large and easy to peel.
The flavor tends to be more complex and robust.
Softneck garlic prefers milder winters and warmer growing conditions. This is the type you typically find braided at farmers’ markets because of its flexible stems.
It produces more cloves per bulb, though they’re smaller, and stores significantly longer than hardneck varieties, often lasting well into the next year.
Best Time to Grow Garlic From a Clove
Timing is everything when it comes to growing garlic. Plant at the right moment, and you’ll be rewarded with plump, full bulbs. Miss the window, and your harvest might be disappointingly small.
Here’s what you need to know about when to plant.
| Planting Season | What to Expect | Key Details |
|---|---|---|
| Fall Planting (Recommended) | Larger, fuller bulbs | Plant 4-6 weeks before the first frost. Cloves establish roots in fall, go dormant in winter, then jump-start growth in spring. |
| Spring Planting | Smaller bulbs | Plant as soon as the soil is workable. Less growing time means modest-sized bulbs. |
Choosing the Right Garlic Cloves
Not all cloves are created equal. Choosing the right ones sets the foundation for a successful harvest.
- Select the largest outer cloves for the biggest, healthiest bulbs.
- Skip any cloves with soft spots, mold, or visible damage.
- Smaller inner cloves produce smaller bulbs, so save those for cooking.
- Size directly impacts bulb development; bigger cloves mean more stored energy.
- Keep the papery skin intact on each clove until you’re ready to plant.
The cloves you choose today become the bulbs you harvest tomorrow, so pick wisely.
Where to Grow Garlic?
Garlic adapts beautifully to different growing spaces, so you can work with what you have. The key is meeting its basic needs: sunshine, good drainage, and enough room to grow.
| Growing Location | Requirements | Why It Works |
|---|---|---|
| Garden Beds | Full sun (6+ hours), well-draining soil | Classic option with plenty of space for roots to spread |
| Raised Beds | 6-8 inches deep, 4-6 inch spacing | Better soil control and drainage, easier to manage |
| Containers | 12+ inch deep pots, drainage holes | Perfect for patios or limited space, needs winter protection |
Tip: Wherever you plant, avoid spots where water pools after rain. Garlic absolutely hates wet feet and will rot in soggy soil.
Soil Preparation for Garlic
Garlic thrives in loose, well-draining soil that allows roots to spread easily and bulbs to expand without restriction. Aim for a pH between 6.0 and 7.0 for optimal growth.
Before planting, work in plenty of organic matter or compost to enrich the soil and improve its structure. This feeds your garlic slowly throughout the season and helps with moisture retention without creating sogginess.
Heavy clay soil is garlic’s nemesis. It holds too much water and restricts bulb development, often leading to rot or stunted growth.
If you’re dealing with clay, amend heavily with compost and sand, or consider raised beds for better results.
Step-by-Step: How to Grow Garlic From a Clove
Growing garlic is surprisingly simple once you understand the basics. Follow these steps for a successful harvest that starts this fall and rewards you next summer.
Step 1: Prepare Your Garlic Cloves
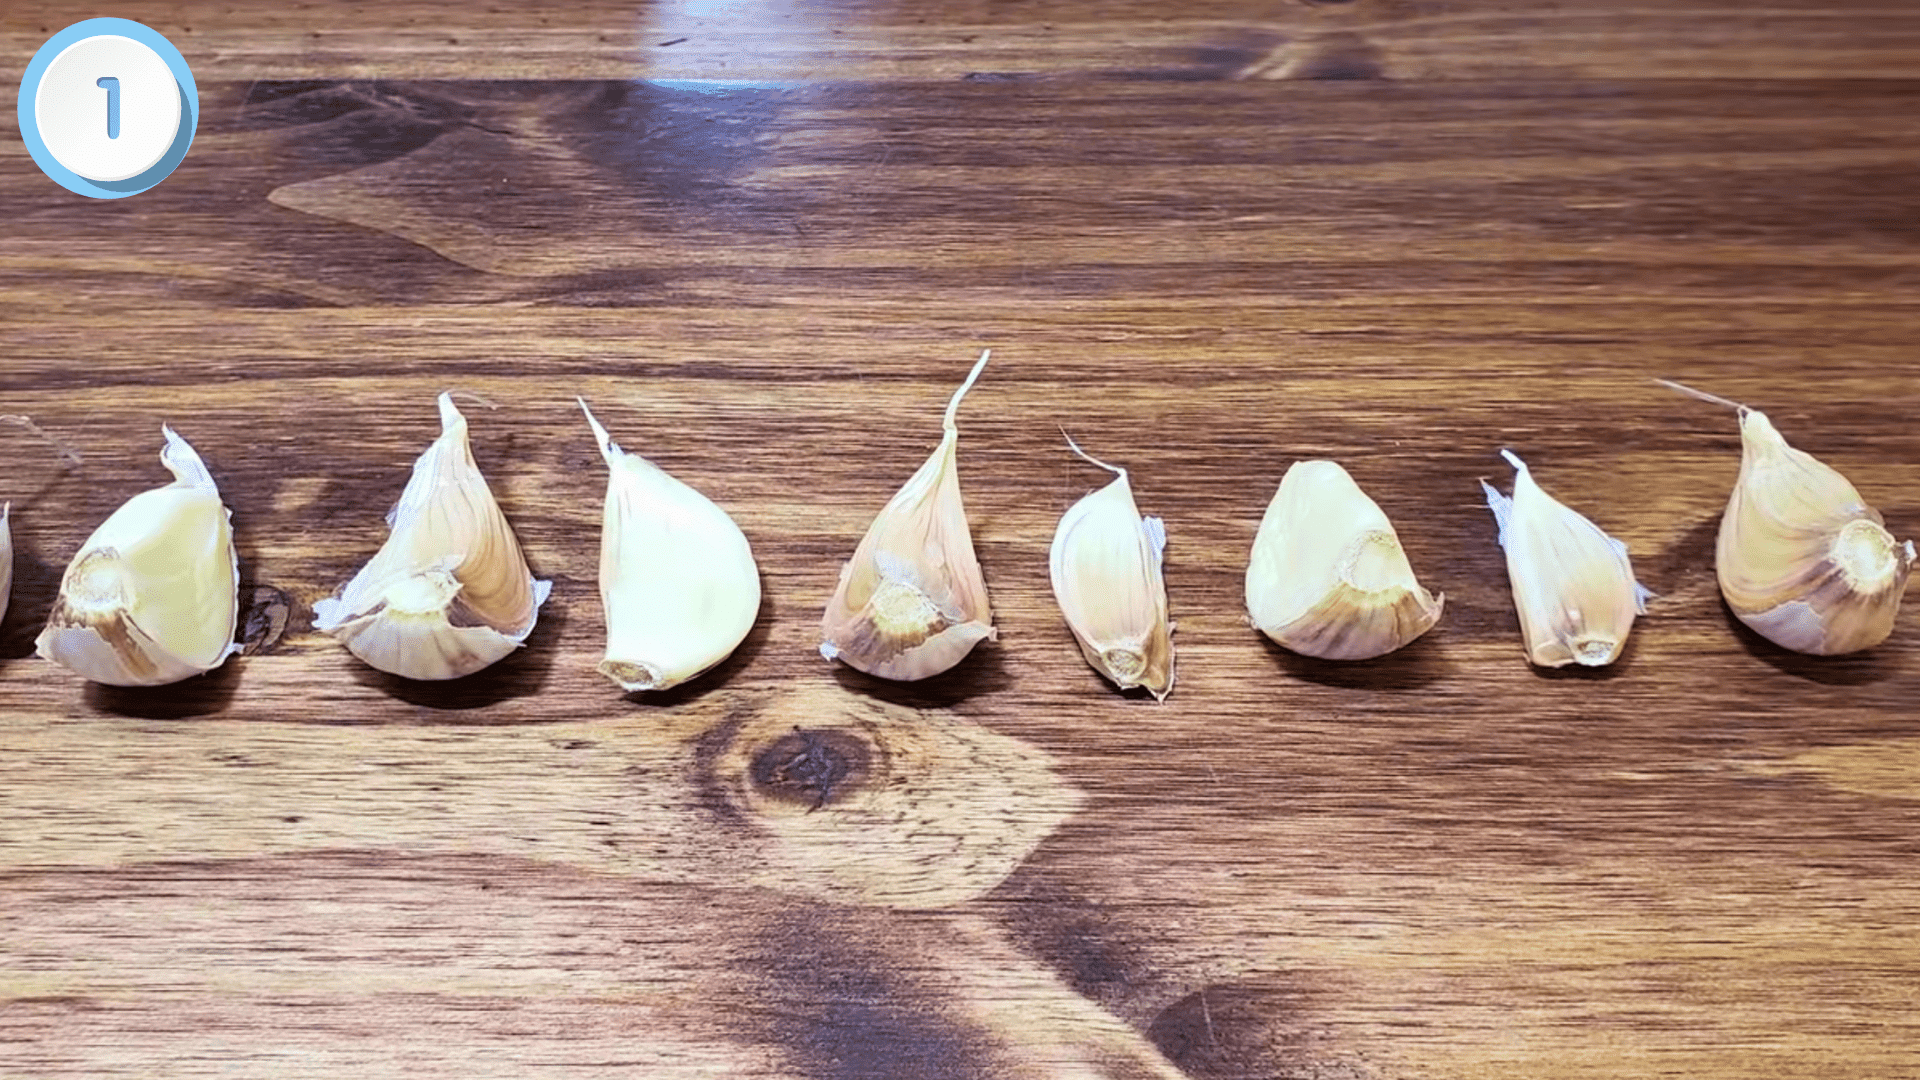
Remove only the outer papery layer that holds the bulb together, then gently separate the individual cloves. Keep the papery coating on each clove intact.
Select the largest, healthiest cloves for planting, as they’ll produce the biggest bulbs. Each clove contains everything needed to grow into a full bulb with multiple new cloves.
Step 2: Prepare Your Growing Space
Set up your containers or beds properly to give garlic the best growing conditions:
- Choose containers at least 6 inches deep with drainage holes, or prepare raised beds.
- Fill with loose, well-draining potting mix with neutral pH.
- Add 5% sand to improve drainage.
- For raised beds, lay down a 2-inch row of fresh soil mix.
- Compress soil about 20% and top off to the proper level.
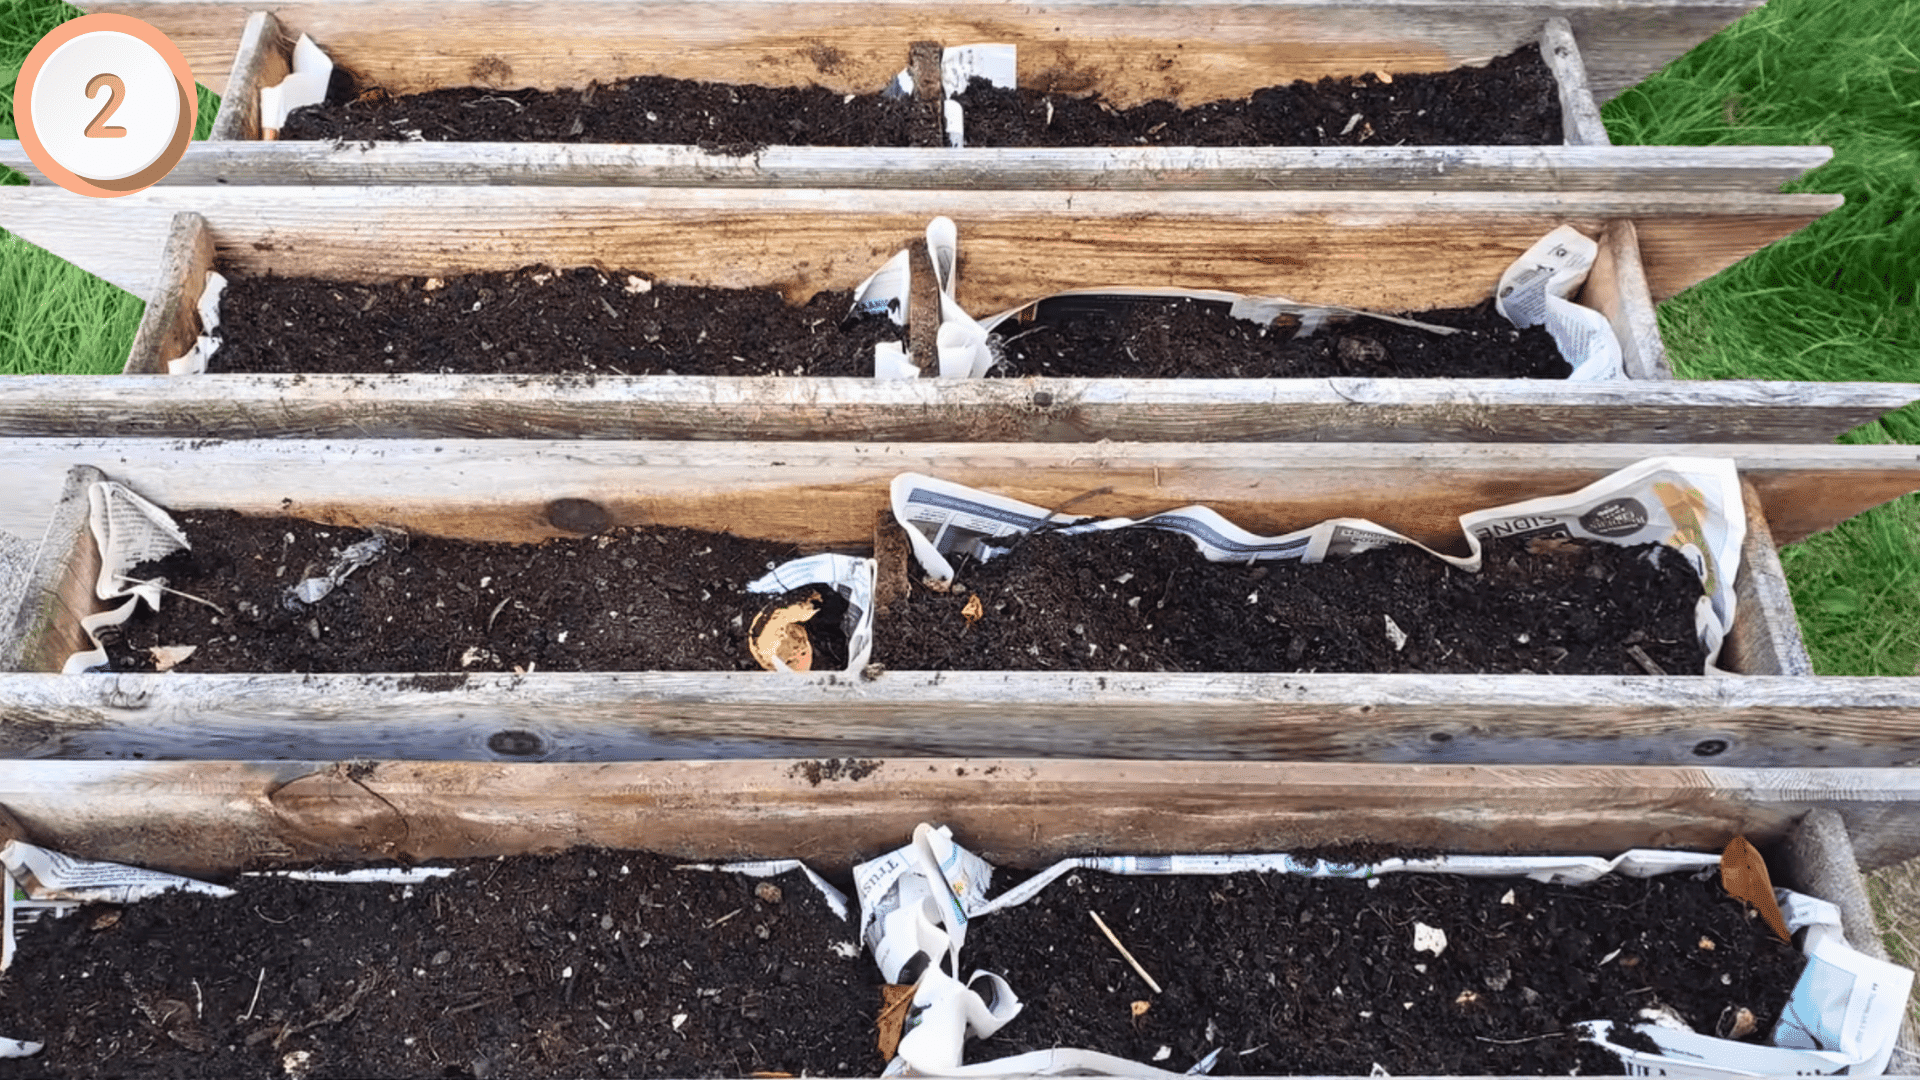
Step 3: Plant the Cloves
Plant cloves root-end down, 1-2 inches deep, spacing them 3-4 inches apart. In containers, push cloves directly into the soil.
In raised beds, set cloves on the soil row and cover with 1-2 inches of potting mix. Keep cloves at least 2 inches from container edges. Ensure all tips are fully buried.
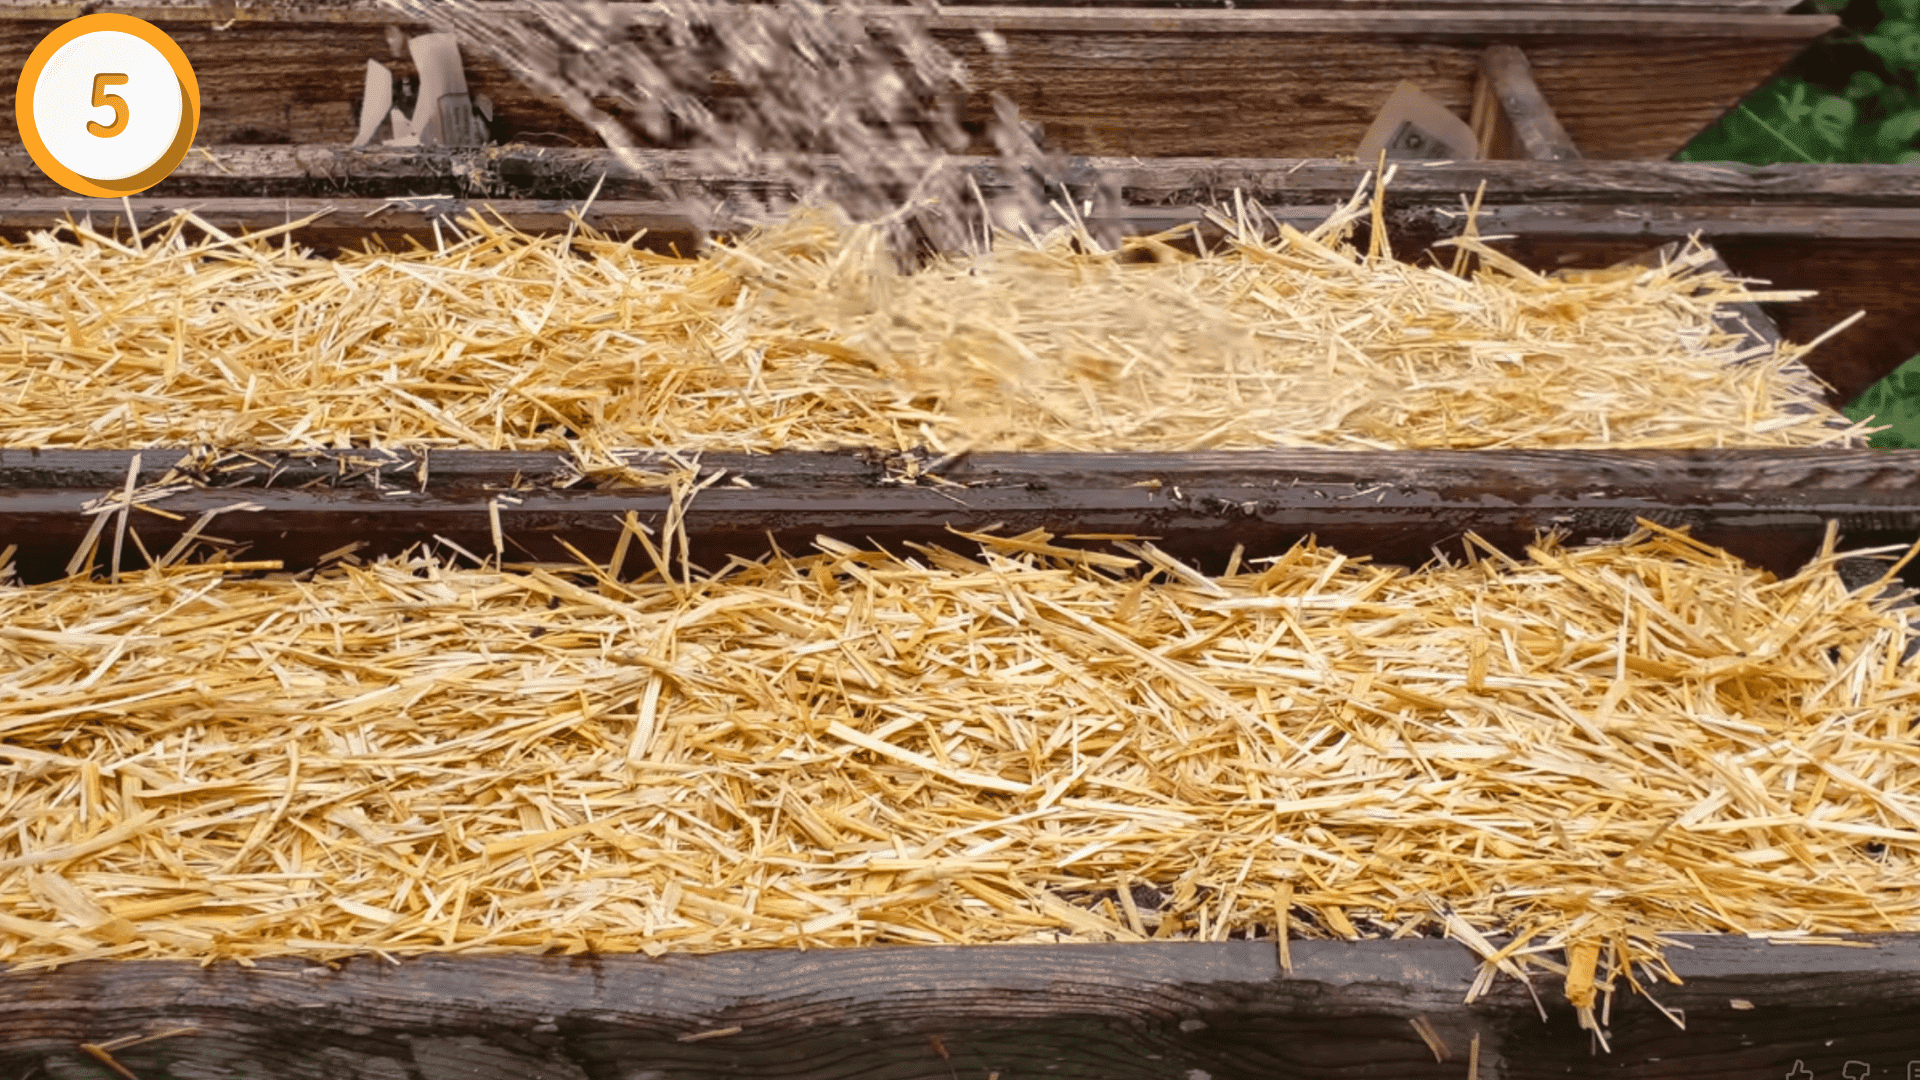
Step 4: Mulch Generously
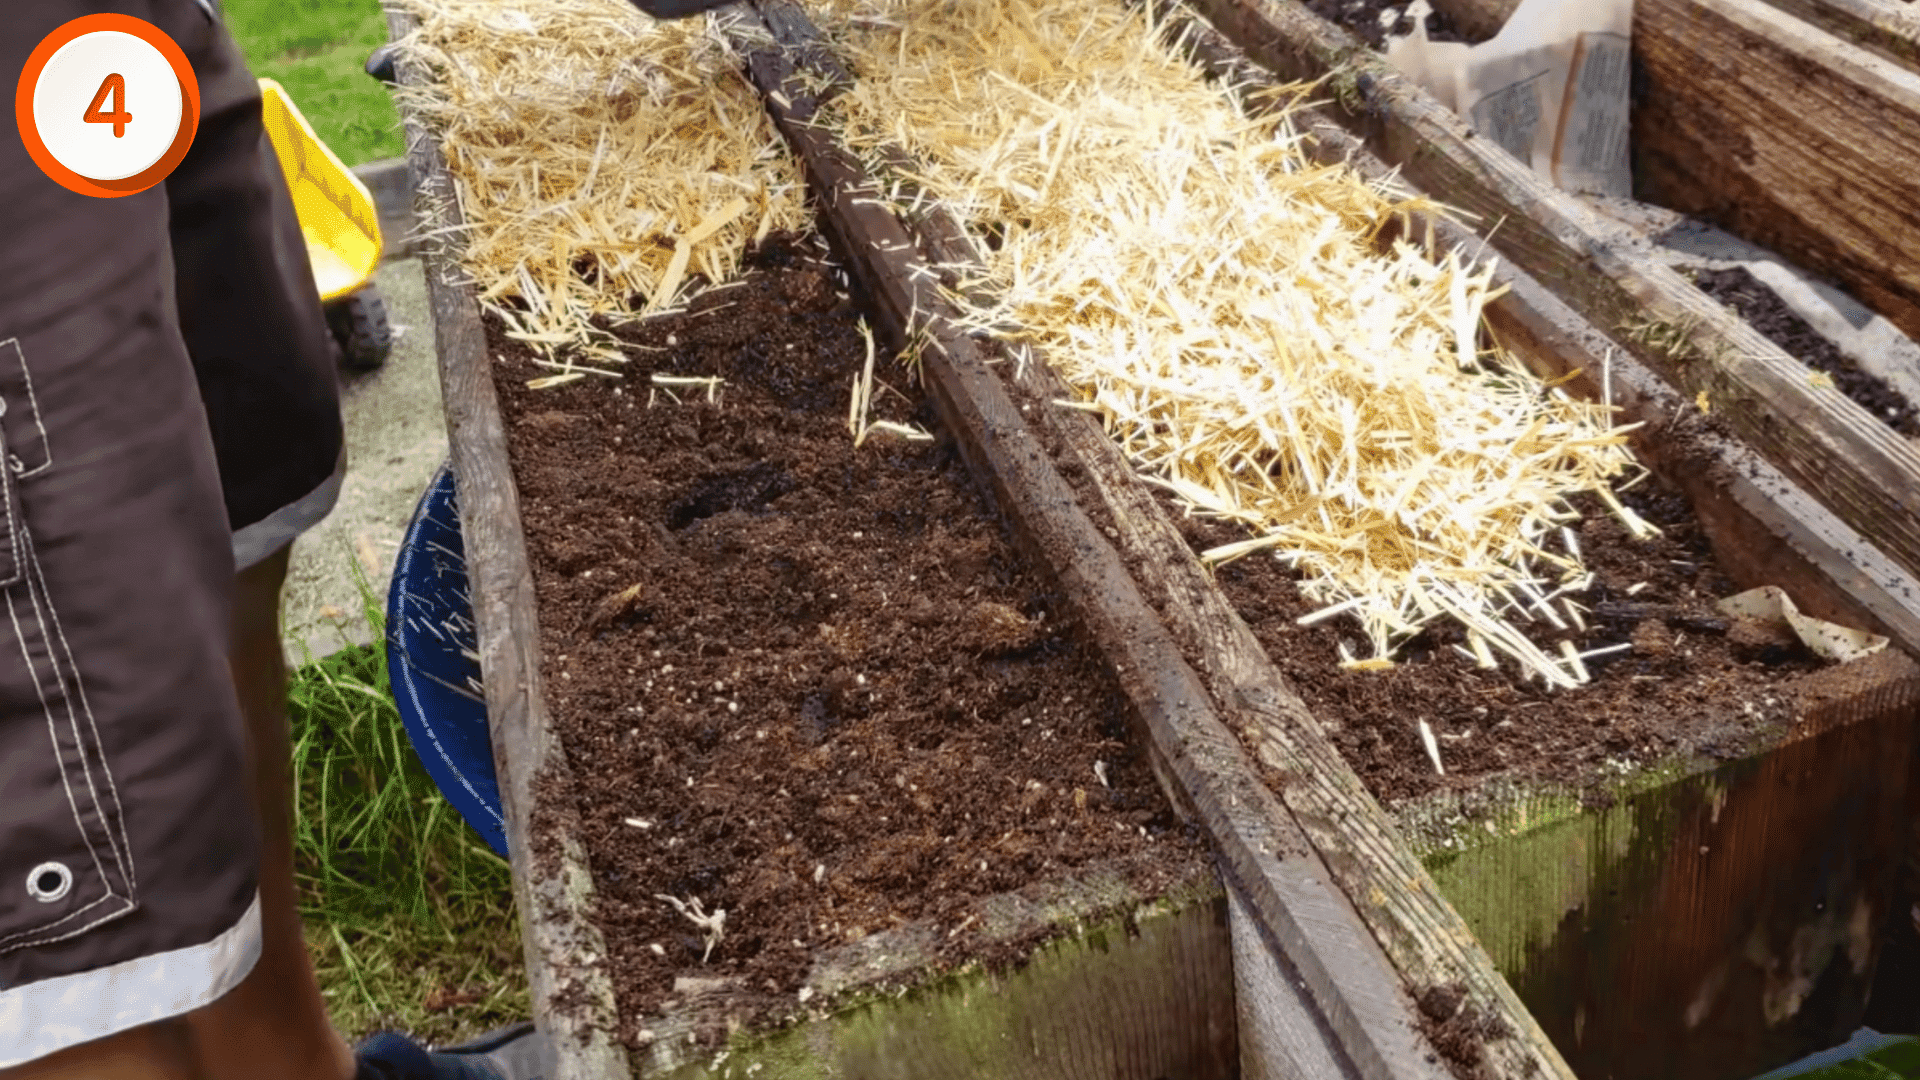
Apply at least 2 inches of organic mulch like straw, shredded leaves, or grass clippings over the entire planting area.
This acts as a winter blanket, protecting cloves from temperature swings and moisture loss. Don’t skimp here; thick mulch can make the difference between a good crop and a great one.
Step 5: Water and Wait
Give your newly planted garlic a thorough soaking immediately after planting. This is likely the only watering you’ll need until spring arrives.
The cloves will establish roots in the fall, go dormant through winter, then shoot up green growth when temperatures warm. Harvest arrives the following summer.
For a more detailed walkthrough of the process, check out the complete video tutorial below by The Ripe Tomato Farms.
Garlic Care During the Growing Season
Garlic is fairly low-maintenance once planted, but a few key practices during the growing season will ensure those bulbs reach their full potential.
Watering and Fertilizing Schedule
Garlic needs consistent moisture and nutrients to develop properly, but timing matters.
Here’s when to adjust your care routine:
| Growth Stage | Watering Needs | Fertilizing Needs |
|---|---|---|
| Early Spring Growth | Water consistently, about 1 inch per week | Apply nitrogen-rich fertilizer when shoots emerge |
| Mid-Season | Maintain steady moisture, avoid extremes | Side-dress with compost or compost tea every 3-4 weeks |
| Pre-Harvest | Stop watering completely 2-3 weeks before harvest | Stop all fertilizing once bulbs begin to swell |
Organic Fertilizer Options:
Keep your garlic well-fed throughout the growing season with these choices:
- Compost tea, applied every 3-4 weeks during active growth
- Aged compost or well-rotted manure as mid-season side dressing
- Fish emulsion for a quick nutrient boost
- Blood meal or feather meal for nitrogen in early spring
Weed Control and Mulch Maintenance
Garlic has shallow roots and struggles to compete with aggressive weeds, so staying on top of them is essential.
- Pull weeds by hand regularly to avoid disturbing shallow garlic roots.
- Maintain that 2-inch mulch layer to suppress weed growth naturally.
- Check weekly during the spring when weeds are most active.
- Never let weeds go to seed near your garlic beds.
- Thick mulch does most of the work, making this task minimal.
Growing Garlic Through Winter
Garlic spends winter quietly establishing a strong root system underground while the bulb remains dormant. This cold period is actually crucial for proper bulb development come spring.
Garlic handles frost and snow beautifully. In fact, it needs cold exposure to trigger bulb formation.
Your mulch layer protects against extreme temperature swings, but the garlic itself is incredibly hardy and can survive well below freezing.
Healthy overwintering shows minimal above-ground activity. You might see small green shoots poking through in late winter, which is perfectly normal.
As long as your mulch stays in place and the bed doesn’t stay waterlogged, your garlic is thriving beneath the surface.
When and How to Harvest Garlic?
Harvesting garlic at the right moment makes all the difference between bulbs that store for months and ones that split or spoil quickly.
Reading the Leaf Signals
Watch your garlic leaves closely in late spring and early summer. When the lower 3 to 4 leaves turn yellow or brown while the top leaves remain green, your garlic is ready.
This typically happens in late June or July, depending on your climate. Harvest too early, and bulbs won’t reach full size. Wait too long, and the bulbs split open, reducing storage life significantly.
Digging Without Damage
Garlic bulbs are delicate and bruise easily, so gentle handling is key:
- Loosen soil around bulbs with a garden fork, staying several inches away from the stems.
- Work your fork in a circle around each plant rather than stabbing straight down.
- Gently lift the bulbs by their stems once the soil is loosened.
- Brush off excess dirt, but don’t wash the bulbs.
- Leave stems and roots attached for proper curing.
Curing Garlic After Harvest
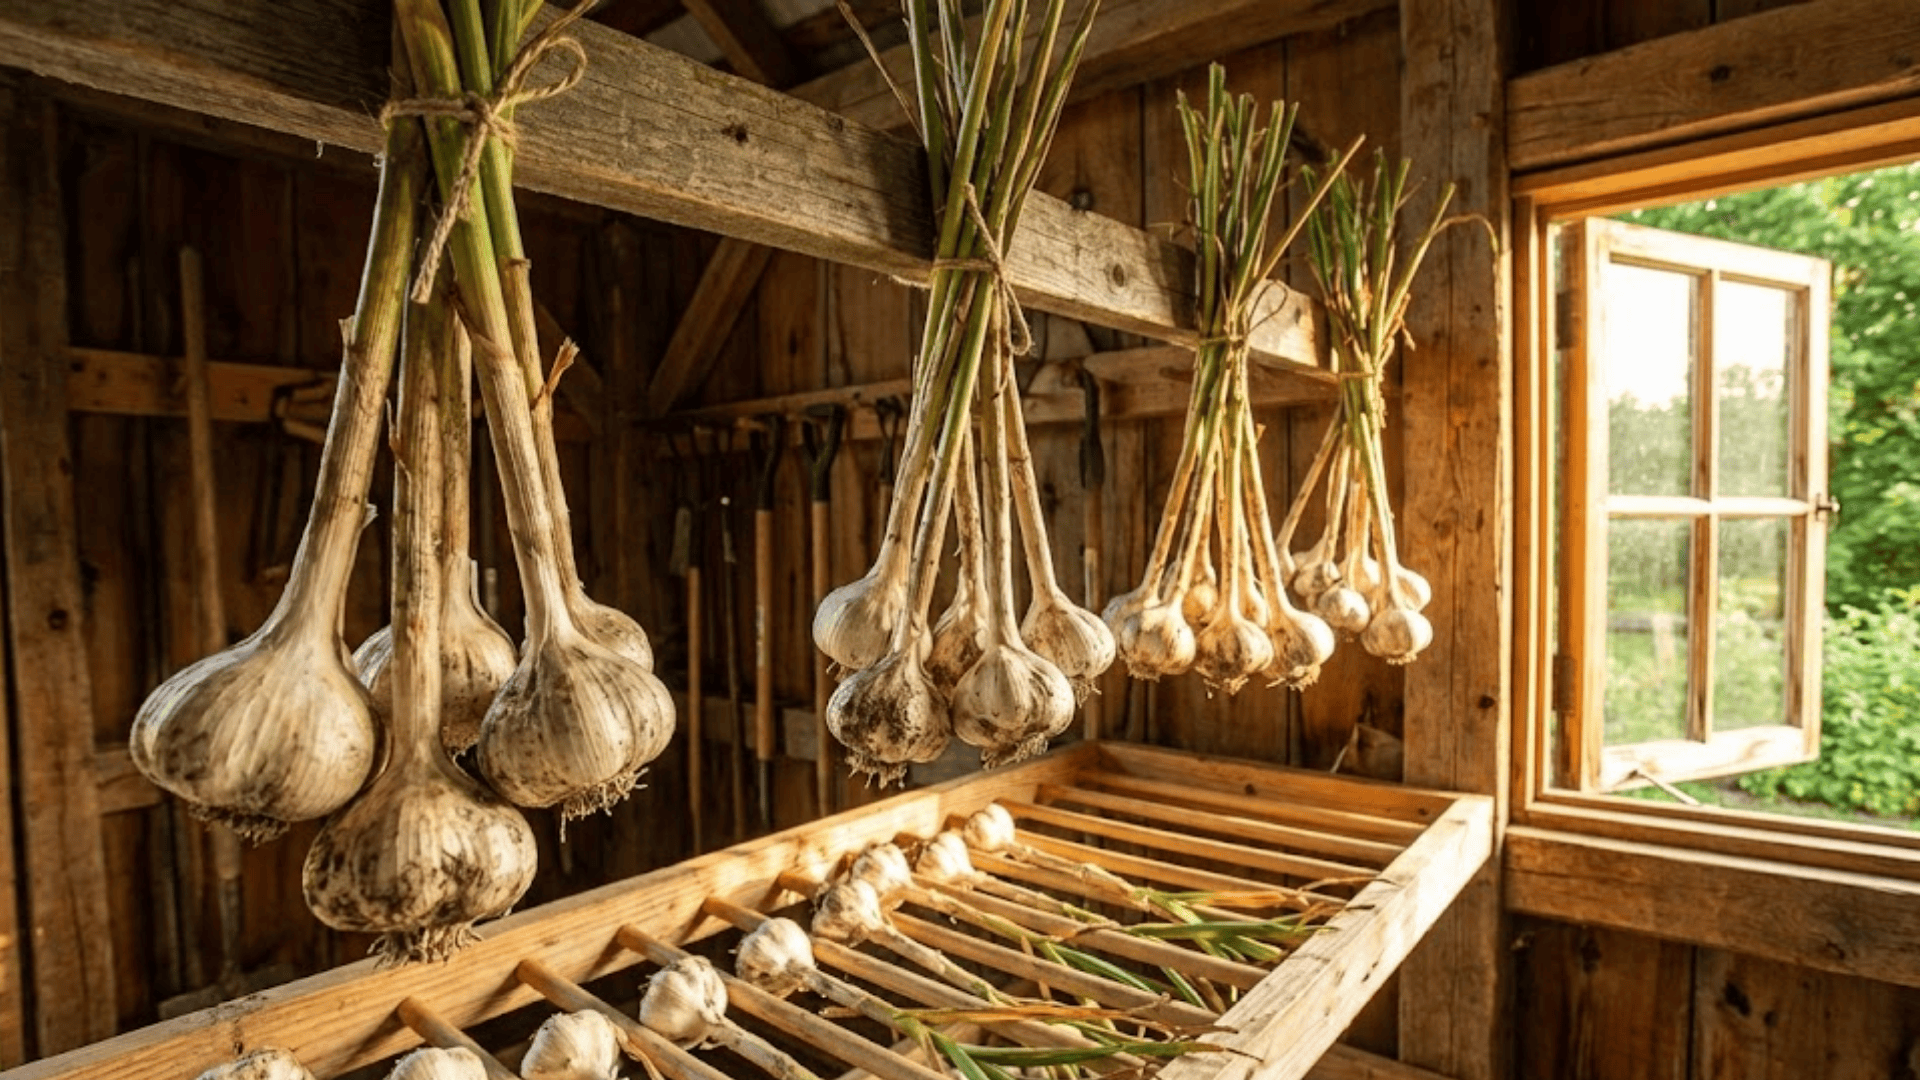
Curing is absolutely essential for long-term garlic storage. Fresh-dug garlic contains too much moisture and will rot within weeks if not properly cured.
The curing process dries the outer layers, sealing in the cloves and extending shelf life for months.
Cure garlic for two to four weeks in a warm, dry, well-ventilated space out of direct sunlight. Aim for temperatures around 80-90°F with good airflow.
Hang bulbs in small bunches or lay them on screens or racks, ensuring air circulates around each bulb.
Your garlic is ready when the outer skins feel papery, and the stems are completely dry and brittle.
How to Store Garlic Properly?
Once cured, proper storage keeps your garlic fresh and flavorful for months. Get the conditions right, and you’ll enjoy your harvest well into winter or even spring.
Storage Guidelines and Common Mistakes
Store garlic in a cool, dark, dry place with good air circulation. The ideal temperature range is 60-65°F with humidity around 60-70%.
Shelf life varies by type: Softneck garlic stores beautifully for 8-12 months, while hardneck varieties typically last 4-6 months. Use hardneck first and save softneck for later in the year.
Common mistakes to avoid:
- Storing in the refrigerator, which promotes sprouting and mold.
- Keeping garlic in plastic bags or airtight containers that trap moisture.
- Exposing bulbs to direct sunlight, which degrades the quality.
- Storing near onions, which can accelerate spoilage.
- Removing all the papery skin too early leaves the cloves vulnerable.
Common Garlic Growing Problems and How to Fix Them
Even the easiest crops can run into issues. Here are the most common garlic problems and how to avoid or solve them.
- Planting cloves upside down or too shallow results in stunted growth or no growth at all; always plant root-end down, 1-2 inches deep.
- Small bulbs at harvest usually mean you planted small cloves, didn’t fertilize enough, or harvested too early.
- Yellow leaves appearing too early in the season signal overwatering, poor drainage, or nitrogen deficiency.
- Mold or rot during growth comes from waterlogged soil, poor air circulation, or using damaged cloves at planting.
- Pest and disease pressure increases when garlic is stressed; maintain good drainage, proper spacing, and avoid working with wet plants.
Catch these issues early, and your garlic will bounce back beautifully, rewarding you with a bountiful harvest.
That’s a Wrap
Growing garlic from a clove is one of those rare gardening wins that delivers on every level.
You get superior flavor, serious savings at the grocery store, and the pure satisfaction of pulling up those beautiful bulbs you nurtured through the seasons.
What makes it even better is how it practically grows itself once you understand the basics.
So grab some quality cloves this fall, tuck them into the soil, and let nature do the rest.
Have questions about your garlic growing experience or tips to share? Drop a comment below and let’s keep the conversation growing.