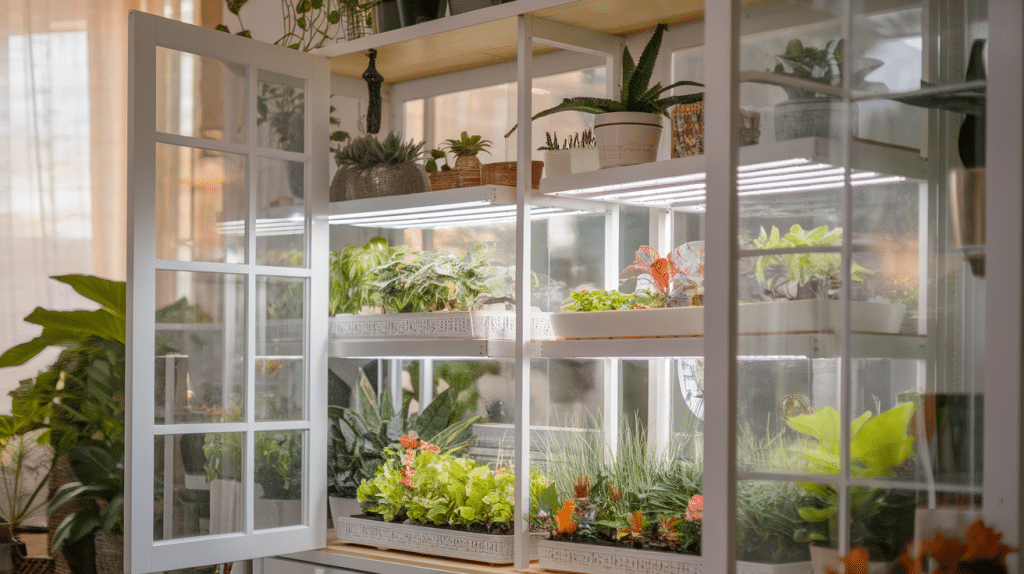
Looking for a way to keep your plants healthy and happy indoors? A DIY greenhouse cabinet might be the perfect solution!
These cabinets create the ideal environment for your plants, helping them thrive with the right temperature, humidity, and light.
In this blog, we’ll show you how to build your very own DIY greenhouse cabinet using affordable materials.
Whether you’re a plant lover or a beginner, you’ll find step-by-step instructions, tips for plant care, and ideas for personalizing your cabinet.
By the end, you’ll be ready to turn any cabinet into a thriving plant haven!
Why Choose a Plant Cabinet for Your Indoor Plants?
A plant cabinet gives your plants a special home inside your house. These cabinets keep your plants safe, healthy, and looking good while making it easier for you to care for them.
Let’s look at the benefits of a greenhouse cabinet:
- Climate Control: Plant cabinets keep the temperature and moisture right for your plants. They trap humidity and block cold drafts. You can add a small humidifier for plants that need extra moisture.
- Space-saving Design: Group plants in one spot instead of spreading them around. Cabinets with shelves hold more plants, using less floor space, making them perfect for small homes or apartments.
- Plant Protection: Cabinets guard plants from home dangers. They keep pets from chewing leaves or digging soil. They block dust that can harm plants. Glass doors let in light while maintaining safe plants.
How to DIY Your Greenhouse Cabinet
Making your greenhouse cabinet lets you create a perfect home for your plants while saving money. Follow these steps to build a simple yet useful cabinet for your green friends.
Materials You Will Need
Before starting your project, gather these basic items needed for building your plant cabinet:
- Wood boards (pine or plywood work well and cost less)
- Glass panels or clear plastic sheets
- Hinges for the doors
- Screws and nails
- Wood glue
- Shelf brackets
- Small grow lights
- Thermometer/humidity gauge
- Drill and saw
- Measuring tape and pencil
Step 1: Plan and Measure

Start by deciding how big you want your cabinet to be. Think about where it will go in your home and how many plants you plan to put in it. Draw a simple sketch with all measurements.
Mark where the doors and shelves will go. Consider how much light will reach the inside and whether your plants will fit as they grow bigger. Consider the height of your tallest plants and add extra space for growth.
Step 2: Cut the Wood

Using your measurements, cut the wood boards for the top, bottom, sides, and back of your cabinet. If you don’t have tools, many stores will cut wood for you when you buy it. Make sure all pieces are cut to the right size.
Sand the edges to avoid splinters and improve the cabinet’s appearance. Check each piece against your plan before proceeding to the next step to avoid mistakes that will be difficult to fix later.
Step 3: Build the Frame

Connect the sides, top and bottom pieces using wood glue and screws. Make sure the corners are square by checking with a measuring tool. Let the glue dry fully before moving on.
The frame needs to be strong since it will hold all your plants. Add support beams if your cabinet is large. Pre-drill holes for screws to stop the wood from splitting and make the job easier.
Step 4: Add Shelves and Back

Install shelf brackets at different heights inside your cabinet. Place the shelves on the brackets and secure them. Attach the back panel to complete the main structure.
Make sure shelves are level and strong enough to hold plant pots with wet soil. Leave some space for taller plants on at least one shelf. You might want to add a plastic liner on shelves to catch water that leaks from pots.
Step 5: Install Doors and Lighting

Attach hinges to the frame and connect the glass or plastic doors. Add a simple handle or knob. Mount grow lights under the shelves using brackets.
Leave room for power cords. Test that the doors open and close smoothly. Your plant cabinet is now ready for your green friends to move in!
You might also want to add a small fan for air flow, which helps keep plants healthy and stops mold from growing.
Plant Care in a DIY Greenhouse Cabinet
Plants in your cabinet need special attention. With the right care, they will grow strong and healthy in their new home.
Best Plants for a Greenhouse Cabinet
Small tropical plants work best in cabinets. Try prayer plants, ferns, and small palms that love high moisture. Orchids grow well in these spaces, too. Many types of small ferns like moist air.
Air plants need little soil and fit nicely on small shelves. Baby rubber plants and peperomias stay small enough for cabinet life. Pick plants that won’t grow too big, too fast.
Managing Humidity and Temperature
Keep humidity between 50-70% for most plants. Use a small dish of water or a tiny humidifier inside the cabinet. Check the temperature often – most house plants like 65-75°F.
Open doors for a short time each day to let fresh air in. Avoid putting your cabinet near heaters or AC vents. Use a simple gauge to keep track of both humidity and heat levels.
Light and Watering Tips
Most cabinet plants need bright but not direct light. Put grow lights on timers for 12-14 hours daily. Keep lights 6-12 inches from plant tops.
Water less often than normal since moisture stays in the cabinet longer. Check soil by touching it—water only when the top inch feels dry.
Water early in the day so extra moisture can dry before night. Use room-temperature water to avoid shocking plant roots.
Creative Decorating Ideas for Your Plant Cabinet
Make your plant cabinet stand out with simple touches that show off your style. These easy changes can turn a basic cabinet into a show-stopping plant display.
1. Add Peel-and-Stick Wallpaper

Stick pretty paper to the back wall of your cabinet to make plants pop. Leaf patterns look great with green plants, and plain colors work well, too.
This quick fix makes a big impact, and you can peel it off later if you want a change. Many stores sell low-cost papers that are easy to put up.
2. Incorporate Wooden Shelves or Accents

Add small wooden shelves or boxes inside to showcase your plants. Wood’s warm look goes well with green plants. You can paint the wood or leave it natural.
This gives your plants different heights and makes the display more eye-catching. Wood also helps soak up extra water.
3. Use Decorative Planters

Pick pots with fun colors and shapes to hold your plants. Mix and match sizes and styles for a lively look. Clay pots let soil breathe, but plastic ones hold water longer.
Make sure any pot has holes for water to drain. Small pots work best in cabinets where space is tight.
4. Hang Fairy Lights

Put tiny LED lights around your cabinet to make your plants glow at night. The soft light creates a warm feeling and shows off the plant shapes.
If you don’t have a plug nearby, use battery lights. Make sure the lights don’t get too hot or touch the plants directly.
5. Add Small Sculptures or Decorative Stones

Put tiny figures or pretty rocks among your plants. Small animal figures, glass balls, or smooth stones add fun touches.
These small items fill empty spots and make the space more personal. Flat stones can also help raise plants to better heights for display.
Wrapping Up
Now that you have a clear guide to building your greenhouse cabinet, it’s time to put your plan into action!
You can start by choosing the right cabinet, adding grow lights, and making adjustments for proper ventilation and humidity. This project is perfect for anyone looking to give their indoor plants a safe and controlled environment to thrive.
Not only will it help your plants grow better, but it will also add a stylish touch to your home. If you’re feeling creative, personalize your cabinet with unique decorations or plants that need special care.
So grab your materials and start building your greenhouse cabinet today!