If you want to grow more Monstera plants without buying new ones, propagation is a great option.
Monstera plants have become household favorites thanks to their striking split leaves and easy care needs. Learning to grow new plants from your existing ones saves you money and gives you the joy of watching a new plant develop from scratch.
Good news: anyone can do this! Even if you’re new to plant care, propagating Monstera is simple and satisfying.
In this guide, I’ll show you:
- The best methods for Monstera propagation
- When to start the process
- Step-by-step instructions with clear photos
I’ve grown dozens of Monsteras from cuttings, and I’ll share everything I’ve learned to make your propagation efforts successful.
What Is Monstera Propagation?
Propagation simply means making new plants from parts of existing plants. It’s like getting free plants without buying new ones!
When I take a cutting from my Monstera plant and place it in the right conditions, it can grow into a whole new plant. This happens because Monsteras have special cells that can develop into roots when separated from the mother plant.
The magic occurs at the nodes – those bumpy parts on the stem where leaves grow. These nodes contain everything needed to start new plant life.
You can propagate Monstera in a few different ways:
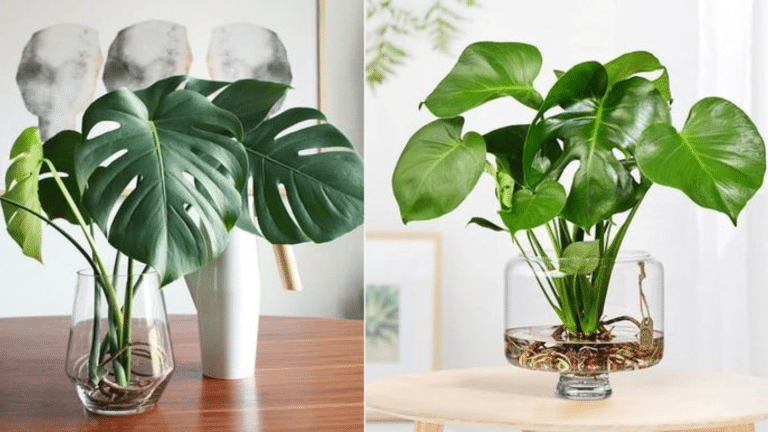
- Water propagation – placing cuttings in water until roots form
- Soil propagation – planting cuttings directly in soil
- Moss propagation – using sphagnum moss as a growing medium
For beginners, water propagation works best. Why? Because you can actually see the roots forming, which is both helpful and exciting!
When done right, your cutting will first grow roots in water. After the roots reach about 2-3 inches long, the cutting is ready to be moved to soil where it will continue to grow into a full plant.
Isn’t it amazing that plants have this ability? A small piece can become a whole new plant that might eventually grow as big as the original!
When Should You Propagate Monstera?

The Right Season Matters
Spring and summer are perfect for propagation. During these warmer months, your Monstera is naturally in its growing phase. I’ve found that cuttings taken during this time root faster and have a better success rate overall.
The longer daylight hours and warmer temperatures create ideal conditions for new growth. Your cutting will have the energy it needs to develop a strong root system before winter arrives.
Signs Your Plant Is Ready
You should only take cuttings from healthy, mature plants. How can you tell if your Monstera is ready? Look for these signs like the plant has multiple stems and leaves or leaves are a rich green color without brown spots or yellowing.
New growth appears regularly and the plant looks full and not sparse. A good candidate for propagation will have stems with at least 2-3 nodes. These are the small bumps on the stem where leaves and aerial roots grow from.
What to Avoid
I never recommend taking cuttings from weak or unhealthy plants. Suppose your Monstera shows signs of stress—yellow leaves, pest problems, or slow growth—focus on nursing it back to health first.
Taking a cutting puts stress on the parent plant. A sick Monstera needs all its resources to recover, not to support propagation.
Also, avoid propagating during fall and winter when the plant is in its dormant phase. The success rate drops significantly, and both the mother plant and the cutting may struggle.
What You Need Before You Start?

Basic Tools and Supplies
- Clean, sharp scissors or pruning shears
- A clear glass or jar (I prefer glass because it lets me see the roots forming)
- Fresh, room-temperature water
- Paper towels to catch drips
- A small tray or plate to place under your jar
- Rooting hormone powder (gives your cutting a head start)
- A clean cloth to wipe your tools
- Small stakes and twist ties (for supporting top-heavy cuttings)
Preparing Your Tools
Clean tools are essential for successful propagation. I always wash my scissors or shears with soap and water, then wipe them with rubbing alcohol before making any cuts.
Why does this matter so much? Plant tissue is very open to infection when cut. Dirty tools can introduce bacteria or fungi that cause the cut to rot instead of the root.
Setting up Your Propagation Station
Choose a spot for your propagation jar that gets bright, indirect light. Direct sunlight can be too harsh for new cuttings and may heat the water too much.
Fill your clear container with room-temperature water. If your tap water contains lots of chemicals, let it sit out overnight before using it, or use filtered water instead.
The container should be large enough to support your cutting without it falling over, but not so big that the cutting gets lost in it.
With these simple supplies ready, you’re all set to take your first cutting!
How to Cut a Monstera for Propagation?
Propagating Monstera plants is a rewarding way to expand your collection or share with friends. Here’s a step-by-step guide to cutting and propagating your Monstera successfully:
1. Choosing the Right Stem
Finding the perfect stem is your first task. Look for a healthy section of your Monstera that has at least one node and one leaf. Nodes are crucial – they look like small bumps or knots on the stem where leaves grow from. Without a node, your cutting won’t be able to grow roots.
I prefer stems that have at least one aerial root already starting to form. These brown, stick-like roots that grow from the nodes give your cutting a head start in the propagation process.
2. Making the Perfect Cut
Once you’ve picked your stem, it’s time to cut. Position your clean, sharp scissors or shears about 1/4 inch below a node. Make a firm, straight cut through the stem in one motion.
The cut should be clean, not crushed or jagged. A smooth cut helps prevent rot and gives your cut the best chance of success.
If you’re taking multiple cuttings, wipe your tools with alcohol between each cut to keep things clean.
3. Preparing Your Cutting
After cutting, take a moment to check your cut. It should have at least one node (preferably two), or at least one healthy leaf and a clean-cut stem end.
If your cutting has more than 2-3 leaves, consider removing some. I usually leave just 1-2 leaves on each cutting. Too many leaves can stress the cutting as it tries to support them before it has roots.
4. Drying Step
Some plant experts suggest letting your cutting dry for 1-2 hours before placing it in water. This allows the cut end to form a slight callus, which may help prevent rot.
I’ve had success with both this step and without it. If you live in a humid climate, this drying time might be more important. Simply lay your cutting on a clean paper towel in a warm spot out of direct sunlight.
Propagating in Water: The Easiest Method
Water propagation is indeed one of the simplest and most satisfying ways to multiply your plants. This is a comprehensive guide to successfully propagating plants in water:
1. Placing Your Cutting Correctly
Fill your clear glass or jar with room-temperature water. Now, place your Monstera cutting in the container so that the node is completely underwater. The node must be submerged because this is where the new roots will grow from.
Make sure the leaf (or leaves) stay above the water line. If leaves sit in water, they’ll rot quickly. I sometimes use the rim of the jar to help position the cutting just right.
Your cutting might not stand up straight at first. That’s okay! You can lean it against the side of the container or use a small stake for support if needed.
2. Finding the Perfect Spot
Location matters a lot for successful water propagation. Place your cutting in an area with bright, indirect light. Direct sunlight is too harsh and can cook your cutting, while too little light will slow down root growth.
Temperature is important too. Monstera love warmth – a spot that stays between 70-80°F (21-27°C) is perfect. I keep my cuttings away from cold drafts, air conditioners, and heating vents that cause temperature swings.
3. Changing the Water Regularly
Fresh water is crucial for healthy root development. I change the water in my propagation jars every 3-5 days. Stale water can become a breeding ground for bacteria that may cause your cutting to rot.
When changing the water, be gentle with any tiny roots that are starting to form. They’re very fragile at this stage! Simply pour out the old water and refill with fresh, room-temperature water.
4. Watching for Root Growth
The waiting game begins! Within 1-3 weeks, you should start to see small white roots forming from the nodes. These first roots are thin and delicate.
Be patient – some cuttings root quickly while others take more time. As long as your cutting still looks healthy (green leaf, firm stem), keep caring for it, and roots will develop.
How to Know It’s Working?

Early Signs of Success
Within the first 1-2 weeks, look closely at the submerged nodes on your cutting. The first sign of success is tiny white bumps forming on the nodes. These small bumps are the beginning of root development.
The cutting’s stem should remain firm and green. This shows it’s still healthy and has enough stored energy to develop roots. I check my cuttings every few days, looking for these early signs that the propagation is going well.
Root Development Timeline
After those first white bumps appear, actual roots will start to grow. At first, they’ll be short, thin, and few in number. Don’t worry if progress seems slow – this is normal. By weeks 2-4, you should see more defined white roots extending from the nodes.
These roots will grow longer and may start to branch out. Some cuttings might develop roots faster than others, even if they were cut from the same plant. The most exciting moment for me is when I see the first root branch or split – it means the root system is becoming more complex!
Watching for Problems
While waiting for roots, keep an eye out for warning signs. Yellow leaves on your cutting might indicate stress, but one yellowing leaf isn’t always cause for alarm if the stem remains healthy.
The most concerning signs are a soft, mushy stem (especially at the cut end), brown or black discoloration spreading on the stem and foul smell from the water. If you notice any of these issues, take action right away. Cut away any rotting portions with clean scissors and change the water immediately.
The Patience Factor
Propagation teaches you patience. Some Monstera cuttings might take up to 4-6 weeks to develop a strong root system. As long as the cutting isn’t showing signs of rot, keep caring for it.
I’ve had cuttings that seemed to do nothing for weeks, then suddenly sprouted several roots all at once. Plant growth isn’t always steady or predictable. Trust the process and give your cutting time.
Conclusion
Growing new Monstera plants from cuttings is both simple and rewarding. With just basic supplies and a little patience, you can multiply your plant collection for free.
Remember that plant propagation is a learning process. Not every cutting will succeed, and that’s perfectly okay! Each attempt teaches you something new about these wonderful plants.
The best part of propagation is the joy of seeing those first roots appear. It’s a small victory that any plant lover can appreciate. And when you eventually pot your rooted cutting and see that first new leaf unfurl, you’ll feel a sense of accomplishment that’s hard to beat.
I hope this guide gives you the confidence to try propagating your Monstera. Your green family can grow without spending extra money, and you might even have new plants to share with friends.
Have you tried propagating Monstera before? I’d love to hear about your experiences or answer any questions in the comments below!


